符号化
RVA
Understanding Concepts Of VA, RVA and Offset
Applications do not directly access physical memory, they only access virtual memory. In other words, the Virtual Addresses (VAs) are the memory addresses that are referenced by an application.
Relative Virtual Address (RVA) is the relative address with respect to the ImageBase. ImageBase here means the base address where the executable file is first loaded into the memory.
We can calculate RVA with the help of the following formula: VA = RVA + ImageBase.
获取函数调用栈
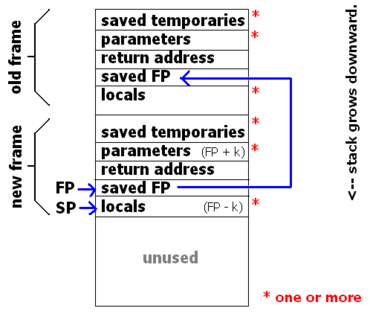
函数调用时,函数入参、返回地址、本地变量会记录在栈帧里。栈��指针指向栈的顶部;帧指针指向上一栈帧。这样就可以递归回溯获取整个调用栈。
以下方法可以获取当前线程的调用栈:
// The return value describes the call stack backtrace of the current thread at the moment this method was called.
NSArray<NSString *> *array = [NSThread callStackSymbols];
NSLog(@"%@", array);
要获取所有线程的调用栈,要依靠操作系统内核接口。
// 获取任务(即进程)的所有线程
mach_msg_type_number_t count;
thread_act_array_t list;
task_threads(mach_task_self(), &list, &count);

// 获取线程状态
mach_msg_type_number_t stateCountBuff = ARM_THREAD_STATE64_COUNT;
kern_return_t kr = thread_get_state(thread, ARM_THREAD_STATE64, (thread_state_t)&machineContext->__ss, &stateCountBuff);

// machineContext.__ss.__pc 即 CPU 指令地址
// typedef int kern_return_t; e.g. KERN_SUCCESS
kern_return_t task_threads // 获取所有线程,Mach Task 即 BSD 进程,两者是一一对应关系。
(
    task_inspect_t target_task, // 当前任务(进程)
    thread_act_array_t *act_list, // 任务中所有线程的列表
    mach_msg_type_number_t *act_listCnt // 任务中所有线程的数量
);

// 定义在 mach/thread_act.h
kern_return_t thread_get_state // 获取线程状态
(
    thread_read_t target_act, // 目标线程
    thread_state_flavor_t flavor, // 线程状态类型,和 CPU 架构有关
    thread_state_t old_state, // 获取线程栈寄存器
    mach_msg_type_number_t *old_stateCnt // 线程状态成员数组
);
以上,我们��获得了所有线程的调用栈,以及详细的函数地址信息,那么,如何将它符号化呢?
符号化原理
DWARF 是一种被众多编译器和调试器使用的、用于支持源代码调试的文件格式。
在编译过程中,目标文件(mach-o)将调试信息保存在专门的 Sections 里。
clang -c main.c 后 objdump --macho --private-headers main.o,此时没有 Dwarf Section。
clang -c -g main.c 后再查看,多了很多 segname 为__DWARF的 section。
dSYM 文件是保存了 DWARF 格式的调试信息的文件。它是怎么生成的?从目标文件中加载 DWARF 段、重定位所有地址、然后打包成 dSYM。dSYM 保存的是不含偏移的虚拟内存地址。
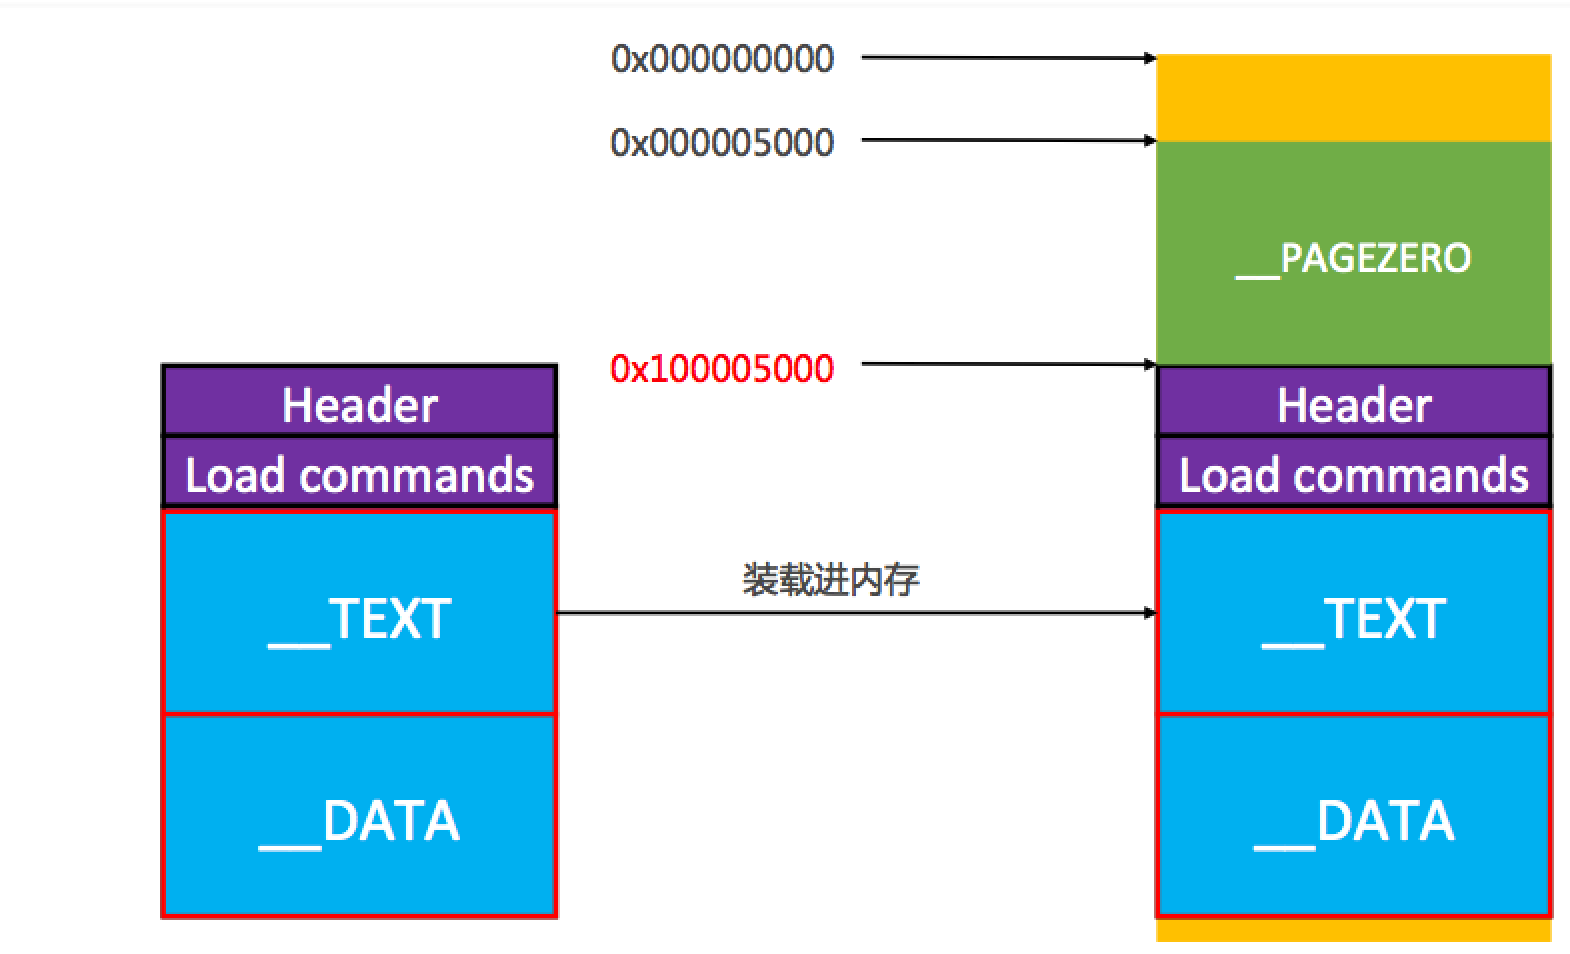
调试地址(崩溃/卡顿捕获到的内存地址)= ImageBase + RVA。
ASLR(Address space layout randomization)通过随机放置进程关键数据区域的地址空间,来防止攻击者能可靠地跳转到内存的特定位置来利用函数。
不考虑 ASLR,虚拟内存地址是从 0x100000000 开始,前面是 __PAGEZERO:
#import "ViewController.h"
#import "mach-o/dyld.h"
#import "objc/runtime.h"
@implementation ViewController
- (void)viewDidLoad {
    [super viewDidLoad];

    uintptr_t aslr = get_slide_address();
    // image "demo" at address 0x104d3c000 and ASLR slide 0x4d3c000
    // demo.app 这个 image 的 ImageBase = 0x100000000 + 0x4d3c000 (ASLR) = 0x104d3c000

    IMP imp = (IMP)class_getMethodImplementation(self.class, @selector(viewDidLoad));
    unsigned long imp_addr = (unsigned long)imp;
    NSLog(@"viewDidLoad 方法的虚拟内存地址:0x%lx", imp_addr); // 0x104d3dc10

    unsigned long imp_addr_without_offset = imp_addr - aslr;
    NSLog(@"viewDidLoad 不带偏移的地址:0x%lx", imp_addr_without_offset); // 0x100001c10, dSYM 文件里记录的就是这个地址!
}

/// 获取本工程可执行文件在内存中镜像的 ASLR
uintptr_t get_slide_address(void) {
    uintptr_t vmaddr_slide = 0;
    // _dyld_image_count 程序启动后加载的可执行文件和动态库的数量
    for (uint32_t i = 0; i < _dyld_image_count(); i++) {
        const char *image_name = (char*)_dyld_get_image_name(i);
        // returns a pointer to the mach header of the image indexed by image_index
        const struct mach_header *header = _dyld_get_image_header(i);
        if (header->filetype == MH_EXECUTE) {
            vmaddr_slide = _dyld_get_image_vmaddr_slide(i);
        }
        NSString *str = [NSString stringWithUTF8String:image_name];
        if ([str containsString:@"demo.app"]) { // 镜像名字是本工程的可执行文件
            NSLog(@"image %s at address 0x%llx and ASLR slide 0x%lx", image_name, (mach_vm_address_t)header, vmaddr_slide);
            break;
        }
//        NSLog(@"%@", str); // 打印镜像的名称
    }
    return vmaddr_slide;
}
@end
崩溃符号化实战
Xcode archive 之后得到的是 .xcarchive 目录,其内容是:
├── Info.plist
├── Products
│   └── Applications
│       └── Demo.app
├── SCMBlueprint
│   └── Demo.xcscmblueprint
├── SwiftSupport
│   └── iphoneos
└── dSYMs
    ├── Demo.app.dSYM
    ├── DemoNotificationService.appex.dSYM
选择 Distripbute App,选择发布方式(App Store Connect、Ad Hoc、Enterprise、Development),选择证书和 Provisioning Profile 之后即可生成 ipa 文件。
ipa 文件解压缩后可得到 Payload 文件夹里面有 .app 目录。
.app 中的二进制文件 和 .dSYM 有相同的 UUID,以标识是同一次编译的产物。
dwarfdump --uuid Demo.app.dSYM
dwarfdump --uuid Demo.app/Demo
崩溃日志文件中记录了函数内存地址,这些地址可以在 .dSYM 文件中对应到具体的文件名、函数名和行号。
无法连接电脑的情况:Settings - Privacy - Analytics & Improvements - Analytics Data,找到 TargetName-2021-03-20-102603.ips 文件,通过 AirDrop 分享出来。
可以连接电脑的情况:Xcode - Devices and Simulators - View Device Logs,首次进入会将设备上的分析数据拷贝到电脑中,然后 Xcode 会帮助我们自动符号化。
Xcode 中必须要有对应版本系统的 iOS DeviceSupport 文件,否则符号化会失败。打开 DeviceSupport 文件夹:
open /Applications/Xcode.app/Contents/Developer/Platforms/iPhoneOS.platform/DeviceSupport
下载 DeviceSupport:https://github.com/iGhibli/iOS-DeviceSupport
使用 symbolicatecrash 工具进行符号化。symbolicatecrash 是 Xcode 自带的符号化工具,但是不在系统的 PATH 内,因此运行该命令需要修改 PATH 变量,在终端执行如下命令:
export DEVELOPER_DIR="/Applications/Xcode.app/Contents/Developer"
export PATH=$PATH:/Applications/Xcode.app/Contents/SharedFrameworks/DVTFoundation.framework/Versions/A/Resources/
执行命令:symbolicatecrash xxx.ips -o crash.log
查看符号化的详细过程:symbolicatecrash xxx.ips -o crash.log --verbose &> sh.log,查看得知,并不需要显式地指定 dSYM,因为工具会自动在电脑中搜索:
Running mdfind "com_apple_xcode_dsym_uuids == 8E662F82-B1E4-3E7E-A376-18E9755A8F51"
.ips 文件符号化之前:
5   Demo                    0x00000001026188f0 0x102408000 + 2164976
6   Demo                    0x0000000102619b10 0x102408000 + 2169616
第三列 0x00000001026188f0 是实际运行时的虚拟内存地址,它等于第四列 + 第五列(十六进制)。即公式 VA = ImageBase + RVA!
第四列 0x102408000 是 Demo 镜像在内存中的首地址,我们知道 arm64 架构如果没有 ASLR 的话首地址是 0x100000000,因此 ASLR 偏移量就是 0x102408000 - 0x100000000 = 0x2408000。
那么函数在 dSYM 文件中的地址 = 0x00000001026188f0 - 0x2408000 = 0x1002108F0(即十六进制的 2164976!)
本地手动翻译堆栈,推荐使用 atos,传入镜像首地址和函数真实内存地址即可。
在 Bugly 页面选择“还原前”,三个红框分别是基址、真实虚拟内存地址、UUID:

atos -o editorFramework.framework.dSYM/Contents/Resources/DWARF/editorFramework -arch arm64 -l 0x1111fc000 0x0000000111fa8c5c 0x0000000111fa8c58 0x0000000111fa9870 0x0000000111fa9648 0x0000000111d9dc24 0x0000000111d9db98
0x1111fc000是基地址,后面的是堆栈地址。