Frameworks
静态库与动态库
Dynamic Library Programming Topics
When an app is linked with a library using a static linker, the code that the app uses is copied to the generated executable file. A static linker collects compiled source code, known as object code, and library code into one executable file that is loaded into memory in its entirety at runtime. The kind of library that becomes part of an app’s executable file is known as a static library. Static libraries are collections or archives of object files.
A better approach is for an app to load code into its address space when it’s actually needed, either at launch time or at runtime. The type of library that provides this flexibility is called dynamic library. Dynamic libraries are not statically linked into client apps; they don't become part of the executable file.
When an app is launched, the OS X kernel loads the app’s code and data into the address space of a new process. The kernel also loads the dynamic loader (/usr/lib/dyld) into the process and passes control to it. The dynamic loader then loads the app’s dependent libraries. These are the dynamic libraries the app was linked with. The static linker records the filenames of each of the dependent libraries at the time the app is linked. This filename is known as the dynamic library’s install name. The dynamic loader uses the app’s dependent libraries’ install names to locate them in the file system.
The dynamic loader—in addition to automatically loading dynamic libraries at launch time—loads dynamic libraries at runtime, at the app’s request. That is, if an app doesn't require that a dynamic library be loaded when it launches, developers can choose to not link the app’s object files with the dynamic library, and, instead, load the dynamic library only in the parts of the app that require it. Using dynamic libraries this way speeds up the launch process. Dynamic libraries loaded at runtime are known as dynamically loaded libraries. To load libraries at runtime, apps can use functions that interact with the dynamic loader for the platform under which they're running.
查看一个库是动态库还是静态库可以用如下方法:
file opencv2
opencv2: Mach-O universal binary with 2 architectures: [x86_64:current ar archive] [arm64]
opencv2 (for architecture x86_64):	current ar archive
opencv2 (for architecture arm64):	current ar archive

file Flutter
Flutter: Mach-O universal binary with 2 architectures: [arm_v7:Mach-O dynamically linked shared library arm_v7] [arm64]
Flutter (for architecture armv7):	Mach-O dynamically linked shared library arm_v7
Flutter (for architecture arm64):	Mach-O 64-bit dynamically linked shared library arm64
动态库会显示 "dynamically linked shared library"
Framework
In iOS, Apple is using Framework to package the header files, source files, binary files and resources. Similarly, Framework can be divides into Static Framework and Dynamic Framework.
Framework 是一种打包方式。将库的二进制、头文件、资源文件打包到一起,方便管理。相当于 Android 的 AAR (Android ARchive)。
开发者制作的 Framework 和系统的 UIKit.framework 有什么区别?系统的 Framework 不需要拷贝到应用程序中,是运行时加载的,在不同应用程序之间共享。开发者制作的 Framework,最后是会被拷贝到应用程序中,苹果把这种 Framework 又称为 Embedded Framework。
开发者制作的 Framework 会被放到 ipa 的 Frameworks 目录下,被严格限制在沙盒中运行。App 打包时会对动态库进行签名,不同的 App,即使使用的是完全相同的动态库,在系统中也会加载多份。
tdb
https://opensource.apple.com/source/tapi/tapi-1100.0.11/docs/TBD.rst.auto.html
Text-based Dynamic Library Stubs (.tbd) are a new representation for dynamic libraries and frameworks in Apple's SDKs.
The new dynamic library stub file format is a human readable and editable YAML text file. Those text-based stub files contain the same exported symbols as the original dynamic library.
我们在项目中引入的系统库,都是 tbd 的格式。因为真正的动态库放在手机设备上,Xcode 在链接时只需要描述信息就可以了。
tbd 里面记录了包括动态库导出的符号、架构、依赖等信息。
AFNetworking 静态库
首先找到 AFNetworking 的源码,也就是 https://github.com/AFNetworking/AFNetworking/tree/master/AFNetworking 这个目录下的所有文件。
新建一个 Xcode Project,平台选择为 macOS(因为后面我们会直接运行程序),模板选择静态库,然后把源码拖进去。构建,然后在 DerivedData 里找到产物,得到 libAFNetworking.a
ar -t libAFNetworking.a 列出静态库里面所有的目标文件。静态库就是 .o 文件的集合,既然它是目标文件的集合,它可以被进一步地链接,从而生成动态库。
手动创建一个 main.m 文件,并在其中引用 AFNetworking:
#import <Foundation/Foundation.h>
#import <AFNetworking.h>

int main() {
    AFHTTPSessionManager *manager = [AFHTTPSessionManager manager];
    NSLog(@"%@", manager);
    return 0;
}
接下来把它编译成目标文件:
# 编译
# -I: HEADER_SEARCH_PATHS
clang \
-fobjc-arc \
-target arm64-apple-macos \
-mmacos-version-min=12.3 \
-isysroot /Applications/Xcode.app/Contents/Developer/Platforms/MacOSX.platform/Developer/SDKs/MacOSX.sdk \
-IAFNetworking \
-c main.m -o main.o
在编译目标文件时,我们不需要 AFHTTPSessionManager 的源码,也不需要 AFNetworking 库,只需要在 HEADER_SEARCH_PATHS 里能找到 AFNetworking.h 头文件就可以了(头文件里有AFHTTPSessionManager符号),这个符号会被放入目标文件的重定位符号表,在之后链接的过程中,会确定符号的地址。
# 将目标文件与静态库进行链接
# -L: library_search_path
# -l: 要链接的库的名称,找的时候会自动加 lib 前缀
clang \
-fobjc-arc \
-target arm64-apple-macos \
-mmacos-version-min=12.3 \
-isysroot /Applications/Xcode.app/Contents/Developer/Platforms/MacOSX.platform/Developer/SDKs/MacOSX.sdk \
-LProducts/Release \
-lAFNetworking \
main.o -o main
现在可以通过 ./main 直接运行这个二进制,看到 NSLog 的输出了。
如果需要打包 iOS,则:
-target arm64-apple-ios \
-mios-version-min=15.0 \
-isysroot /Applications/Xcode.app/Contents/Developer/Platforms/iPhoneOS.platform/Developer/SDKs/iPhoneOS.sdk \
静态库可以手动组织成 Framework,mkdir AFNetworking.framework,将静态库文件重命名为 AFNetworking 后放入,再将头文件放入 Headers 目录下即可。
# 将目标文件与 Framework 进行链接
# -F 即 framework_search_path
# -framework 属于 other_linker_flags
clang \
-fobjc-arc \
-target arm64-apple-macos \
-mmacos-version-min=12.3 \
-isysroot /Applications/Xcode.app/Contents/Developer/Platforms/MacOSX.platform/Developer/SDKs/MacOSX.sdk \
-F./Frameworks \
-framework AFNetworking \
main.o -o main
总结,编译链接一个 Framework 的三要素:
- Header Search Paths
- Framework Search Paths
- Other Linker Flags -
-framework
静态库中没有用到的代码,会被 Dead Code Stripping 脱掉。objc 的 class 默认会载入,但 category 默认是会被脱掉的。此时,可以通过向链接器传递参数,来控制哪些符号会被载入二进制产物中。
OTHER_LDFLAGS=-Xlinker -all_load # 加载所有符号,clang -Xlinker -all_load
OTHER_LDFLAGS=-Xlinker -ObjC # 加载所有 objc 符号
OTHER_LDFLAGS=-Xlinker -force_load # ��加载指定静态库里面的所有符号
OTHER_LDFLAGS=-Xlinker -load_hidden # 隐藏指定静态库里面的所有全局符号
在 clang 命令中使用 Dead Code Stripping:
# -why_load: Log why each object file in a static library is loaded
clang \
-fobjc-arc \
-target arm64-apple-macos \
-mmacos-version-min=12.3 \
-isysroot /Applications/Xcode.app/Contents/Developer/Platforms/MacOSX.platform/Developer/SDKs/MacOSX.sdk \
-LProducts/Release \
-lAFNetworking \
-Xlinker -dead_strip \
-Xlinker -why_load \
main.o -o main
AFNetworking 动态库
同样地,新建一个 Xcode Project,平台选择为 macOS(因为后面我们会直接运行二进制),模板选择动态库,然后把源码拖进去。
动态库是运行时加载的,加载的话就会需要一个路径,这个路径就是 install_name。新建的 Xcode 动态库工程,如果不做修改的话,会是这样的:
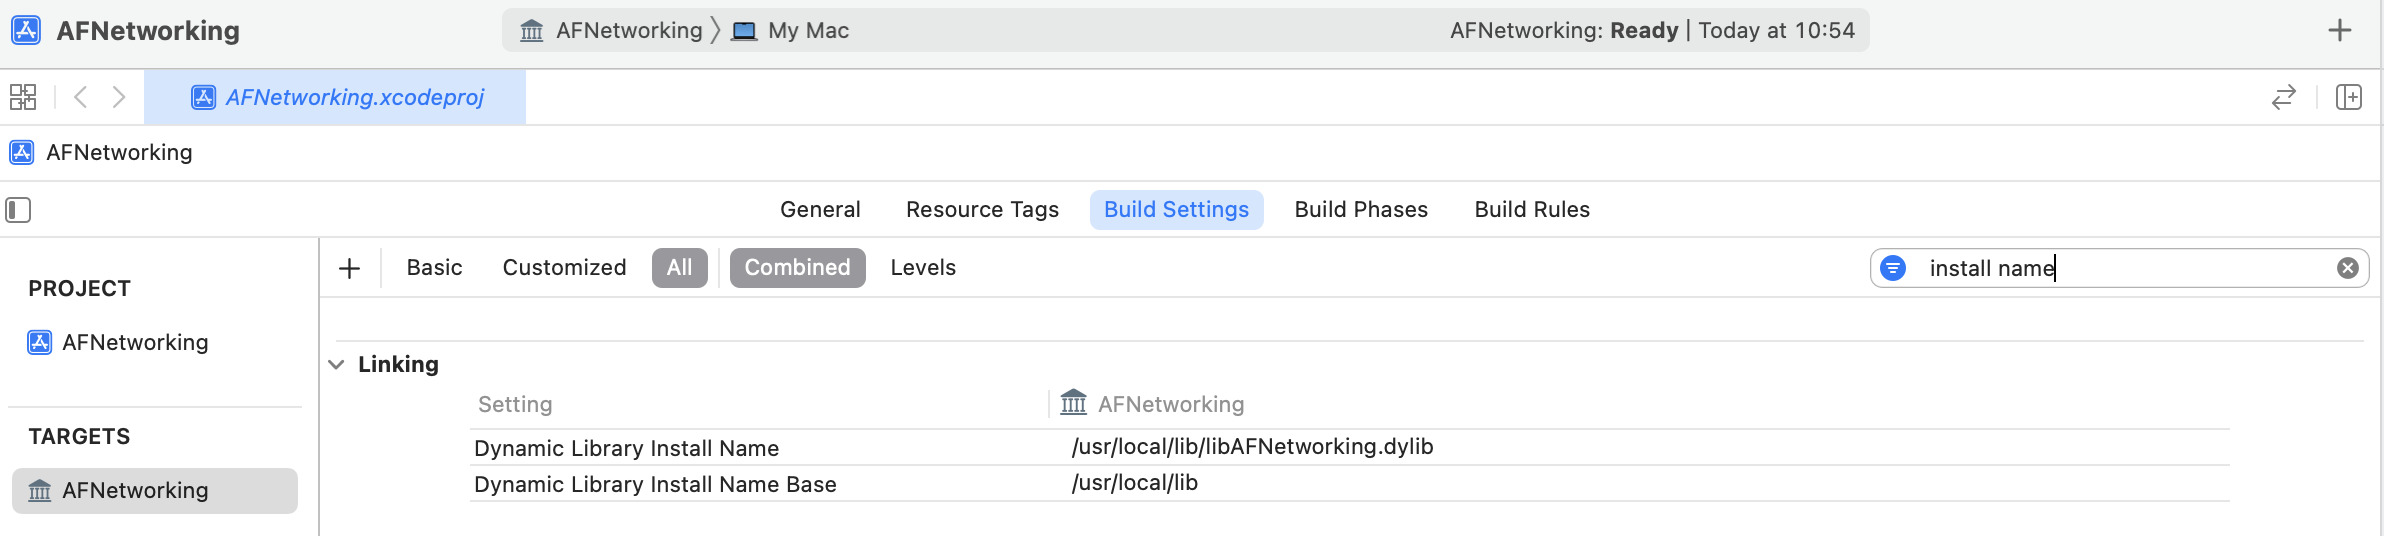
我们按照苹果 App 的目录结构,修改为以下配置:
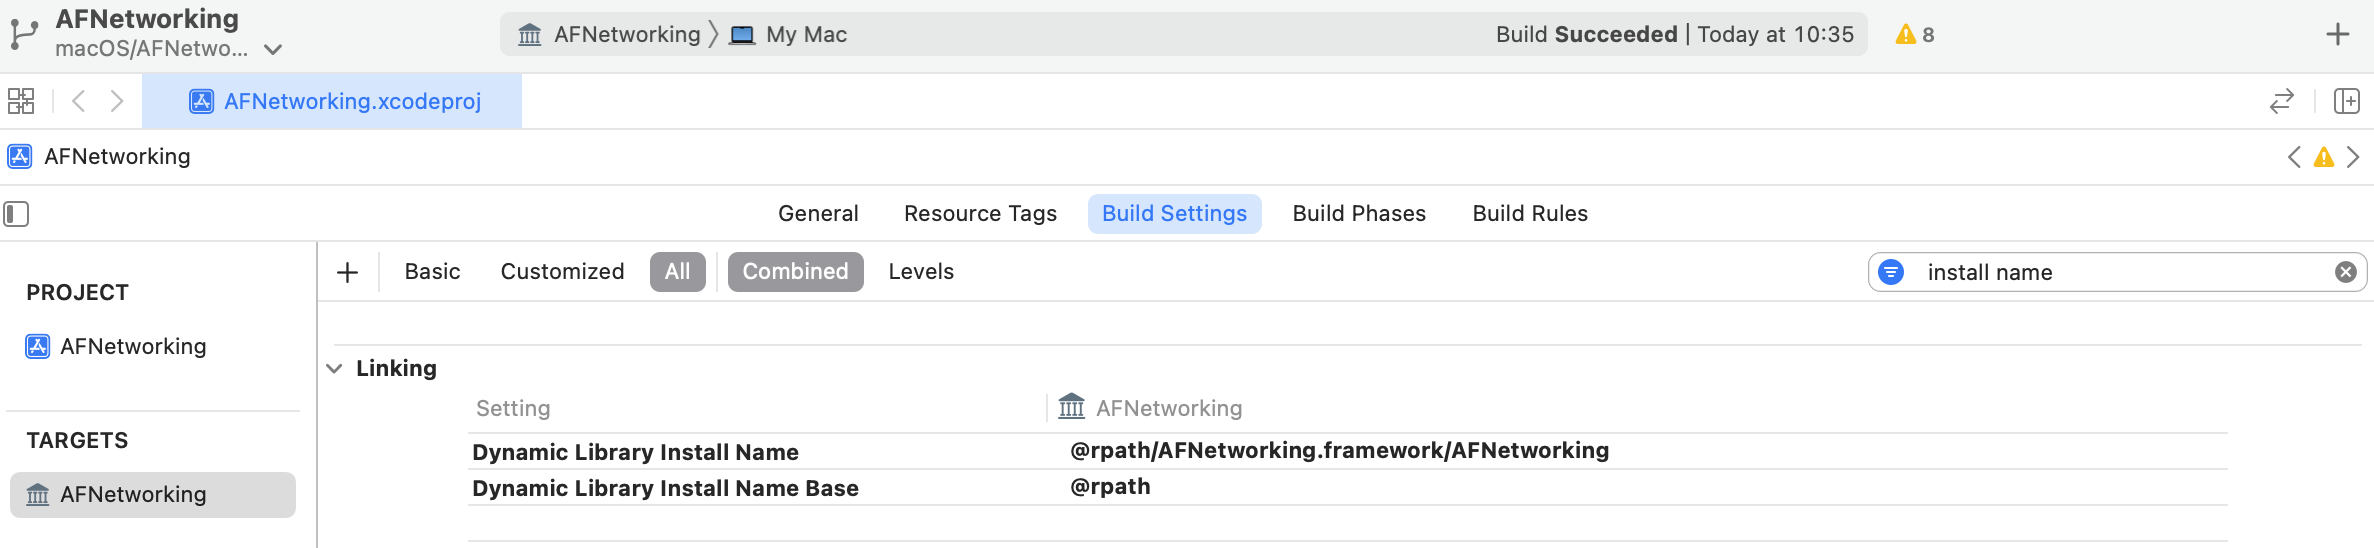
@rpath 代表 Build Settings - Runpath Search Paths,xcconfig 里的 LD_RUNPATH_SEARCH_PATHS,可保存多个路径,dyld 搜索动态库时会在这些路径下搜索。由于我们这个动态库是给 main 用的,当 main 链接这个动态库时,main 就负责展开 @rpath。
接下来,构建,然后在 DerivedData 里找到产物。
动态库的路径是记录在 libAFNetworking.dylib 自己的 load command 里的:
otool -l libAFNetworking.dylib | grep "LC_ID_DYLIB" -A 5
          cmd LC_ID_DYLIB
      cmdsize 72
         name @rpath/AFNetworking.framework/AFNetworking (offset 24)
   time stamp 1 Thu Jan  1 08:00:01 1970
      current version 1.0.0
compatibility version 1.0.0
然后手动创建一个 main.m 文件,并在其中引用 AFNetworking,接下来把它编译成目标文件,然后链接。
在 main 去链接 libAFNetworking.dylib 时,main 会把上面的路径又写到了自己的 load command 里:
otool -l main | grep 'LC_LOAD_DYLIB' -A 5
          cmd LC_LOAD_DYLIB
      cmdsize 72
         name @rpath/AFNetworking.framework/AFNetworking (offset 24)
   time stamp 2 Thu Jan  1 08:00:02 1970
      current version 1.0.0
compatibility version 1.0.0
当 dyld 去加载 main 依赖的动态库时,就会使用上述路径来加载。
此时运行 main,会出现 Library not loaded 错误,这是由于在链接时我们没有指定 main 的 rpath,加载动态库时无法展开,于是系统只好到兜底的 /Library/Frameworks 和 /System/Library/Frameworks/ 目录去找,但是找不到,于是就发生异常:
dyld[55541]: Library not loaded: '@rpath/AFNetworking.framework/AFNetworking'
  Referenced from: '/Users/yianzhou/Documents/megabox/examples/macOS/AFNetworking-dylib/main'
  Reason: tried: '/Library/Frameworks/AFNetworking.framework/AFNetworking' (no such file), '/System/Library/Frameworks/AFNetworking.framework/AFNetworking' (no such file)
因此,在链接时,还需额外给链接器传入 rpath 参数,就可以正常运行了。(iOS App 都会把动态库放到 @executable_path/Frameworks 目录下,@excutable_path 代表可执行程序所在目录)
clang \
-fobjc-arc \
-target arm64-apple-macos \
-mmacos-version-min=12.3 \
-isysroot /Applications/Xcode.app/Contents/Developer/Platforms/MacOSX.platform/Developer/SDKs/MacOSX.sdk \
-F./Frameworks \
-framework AFNetworking \
-Xlinker -rpath -Xlinker @executable_path/Frameworks \
main.o -o main
当动态库链接动态库时,情况会变得更复杂一些。假设 AFNetworking 还依赖了其它动态库,通常放在 AFNetworking.framework/Frameworks 下面。
那么,当加载 AFNetworking 用到的动态库时,就要在 AFNetworking 的 rpath 里找。而 AFNetworking 不是可执行程序,它是动态库。因此如果把 AFNetworking 的 rpath 配置为 @executable_path/Frameworks 的话,肯定是找不到的。此时苹果提供了另一个参数 @loader_path,表示被加载的 mach-o 所在目录。当 AFNetworking 被加载时,@loader_path 就被展开为 AFNetworking 所在目录,因此我们将 AFNetworking 的 rpath 配置为 @loader_path/Frameworks,就可以确保动态库依赖动态库的情况也可以找到正确的路径了。
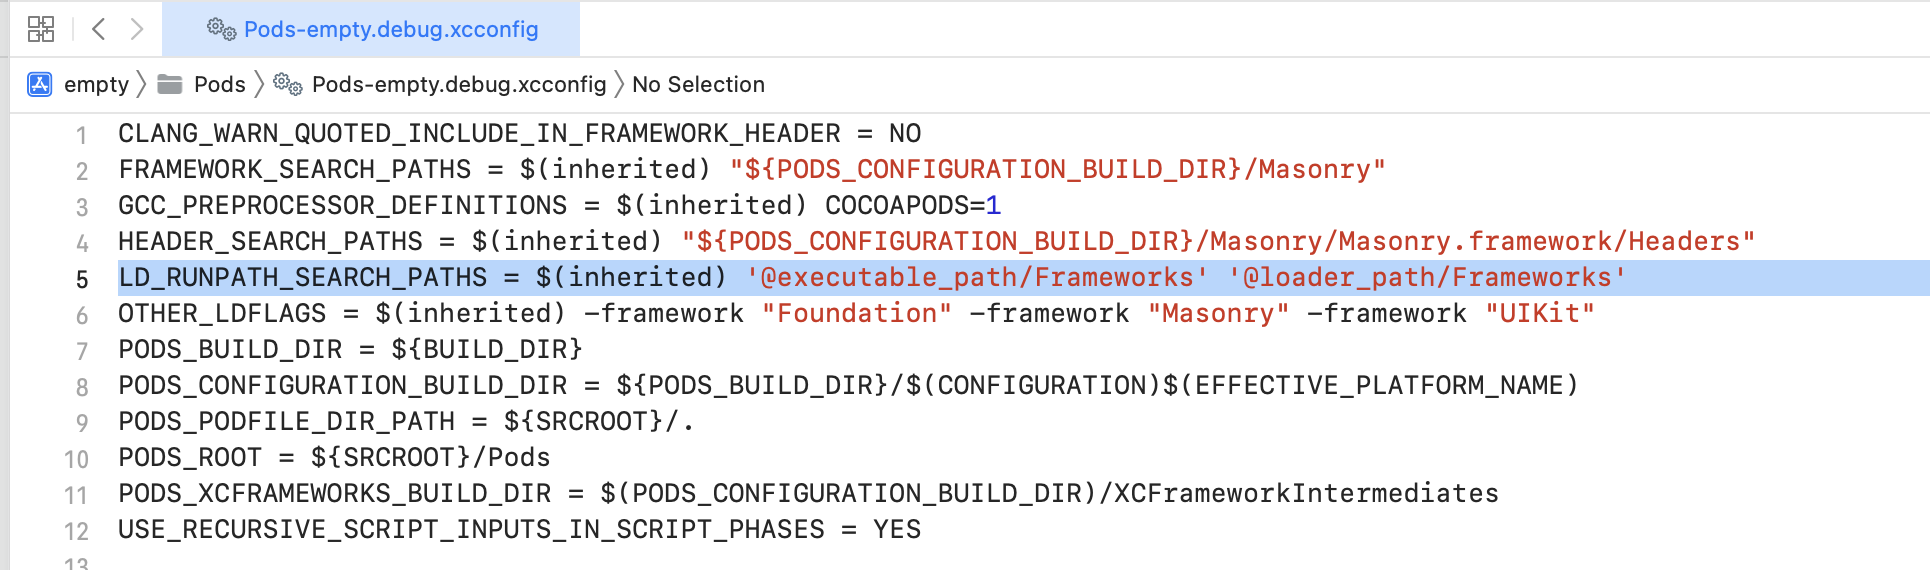
咱们平时通过 Cocoapods 管理工程配置时,它也是这么给我们配置的:
不同的链接情况
1. ��动态库链接动态库
App -> 动态库 A -> 动态库 B,要在 App 内使用动态库 B 的代码:
Demo/Pods/Target Support Files/Pods-Demo/Pods-Demo-frameworks.sh这个路径下的脚本,已经帮忙把动态库 B 拷贝到 App 沙盒的 Frameworks 目录下,并且写好配置了Demo/Pods/Target Support Files/Pods-Demo/Pods-Demo-frameworks.sh。- App 通过 pod 安装动态库 B:
pod 'B'
动态库 A 可以反向使用 App 的代码吗?——可以的,第一,在运行时,App 的符号肯定是载入内存中可以被使用的;第二,动态库编译的时候不需要实现,只需要配置 HEADER_SEARCH_PATHS 能找到头文件即可;第三,在动态库链接的时候,App 的符号会报错找不到,此时可以传链接器参数,告诉链接器允许某些符号未定义:
OTHER_LDFLAGS = $(inherited) -Xlinker -U -Xlinker _OBJC_CLASS_$_AppObject
这样就可以顺利通过链接,并且在运行时,也可以使用到 AppObject。
2. 动态库链接静态库
editorFramework 是动态库,它链接了十几个静态库
App -> 动态库 A -> 静态库 B,动态库 A 的链接阶段就会把静态库 B 的符号都载入进来,因此,静态库 B 的导出符号也就成为动态库 A 的导出符号,对 App 自然也是可见的,App 使用静态库 B 没有问题。
如果不想把静态库 B 的符号暴露给 App,可以传链接器参数,告诉链接器隐藏静态库 B 的符号:
OTHER_LDFLAGS = $(inherited) -Xlinker -hidden-l"B"
The 'Pods-Runner' target has transitive dependencies that include statically linked binaries
这个错误提示表明你的 Pods-Runner 目标包含了一个静态链接的二进制文件 QimeiSDK.xcframework,而这个文件是通过传递依赖关系引入的。CocoaPods 默认情况下不支持将静态库作为动态库的一部分进行链接,这可能会导致链接错误。
问题:QBFrame 依赖 QimeiSDK,QBFrame 是动态库,QimeiSDK 是静态库
解决:QBFrame 改为静态库
3. 静态库链接静态库
App -> 静态库 A -> 静态库 B,需要配置 HEADER_SEARCH_PATHS 和 OTHER_LDFLAGS 让静态库 B 对 App 可见。
或者直接使用 pod 把静态库 B 装给 App。
4. 静态库链接动态库
App -> 静态库 A -> 动态库 B,配置 FRAMEWORK_SEARCH_PATHS 让动态库 B 对 App 可见,同时参考 1 中的做法,通过脚本拷贝 Framework 或者通过 pod 安装。
5. APP 链接多个静态库
233 duplicate symbols for architecture arm64 符号冲突
Cocoapods 集成
target "Runner" do
  # 加上这句就是把下面的pod都用动态库,去掉这句就是都用静态库
  use_frameworks!
end

# 部分使用动态库,其余静态库
dylib_set = Set.new ["bugly", "sqflite", "pdf_engine", "FMDB"]
post_install do |installer|
  installer.pods_project.targets.each do |target|
    unless dylib_set.include?(target.name)
      target.build_configurations.each do |config|
        config.build_settings["MACH_O_TYPE"] = "staticlib"
      end
    end
  end
end
Modules
头文件也要编译,尤其对于 C++ 来说,头文件几乎包含了所有语法特性。
https://clang.llvm.org/docs/Modules.html
Most software is built using a number of software libraries. For each library, one needs to access both its interface (API) and its implementation.
In the C family of languages, the interface to a library is accessed by including the appropriate header files(s):
#include <SomeLib.h>
(用 include 的坏处)The #include mechanism provided by the C preprocessor is a very poor way to access the API of a library, for a number of reasons:
- In a project with N translation units and M headers included in each translation unit, the compiler is performing M x N work even though most of the M headers are shared among multiple translation units.(头文件被重复编译多次)
- When the headers for two different libraries interact due to macro collisions, users are forced to reorder
#includedirectives or introduce#undefdirectives to break the (unintended) dependency.(宏定义冲突) - C programmers have adopted a number of conventions to work around the fragility of the C preprocessor model.(用全大写、加下划线等惯用法来避免命名冲突,使代码变得又长又臭)
- The boundaries of the libraries are not clear. Which headers belong to a particular library, and in what order should those headers be included to guarantee that they compile correctly?(说不清楚边界到底在哪)
(用 Modules 的好处)When the compiler sees the module import @import std.io;, it loads a binary representation of the std.io module. Preprocessor definitions that precede the import declaration have no impact on the API provided by std.io, because the module itself was compiled as a separate, standalone module.(每个头文件只会编译一次)
clang 编译器会自动把 #include <stdio.h> 指令翻译成 @import std.io;。
The crucial link between modules and headers is described by a module map, which describes how a collection of existing headers maps on to the (logical) structure of a module. Having a list of the headers that are part of the std module allows the compiler to build the std module as a standalone entity, and having the mapping from header names to (sub)modules allows the automatic translation of #include directives to module imports.
The binary representation of modules is persisted in the module cache. Modules maintain references to each of the headers that were part of the module build. If any of those headers changes, or if any of the modules on which a module depends change, then the module will be (automatically) recompiled. The process should never require any user intervention.
To enable support for using a library as a module, one must write a module.modulemap file for that library. The module.modulemap file is placed alongside the header files themselves.
先写好 module.modulemap 再编译,才能产生 module cache:clang -fmodules -fmodules-cache-path=prebuilt use.c
查看参数含义:clang --help | grep "\-fmodules" -A 5
参考开源库的 module.modulemap 文件:

framework module SDWebImage {
  umbrella header "SDWebImage-umbrella.h"

  export *
  module * { export * }
}
export *: anything included by that submodule will be automatically re-exported
module *: module 里的所有头文件都当作一个子 module
Swift Library
App 里 Swift 调用 OC 代码,是用 -Bridge-Header.h 桥接文件。但在 Swift 库中无法使用桥接文件,怎么办?可以把 OC 的头文件放到 modulemap 下,即可暴露给 Swift 调用。
Swift 静态库 A 与 Swift 静态库 B 合并:
- libtool 合并静态库 A、B
- swift 头文件和 modulemap 文件放到一起
- OC 要调用合并后的静态库:
OTHER_CFLAGS="-fmodule-map-file=${SRCROOT}/AGSwiftA.framework/module.modulemap" "-fmodule-map-file=${SRCROOT}/AGSwiftB.framework/module.modulemap" - Swift 要调用合并后的静态库:
SWIFT_INCLUDE_PATHS="${SRCROOT}/AGSwiftC/AGSwiftA.framework" "${SRCROOT}/AGSwiftC/AGSwiftB.framework"
裁剪
查看支持的架构:lipo -info opencv2.framework
// 先瘦身,输出单一架构
$ lipo opencv2.framework/opencv2 -thin arm64 -output opencv2.framework/opencv2-arm64
$ lipo opencv2.framework/opencv2 -thin x86_64 -output opencv2.framework/opencv2-x86_64
// 再合并
$ lipo -create opencv2.framework/opencv2-arm64 opencv2.framework/opencv2-x86_64 -output opencv2.framework/opencv2
查看库里的符号
otool -tv ./ZWAppApi.framework/ZWAppApi | grep "NSString"