Apple Networking
URLSession
URLSession kick-off: init a configuration, init a session, init a task, resume.
Best practice: one session to support many (many!) tasks!
Every URLSession object has a connection pool and when you create multiple of these URLSession objects, you don't get any benefit of connection reusing. It's also important to note that the URLSession objects are fairly expensive to create and have a non-trivial memory footprint.
For almost all of your apps what you should have is just one URLSession, which can then have as many tasks as you want. The only time you would want more than one URLSession is when you have groups of different operations that have radically different requirements. And in that case you might create two different configuration objects to init two different URLSessions. One example is private browsing in Safari where each private browsing window is its own separate URLSession so that it doesn't share cookies and other states with the other sessions.
Most apps can just have one statically-allocated URLSession. But if you do allocate URLSessions dynamically, remember to clean up afterwards. Either finishTasksAndInvalidate or invalidateAndCancel. If you don't clean up, you'll leak memory.
Delegate callbacks and convenience methods: Delegate callbacks give you detailed step-by-step progress information on the state of your task. The convenience methods, by comparison, are a quick and easy way of using the API that you don't get all the intermediate delegate callbacks, you just get the final result reported to the completion handler. Don't mix and match both on the same URLSession, pick one style and be consistent.
URLSessionConfiguration
It is important to configure your URLSessionConfiguration object appropriately before using it to initialize a session object. Once configured, the session object ignores any changes you make to the configuration object. If you need to modify your transfer policies, you must update the session configuration object and use it to create a new URLSession object.
URLSessionConfiguration:
- TLS version
- Cookie policy
- Cache policy
- Storage objects
networkServiceType: provides a hint to the operating system about what the underlying traffic is used for. See networkServiceType.
multipathServiceType: specifies the Multipath TCP connection policy for transmitting data over Wi-Fi and cellular interfaces. See Multipath TCP.
timeoutIntervalForResource: The resource timer starts when the request is initiated and counts until either the request completes or this timeout interval is reached, whichever comes first.
timeoutIntervalForRequest: The timer only starts once the transfer starts. It controls how long a task should wait for additional data to arrive before giving up. The timer associated with this value is reset whenever new data arrives.
allowsCellularAccess: allowed to make connections over a cellular network.
allowsConstrainedNetworkAccess: whether connections may use the network when the user has specified Low Data Mode.
allowsExpensiveNetworkAccess: whether connections may use a network interface that the system considers expensive. (iOS 13 considers most cellular networks and personal hotspots expensive)
waitsForConnectivity
"Please fetch me this resource when the network is available." No longer a need to monitor connectivity and manually retry requests.
You would create and resume the URLSessionTask as before. If the device can't connect to the server, we'd call a delegate callback if you implemented it, once for each task.
let config = USLSessionConfiguration.default
config.waitsForConnectivity = true
// ...
func urlSession(_ session: URLSession, taskIsWaitingForConnectivity task: URLSessionTask) {}
This API only has an effect for non-background sessions, it's not necessary for background URLSession who does this automatically.
URLSessionStreamTask
There are some cases where you need a protocol other than HTTP or HTTPS, and you want to do something custom directly on top of TCP/IP networking. NSURLSessionStreamTask is a Foundation extraction, directly over a TCP connection.
What we have new for you in iOS 11 is automatic navigation of authenticating proxies. If the proxy requires credentials, then we will automatically extract those from the keychain or prompt the user on your behalf.
Progress
Now in iOS 11 URLSessionTask has adopted the ProgressReporting protocol. You can get a progress object from the URLSessionTask.
You can attach that progress object to a UIProgressView or an NSProgressIndicator to get an automatic progress bar.
You can also combine multiple progress objects into a parent progress object when you're performing multiple tasks.
The binding between a URLSessionTask and the progress object is bidirectional. So if you pause a URLSessionTask, that is the same as pausing the progress object. If you pause the progress object, that is the same as pause the URLSessionTask.
HTTP/2
Using URLSession on the client will negotiate HTTP/2 by default if it is enabled on the server.
So double-check your server settings to make sure HTTP/2 is enabled. By the way, URLSession supports HTTP/2 protocol only over an encrypted connection.
URLSession 运行在 HTTP/1.1 时,对同一个 IP 地址的请求,会创建多个并行的 TCP 连接,每个连接的建立都会带来资源消耗(见 httpMaximumConnectionsPerHost);而在 HTTP/2,由于分帧和多路复用,一个 TCP 连接就可以处理多个资源请求。
In iOS 12, we have something new in URLSession, HTTP/2 Connection Coalescing. It is going to be automatically done on for all your apps using URLSession. 相同证书、相同 IP 地址的服务器,可以复用 TCP 连接。
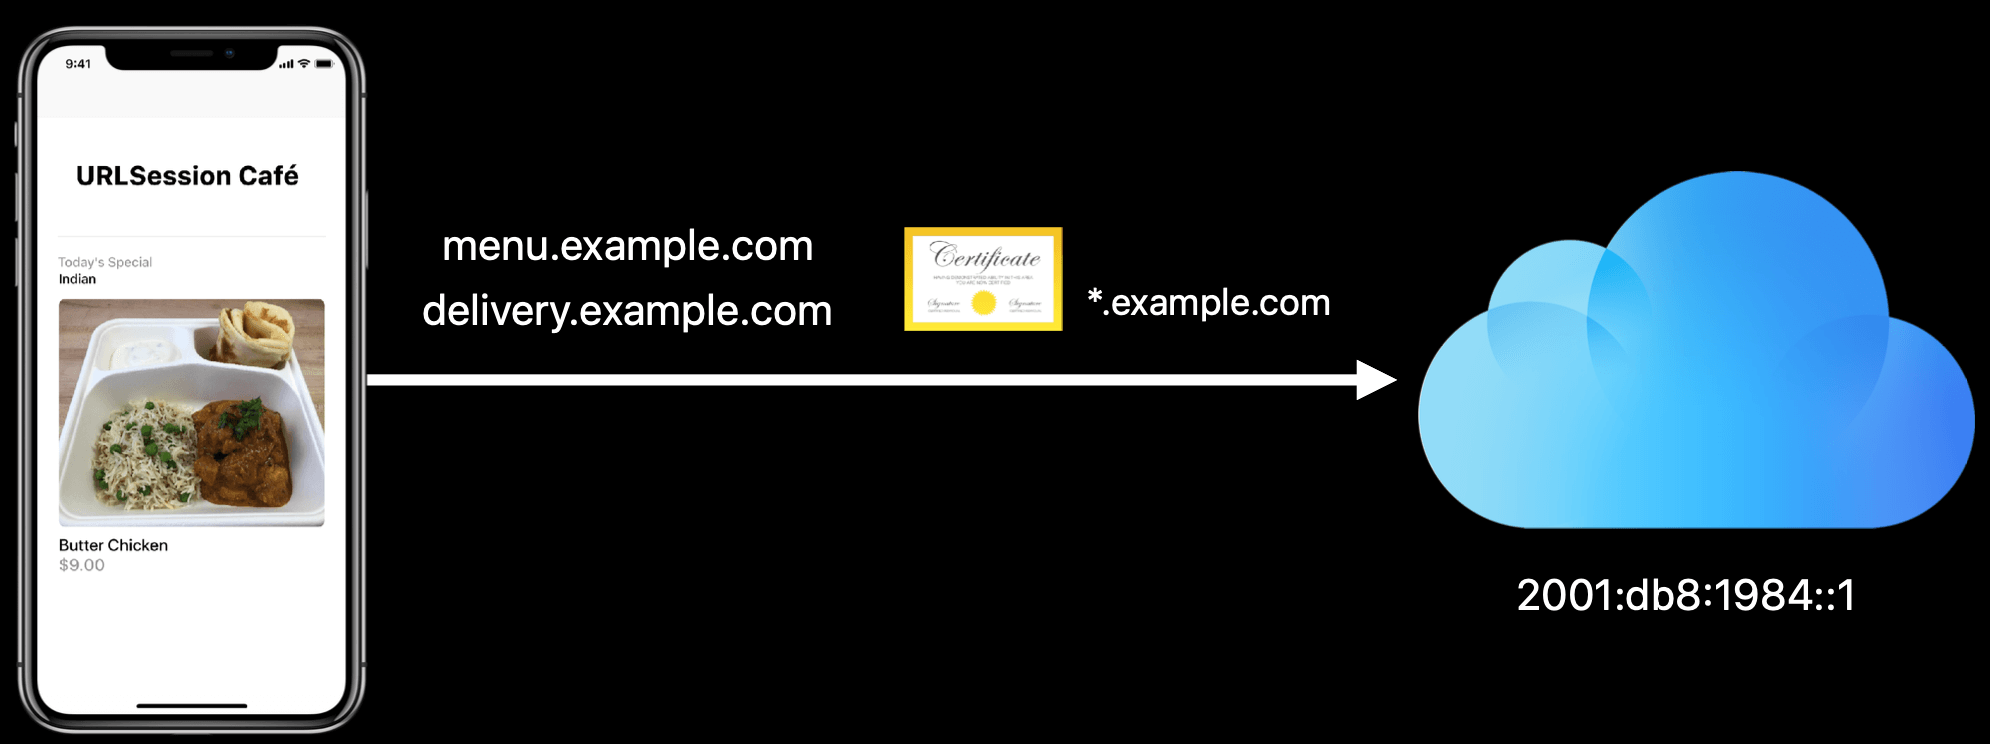
The first certificate presented to us covers all the subdomains under example.com. Also notice that delivery.example.com, it results to the same IP address as the first connection. It's safe to assume we're talking to the same endpoint and reuse the connection instead of opening a new one when we want to fetch the second resource.
Two to three times faster if you configure the Server Push on your HTTP/2 server! And you don't even have to change any code in your app! The data for your URLSessionDataTask will be delivered out of the Server Push storage directly to your application.
HTTP/2 支持服务器在客户端未主动请求的情况下,提前将客户端后续可能需要的资源(如网页依赖的 CSS、JS、图片等)主动推送到客户端并存储在 “Server Push 存储区”。当客户端通过 URLSessionDataTask 发起对这些已推送资源的请求时,无需再通过网络向服务器重新获取 ——URLSession 会直接从本地的 Server Push 存储区读取数据并交付给应用,省去了网络请求的往返耗时,提升资源加载效率。
Optimistic DNS
Many servers have a very short time-to-live configured on their DNS records. And they do this such that if a server goes down or the server wants to load balance over another IP address, it can quickly change the IP address record and have clients adjust and start using the new address.
The downside, though, is that this really can hurt client performance. With a short time-to-live, a client will almost always have to take the round trip to do DNS, to request the address for the host name that you are connecting to. Most of the time, the server address has not changed at all, and so this is a wasted round trip.
So, optimistic DNS is a solution that we released last year that solves this problem. Optimistic DNS allows your connection to optimistically connect to the last known good IP address for that host name, in parallel with issuing a new query for the host name's current address. If nothing has changed, which is almost always the case, the connection will just establish to the old IP address. But if something has changed you'll still get the new IP address and connect to it instead.
It is on by default for connections using Network.framework and URLSession.
Encrypted DNS
Encrypted DNS is a key technology for improving internet privacy. The privacy concern is that DNS requests and responses are sent over an unencrypted transport, UDP. That means that other devices on the network can not only see what names you're looking up, but they can even interfere with the responses.
Starting this year, Apple platforms natively support encrypted DNS. There are two supported protocols. DNS over TLS, also called DoT, and DNS over HTTPS, also called DoH.
There are two ways that encrypted DNS can be enabled:
- The first way is to choose a single DNS server as the default resolver for all apps on the system. If you provide a public DNS server, you can now write a NetworkExtension app that configures the system to use your server. Or, if you use mobile device management, MDM, to configure enterprise settings on devices, you can push down a profile to configure encrypted DNS settings for your networks.
- The second way is to select a specific server to use for some or all of your app's connections.
To use encrypted DNS throughout your app:
import Network

if let url = URL(string: "https://dnsserver.example.net/dns-query") {
    let address = NWEndpoint.hostPort(host: "2001:db8::2", port: 443)
    NWParameters.PrivacyContext.default.requireEncryptedNameResolution(true,
        fallbackResolver: .http(url, serverAddresses: [ address ]))
}

let task = URLSession.shared.dataTask(with: ...)
task.resume()

getaddrinfo(...)
This applies your configuration to every DNS resolution initiated by your app, either when you use URLSessionTask, or when you use lower-layer APIs like getaddrinfo.
Brotli
Brotli compression algorithm is about 15% better than gzip.
HTTPS response header Content-Encoding: br supported in URLSession. Requires HTTPS (TLS).
WebSocket
WebSocket allows bidirectional communication over a single HTTP connection. This enables developers to write applications like chat, multiplayer games, and other real-time applications.
Web applications were originally developed around a client/server model, where the Web client is always the initiator of transactions, requesting data from the server. Thus, there was no mechanism for the server to independently send, or push data to the client without the client first making a request.
To overcome this deficiency, Web app developers can implement a technique called HTTP Long-Polling. When a client wants to receive a response from the server, it sends out a request. The server responds with a 200 status code immediately, but it does not send out the response body because it doesn't have one at this point. Sometime in the future, once the server has a response ready for the client, it sends it out to the client. At which point, the client sends a new request, indicating that it wants to receive the next message.
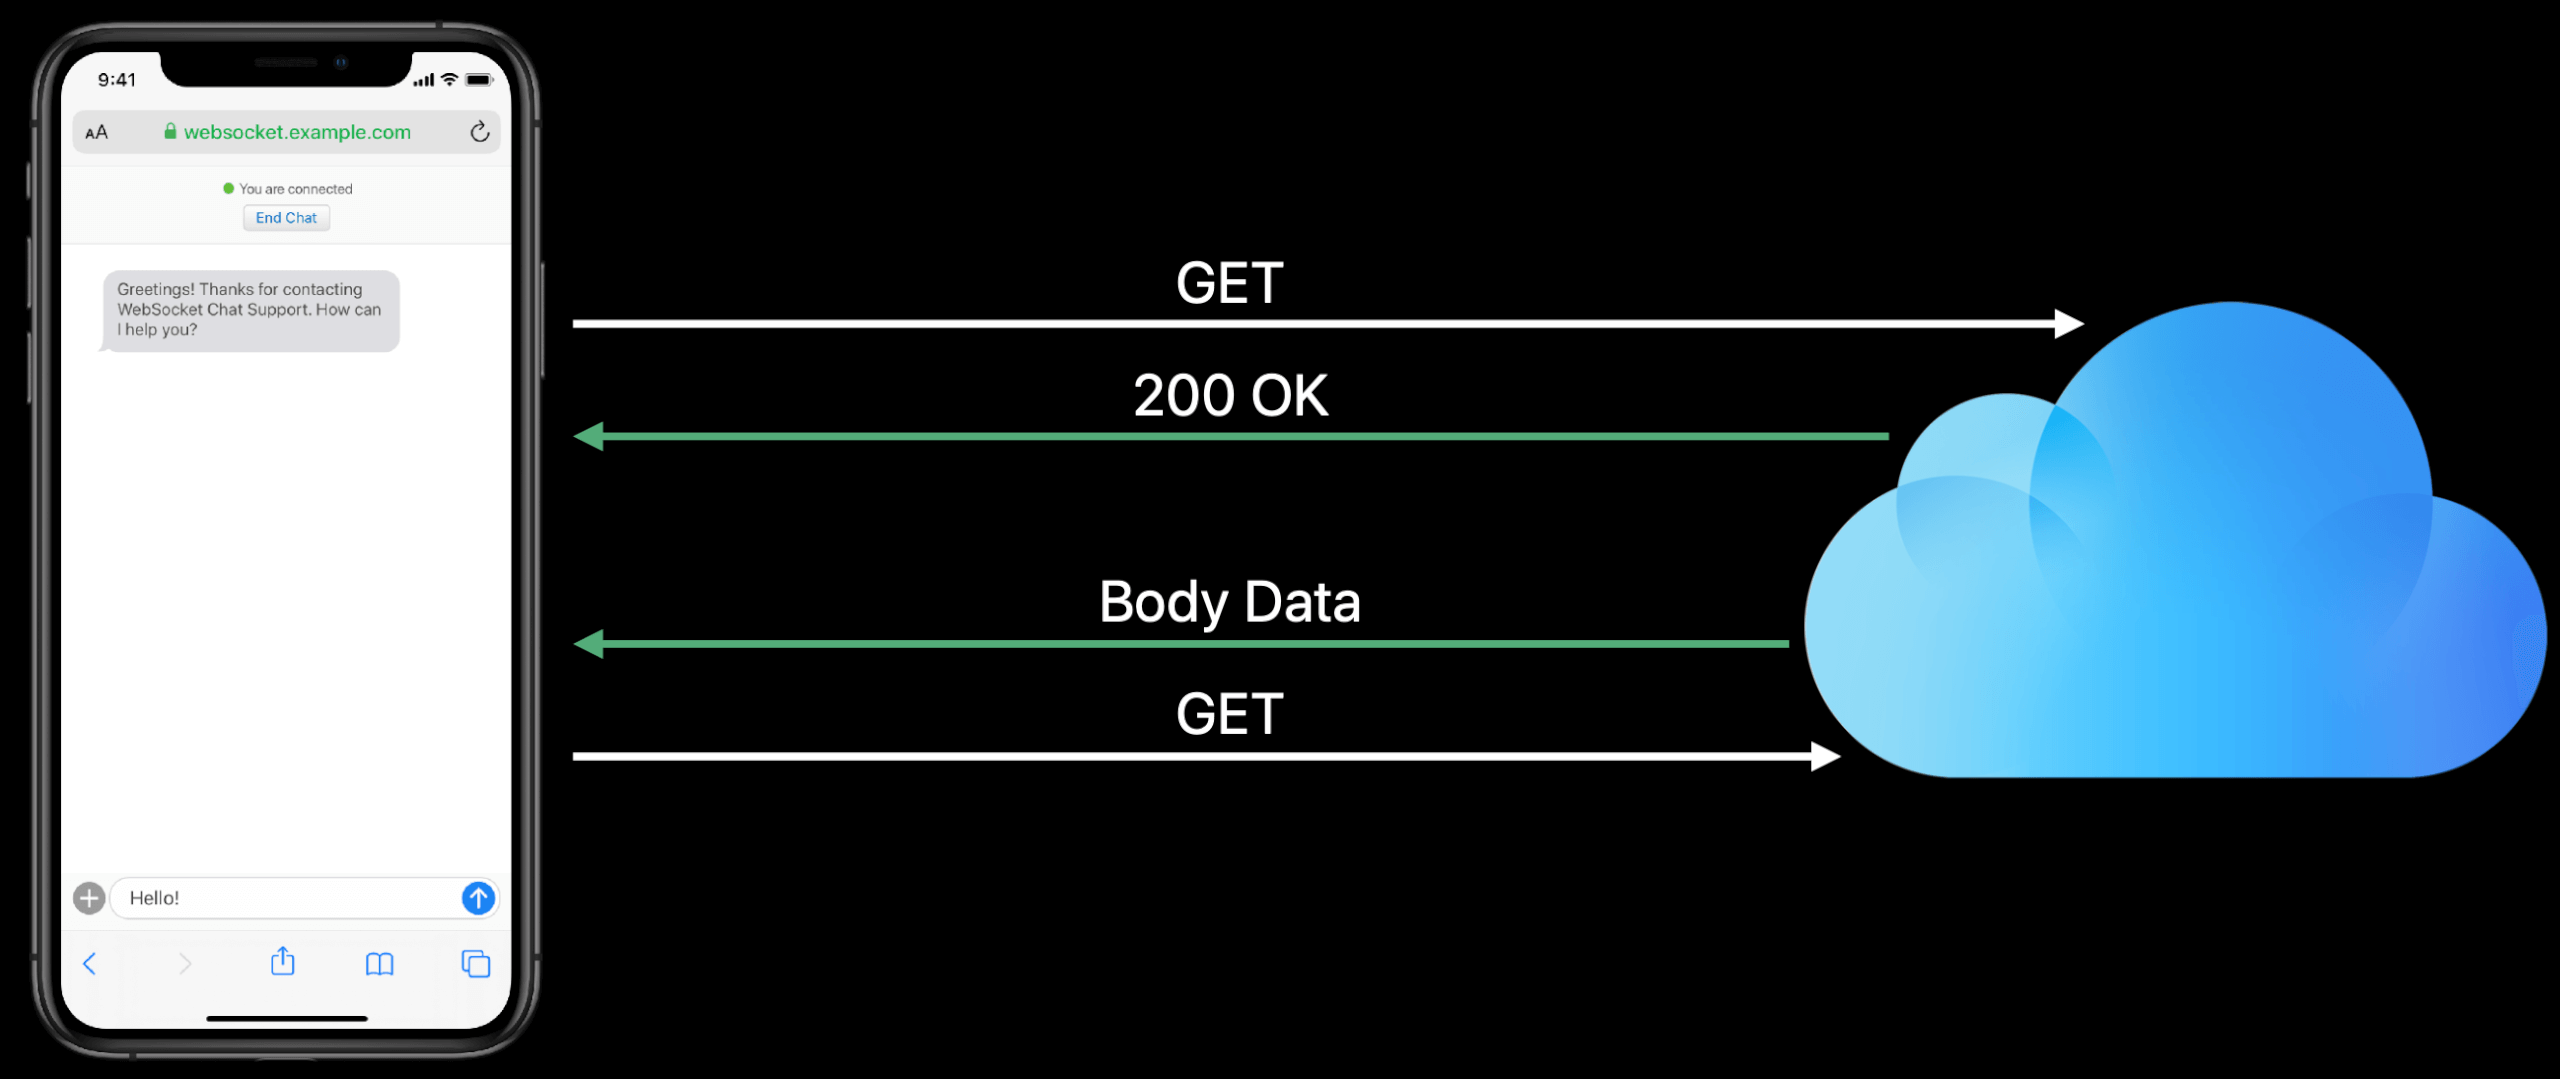
There are some disadvantages associated with long polling. Both the end points when they want to send messages have to either send an HTTP request or an HTTP response, which is a lot of overhead. Additionally, complexity has to be maintained at the server to enable long polling.
Let's see how WebSockets can solve this problem. The first step of the WebSocket handshake, the client sends out a request to the server, indicating that it wants to upgrade this connection to WebSocket. The server responds with the 101 switching protocol to response, at which point we have a bidirectional stream between the two end points. Both the end points are now free to send messages in either direction without any HTTP overhead.
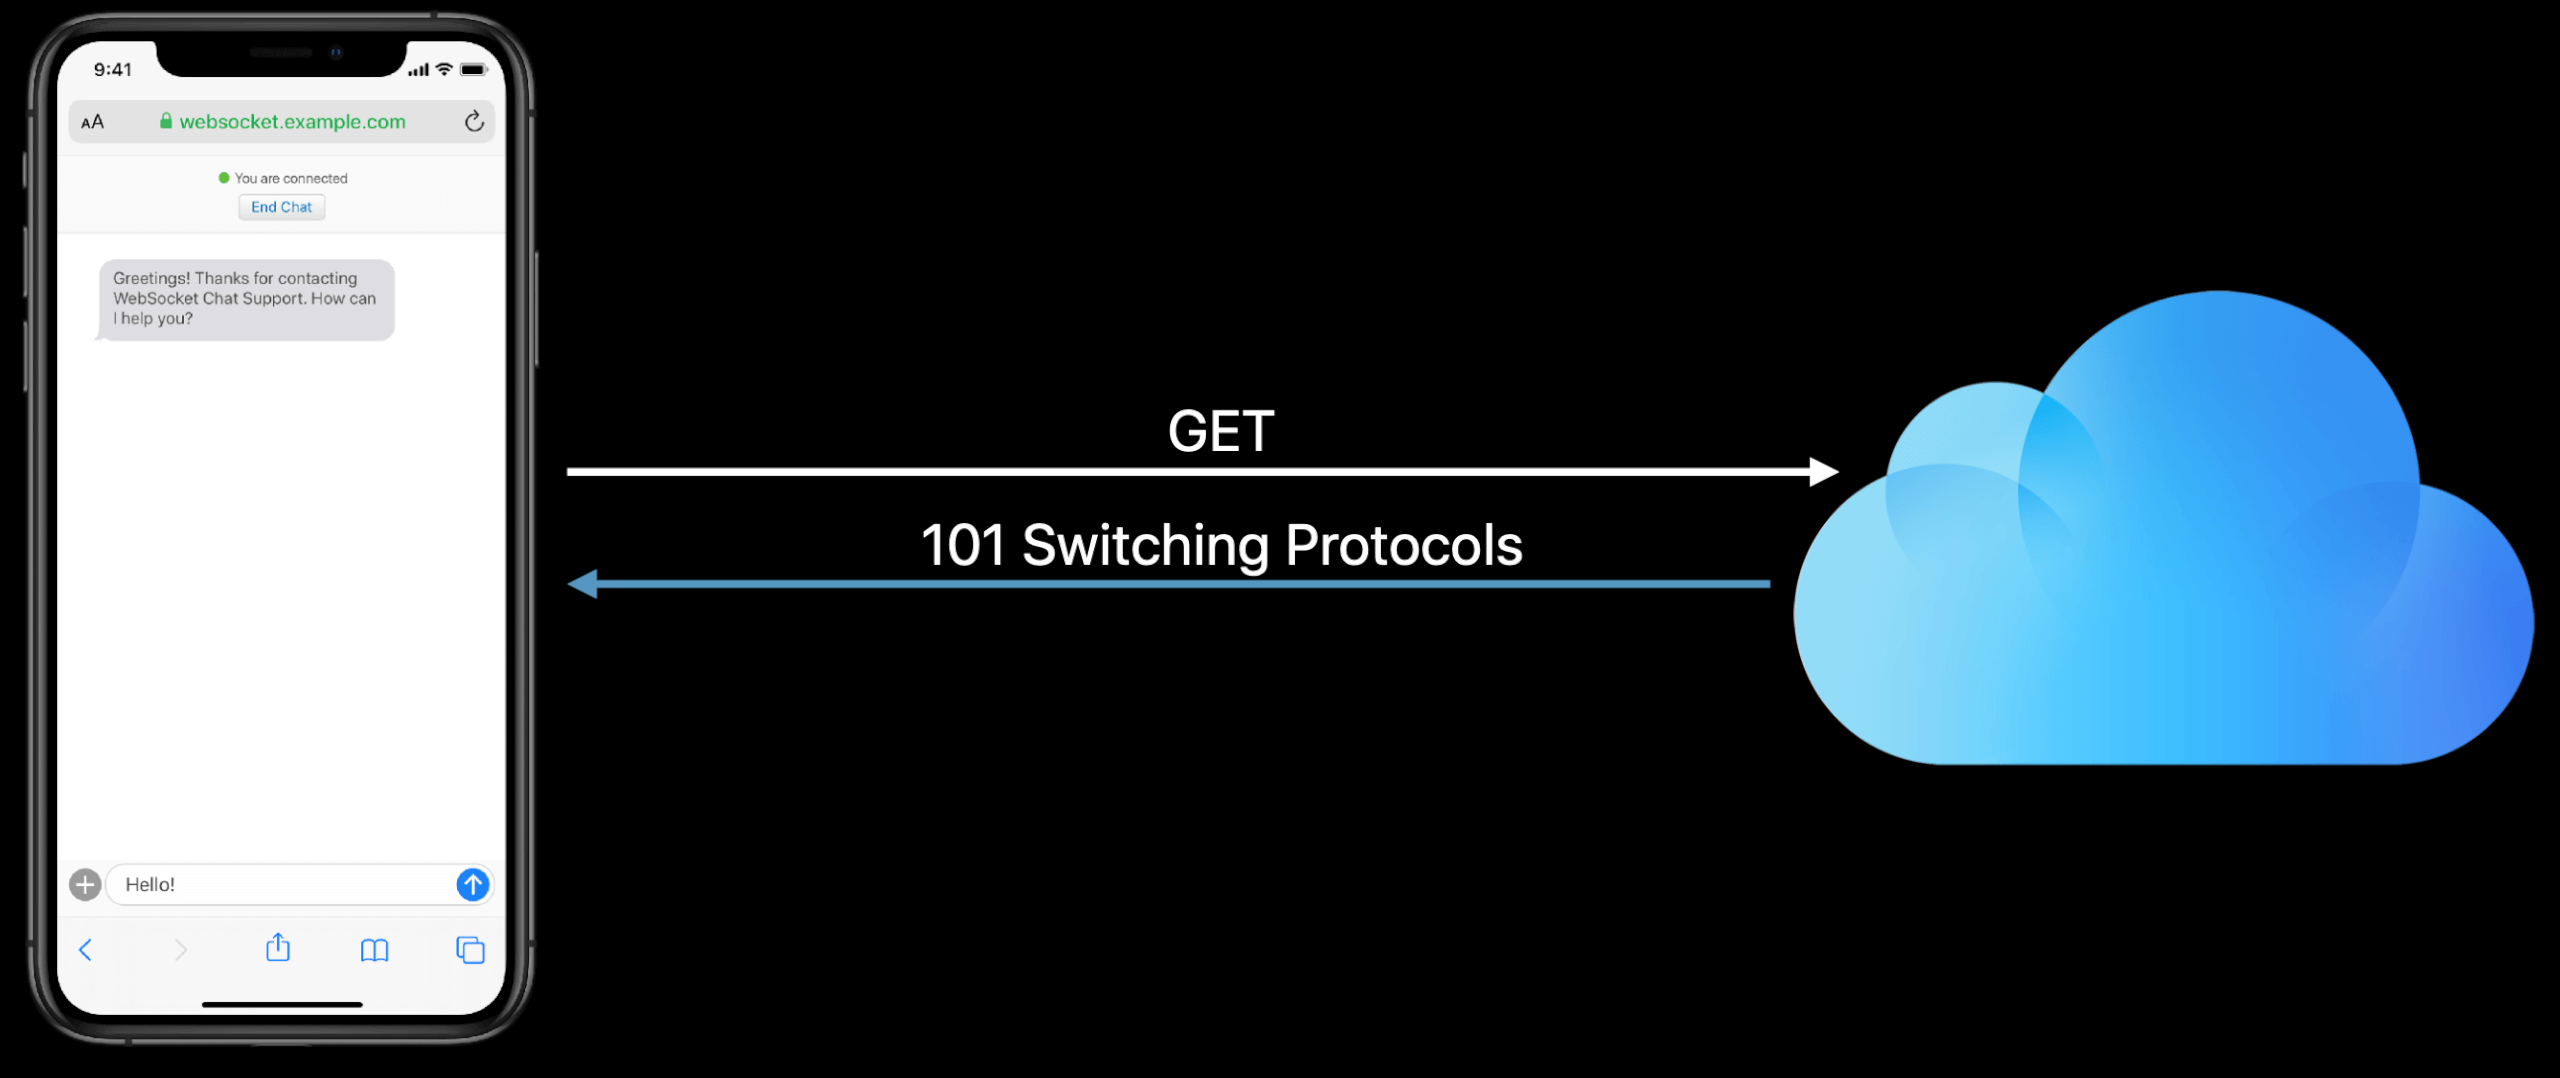
WebSocket works over the well-known HTTP ports and is fully compatible with the existing web infrastructure, allowing you to connect to proxies, CDNs, and firewalls.
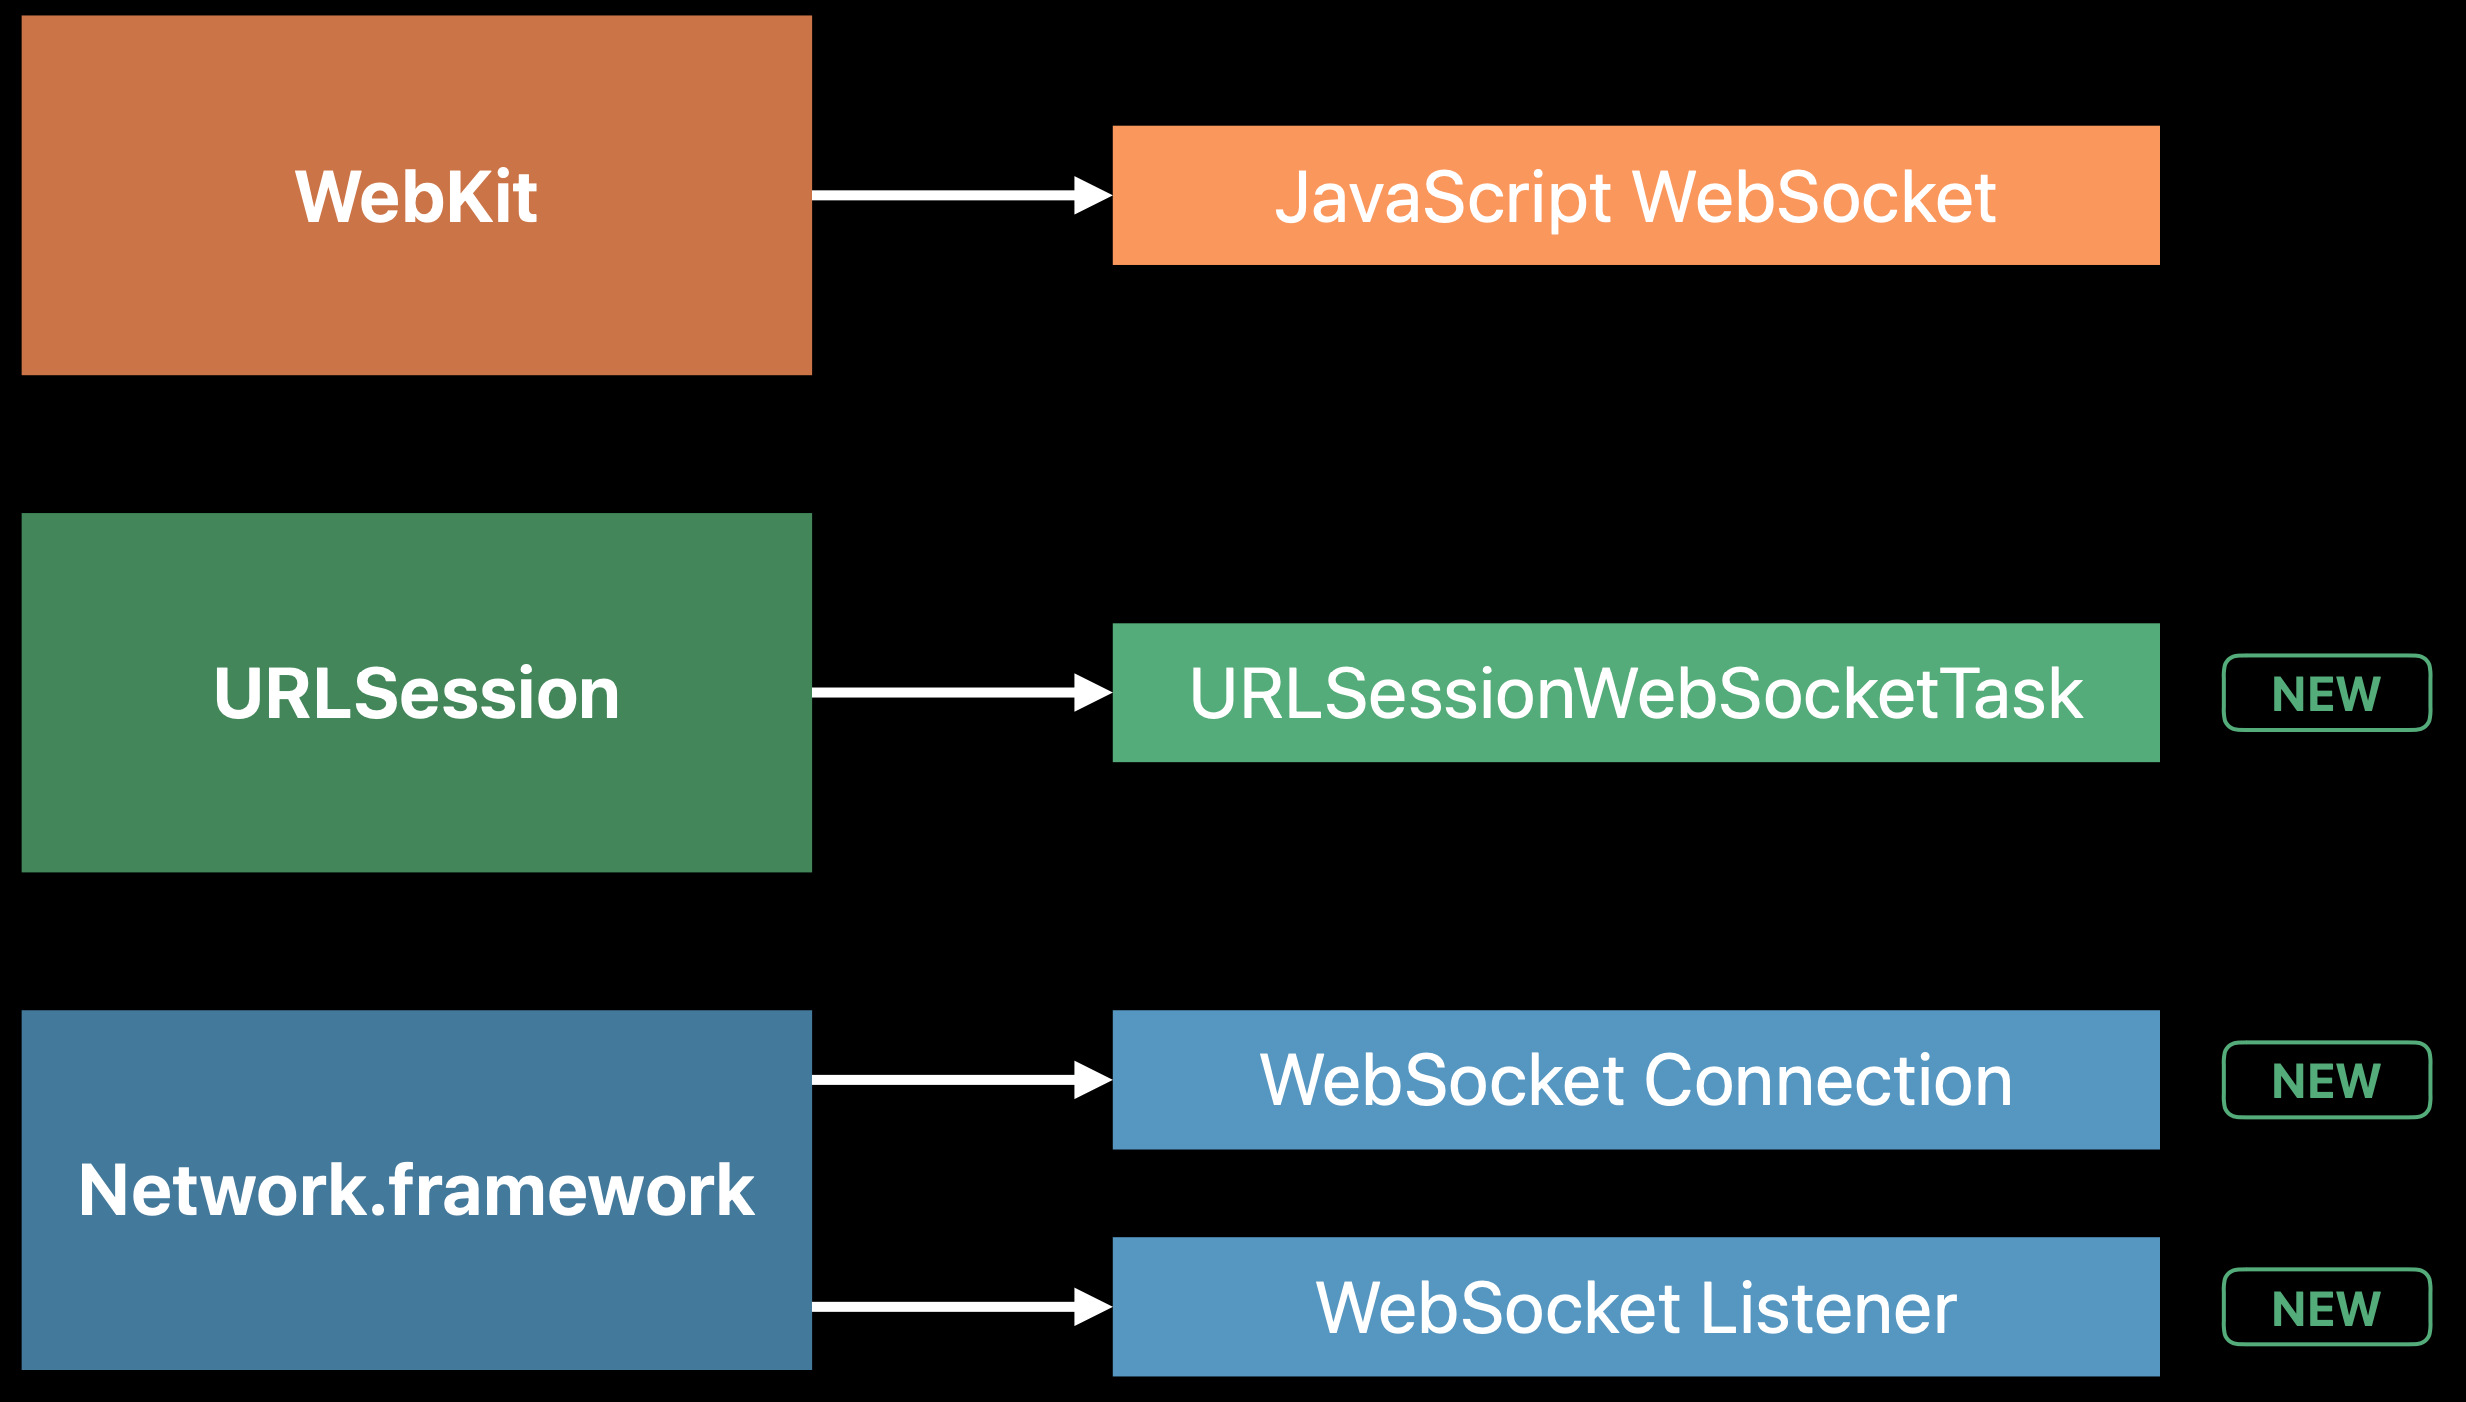
Historically, the WebSocket protocol has been available as a JavaScript API in web browsers, now we've decided to extend this API to our networking framework. This year we are excited to announce new URLSessionWebSocketTask API!
// Create with URL
let task = URLSession.shared.webSocketTask(with: URL(string: "wss://websocket.example")!)
task.resume()
// Send a message
task.send(.string("Hello")) { error in /* Handle error */ }
// Receive a message
task.receive { result in /* Handle result */ }
You can send data or string messages on the task. You can also receive messages on the task by passing a completion handler, which will be called asynchronously once we receive the entire message from the server.
The APIs available for you to add WebSockets to your apps today:
Cookie
HTTPCookieStorage is a container that manages the storage of cookies.
The persistent cookie storage returned by sharedHTTPCookieStorage may be available to app extensions or other apps.
Best Practices: Cookies, are not free and have a non-trivial cost in storing and looking them up.
- Cookies are attached to all the requests that match the domain and path attribute. Please use that attribute wisely to make sure cookies required by the servers are attached to your requests.
- Cooike can quickly increase your request size. Use of smaller cookies when possible, and delete those cookies you no longer need.
- Try to save some state on the server so you can reduce the number of client-side cookies.
Security: One thing we don't want to allow is for a website to set a cookie on the .com domain, which is then accessible to any other .com company. URLSession can now receive Public Suffix List updates over the air. This is important for determining where administrative boundaries occur in the namespace of the Internet. Better security for users against cookie attacks.
Caching
The URL Loading System caches responses both in memory and on disk, improving performance and reducing network traffic.
URLSessionConfiguration has a property called requestCachePolicy; Each URLRequest instance contains a URLRequest.CachePolicy object to indicate if and how caching should be performed.
Currently, only HTTP and HTTPS responses are cached.
Caching is a great way of reducing latency but it's important to note that caching might result in disk IO. Also, useProtocolCachePolicy caches HTTPS responses to disk, which may be undesirable for securing user data. Consider adopting the delegate method to decide what resources should be cached:
func urlSession(_ session: URLSession, dataTask: URLSessionDataTask,
                willCacheResponse proposedResponse: CachedURLResponse,
                completionHandler: @escaping (CachedURLResponse?) -> Void) {
    if proposedResponse.response.url?.scheme == "https" {
        let updatedResponse = CachedURLResponse(response: proposedResponse.response,
                                                data: proposedResponse.data,
                                                userInfo: proposedResponse.userInfo,
                                                storagePolicy: .allowedInMemoryOnly)
        completionHandler(updatedResponse)
    } else {
        completionHandler(proposedResponse)
    }
}
For servers, please consider using cache control headers Cache-Control: no-store to decide what resources should be cacheable.
URLCache: An object that maps URLRequest objects to CachedURLResponse objects. URLCache is thread safe.
NSURLCache *URLCache = [[NSURLCache alloc] initWithMemoryCapacity:4 * 1024 * 1024 diskCapacity:20 * 1024 * 1024 diskPath:nil];
[NSURLCache setSharedURLCache:URLCache];
Statistics
Another evolution to the URLSession API is the addition of network statistics.
urlSession(_:task:didFinishCollecting:) tells the delegate that the session finished collecting metrics for the task.
URLSessionTaskMetrics:
taskInterval: DateIntervalredirectCount: InttransactionMetrics: [URLSessionTaskTransactionMetrics]- Request and Response
- Protocol and Connection
- Load Info
- Connection Establishment and Transmission
- Address and port
- TLS version

Wi-Fi Assist
We have Wi-Fi Assist since iOS 9 (2015). Wi-Fi Assist is triggered whenever we are in a marginal Wi-Fi scenario, which means the signal strength of Wi-Fi is very low. Whenever iOS is detecting this, it will play a contest between Wi-Fi and cellular data. So when you are creating a new connection, we will first attempt to create the connection on Wi-Fi. And shortly after that where if this connection hasn't been established, we will go on and create a connection over cell so that if cellular data wins, we will start using the cellular link.
In iOS 13, even when a flow has already been established on Wi-Fi and has started to exchange data, if later on the signal quality is reducing, we are able to move the next request over to cell.
If Wi-Fi associated once again, You get automatic reliable network fallback if you use URLSession and CFNetwork-layer APIs. What you can do is pay attention to the better route notification so that you migrate back to Wi-Fi when it's available.
func urlSession(_ session: URLSession, betterRouteDiscoveredFor streamTask: URLSessionStreamTask) {}
Multipath TCP
Now in iOS 11, we are adding Multipath TCP (MPTCP) into Wi-Fi Assist. You will need to add the capability Multipath in Xcode.
Multipath TCP is the protocol that has been designed specifically for mobile devices. It is specified by the IETF as a standard (March 2020, RFC 8684), and it provides the exact same service as TCP.
What it does on top of TCP is that it provides a way to seamlessly move traffic from the Wi-Fi interface over to the cellular interface whenever it realizes that Wi-Fi is not good enough, and it also allows to move the traffic back again so that your application is not consuming cellular data. It is also able to choose the best interface if you have a latency-sensitive and interactive flow.
If you are building your application on top of the URLSession API, Multipath TCP sits just below this. It creates the so-called TCP subflows. Those TCP subflows, one for each interface are actually full-fledged TCP connections, and MPTCP is in charge of making sure that the data gets sent over either of them.
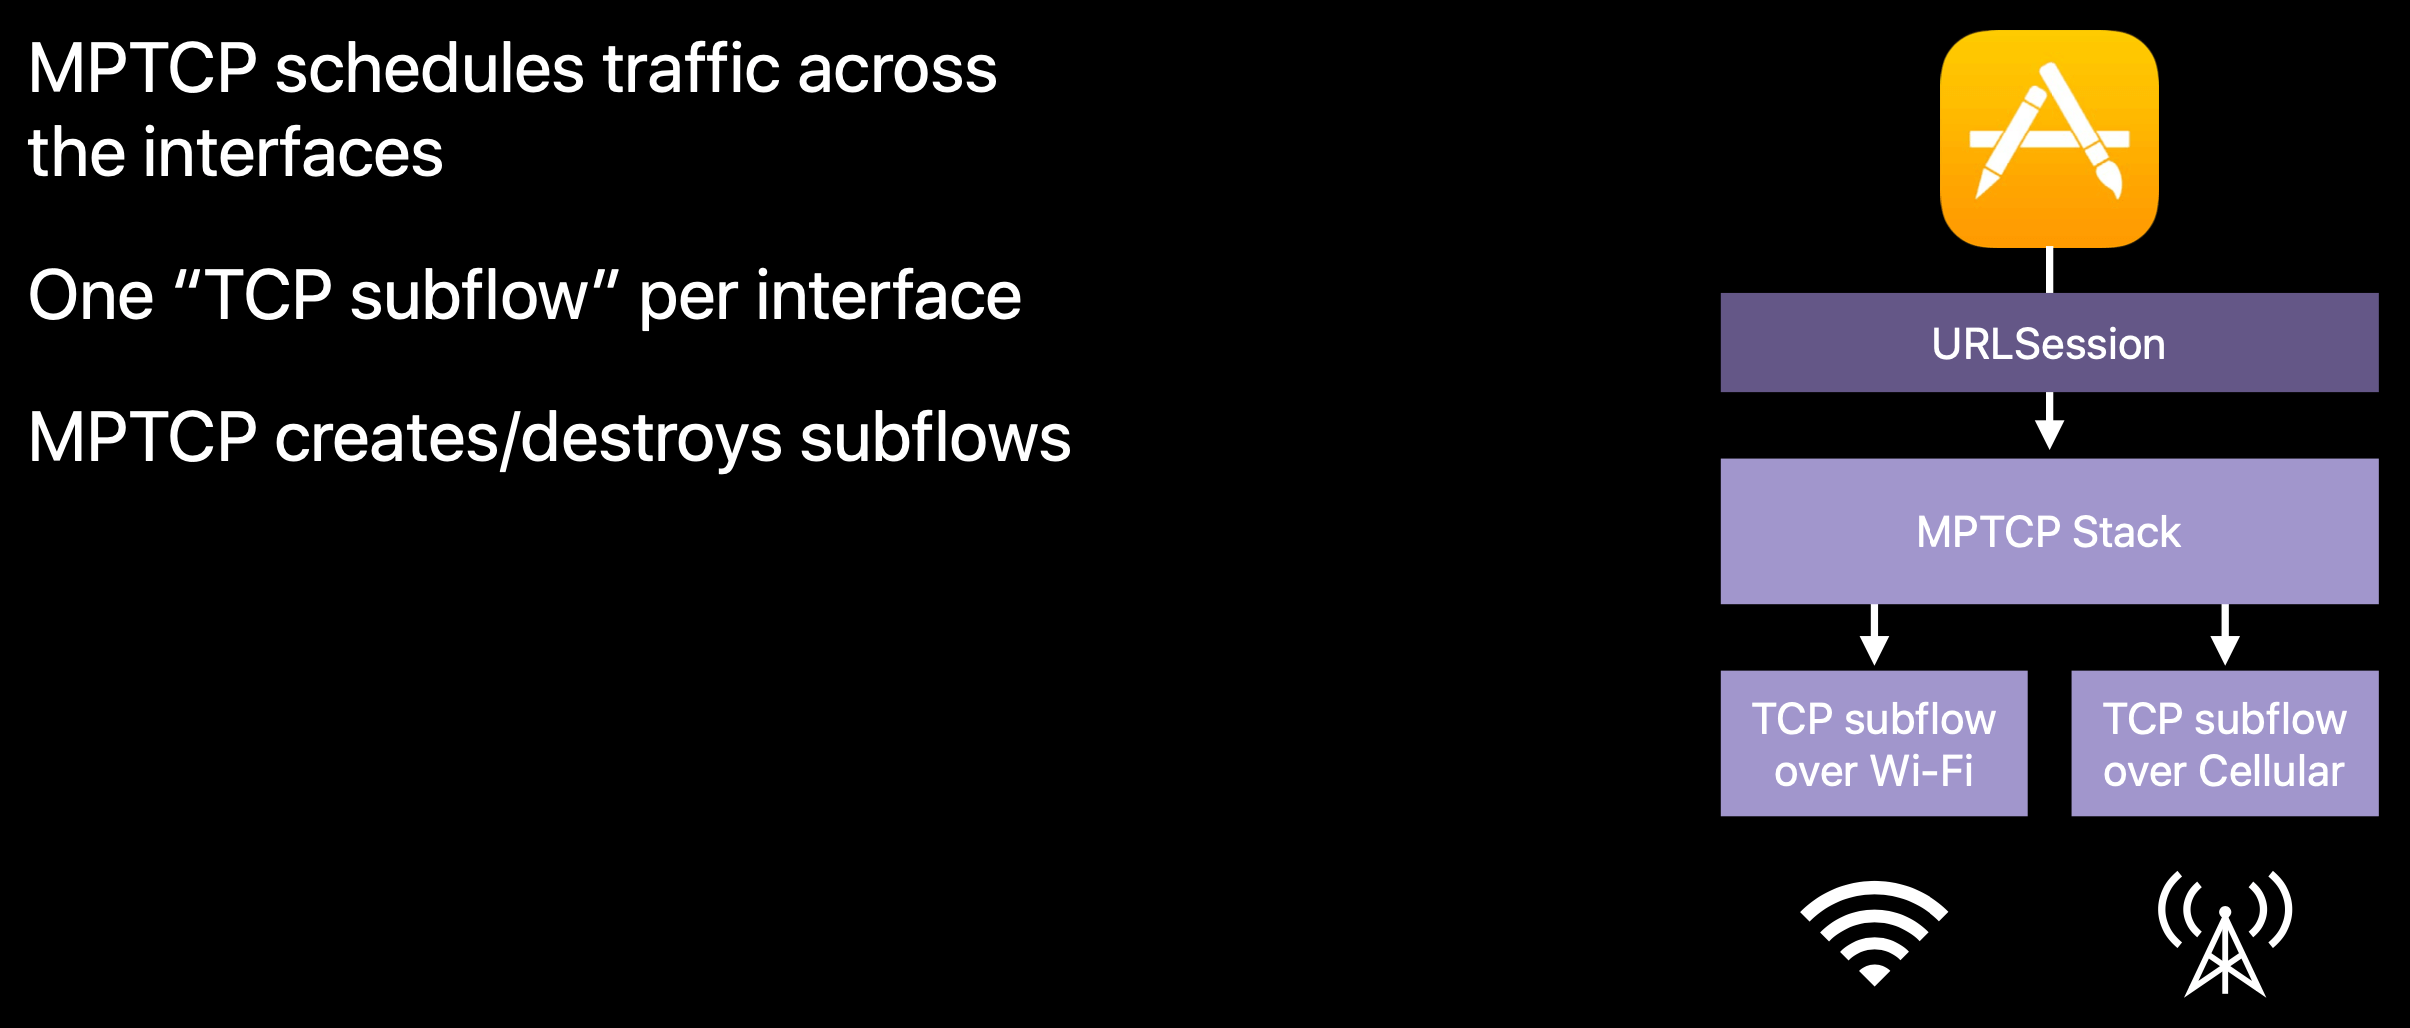
You will need to update or change your server infrastructure to start supporting Multipath TCP.(咨询你的服务器供应商是否支持这个协议;或者更新服务器 Linux 内核以支持这个协议,AWE/GCE 都已经有可用的镜像)
We are exposing two types of different services using MPTCP.
The first one is the handover mode which provides a high reliability for your long-length, hard-to-recover connections. In Wi-Fi Assist we have limits that try to limit the amount of data that we are sending on the cellular link. So we encourage you to use the handover mode only for low volume connections.
The second is the interactive mode, this one provides a low latency response for your interactive and latency sensitive connections. Whenever you're using the interactive mode, we will bring up both Wi-Fi and cell right away, even if Wi-Fi is in a good state, just like what we are doing on Siri.
Network Service Type
You might be familiar with five QoS classes associated with dispatch queues and Operation objects. URLSession is QoS-aware which means it will capture the QoS off the queue on which you call task.resume(). And all the messages that it sends to your delegates will respect this QoS.
For example, if your app wants to fetch some data which is not time critical, consider resuming that task on a queue which has background QoS to make sure this task does not contend for CPU with other higher priority work that your app might be doing.
Starting in iOS 5 we had the networkServiceType API allowing you to classify your network traffic that helps the system prioritize the data leaving the device. It's a way expressing whether you want low throughput and low latency or high throughput and moderate latency.
| Service Type | Availability | Description |
|---|---|---|
| default | iOS 4.0+ | standard network traffic |
| video | iOS 5.0+ | video traffic |
| voice | iOS 5.0+ | voice traffic |
| background | iOS 5.0+ | background traffic, e.g. discretionary download |
| avStreaming | iOS 7.0+ | streaming audio/video data |
| responsiveAV | iOS 7.0+ | responsive (time-sensitive) audio/video data. |
| callSignaling | iOS 10.0+ | network traffic that establishes, maintains, or tears down a VoIP call |
| responsiveData | iOS 12.0+ | This service type’s priority is higher than 'default'. Use this service type for interactive situations where the user is anticipating a quick response, like instant messaging or completing a purchase. |
voice > callSignaling > video > responsiveData > default > background
笔记:对应用内的不同网络请求区分服务类型。大部分的网络请求都可以归类到 default 和 background。其它的情况例如,对需要长时间保持连接的“心跳”服务,可以设置一个低延时低吞吐量的服务类型,操作系统在网络层、链路层做了一系列的工作,提供我们想要的服务。
IP-Layer DSCP QoS Marking: In August of 2015, Apple and Cisco announced a partnership to create a fast lane for iOS business apps. With iOS 10 we are introducing new Quality of Service features to optimize enterprise iOS apps with Cisco networks. Traffic marked with the network service type property will maintain this tag across all the hops when on a Cisco Fast Lane network. Recognizes Cisco fast lane network and sets Differentiated Services Code Point (DSCP) marking appropriately. Useful for: Telephony apps; Backup and other bulk upload apps.
Link-Layer QoS Marking: Controls packet queuing and scheduling on network interface. When you set these options, a couple of things happen. On the device itself, there are multiple outband queues, and the type of service you set for your traffic controls which queue it uses. On Wi-Fi interfaces, it will also set the wireless multi-media access category.
ECN
On any path between two devices there will be one link that has the lowest throughput, that's the bottleneck link. The job of the transport protocol is to work out its share of the bottleneck link.
没有使用 ECN 之前,TCP 会不断增加拥塞窗口大小去尽可能利用更多的带宽、然后发生丢包、减小拥塞窗口大小并重传,如此循环。一直以来这个机制都运行得很好。Historically, packet loss and retransmission has not caused big problems for the traditional networking applications like file transfer and sending email. But when you are watching streaming video, you really want the packets come in order. So in-order delivery has become a much more pressing problem.
Dropping packets is an expensive way to signal congestion. Marking packets “Congestion Experienced” is less destructive.
CoDel (pronounced "coddle") for controlled delay is a scheduling algorithm designed to overcome bufferbloat in networking hardware, such as routers. CoDel (or similar Smart Queue Management) plus ECN does helps to reduce network delay and packet loss!
It is in Linux and turned on by default, more than half of the top million web servers in the world already support ECN. ECN now enabled in OS X 10.11 and iOS 9 for all TCP connection.
One common misunderstanding about ECN is that it has to be supported end to end on the entire path across the internet, and that's not true. There is only one place that needs to support ECN for you to get the benefit. For your residential network access, you may have paid for 20 or 50 megabits of service and your ISP artificially throttle your data to the rate you've paid for. So the bottleneck is always the one that exists at your ISP's headend equipment. That is the only place on the path that needs to mark congestion.
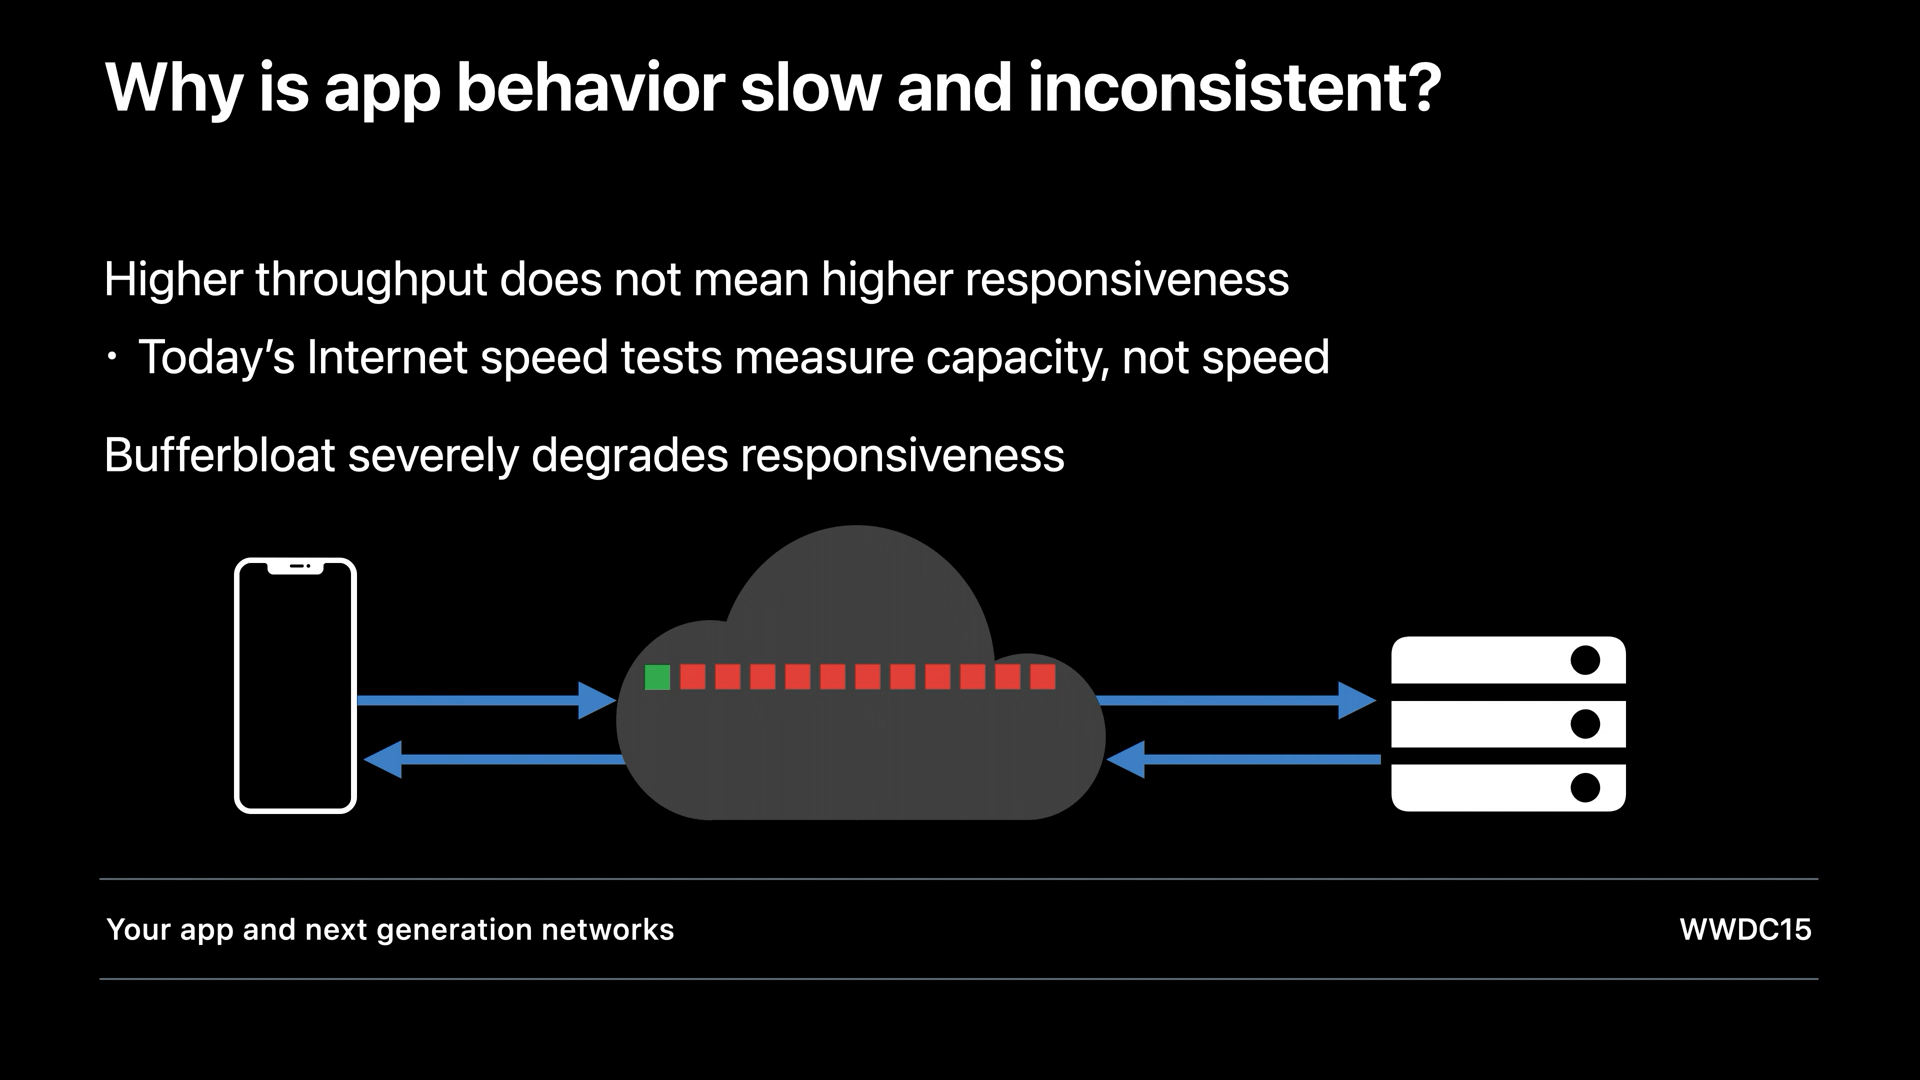
Packets spend a lot of time sitting in excessively large buffers in the network. This phenomenon of excessively large buffers is called bufferbloat.
There's software and hardware processing time. As CPUs get ever faster, this processing time continues to shrink.
There's the actual data transmission time. As data rates increase from kilobits to megabits to gigabits per second, transmission time continues to shrink.
Then there's the time delay due to buffering in the network. We're working with the industry on reducing these delays.
But there's always going to be the speed-of-light signal propagation delay. Back in the 1990s, the Stanford-to-MIT ping time, round-trip, coast-to-coast, across the United States, was already under 100 milliseconds. That's pretty close to the speed-of-light limit already, so it's not going to get much better.
As an app developer, there's not a lot you can do to improve the underlying network round-trip time, but you can control how many round trips your app requires. Every developer who wants great network performance should pay attention to the number of round trips. (HTTP3 + QUIC saves round trips against TCP + TLS1.2!)
TCP_NOTSENT_LOWAT
Screen Sharing problem. The default socket send buffer at that time was 120 kilobytes, my throughput was about 50 kilobytes a second (DSL access network was very slow at upstream direction), so that's about 2.5 seconds delay I was seeing.
setsockopt(skt, IPPROTO_TCP, TCP_NOTSENT_LOWAT, &threshold, sizeof(threshold));
When you set that socket option, the socket send buffer remains unchanged (in this example, 128kB). The difference is that your runloop will not report the socket as being writable until the unsent data has drained to some fairly low threshold, typically 8 or 16 kilobytes. When the socket becomes writable, you then write a single useful atomic chunk into the buffer.
这个选项对屏幕共享这类实时应用非常有用!在这个案例中,上行带宽很小、大量数据停滞在 TCP send buffer 中等待传输,通过设置这个选项,应用层就不会每产生一个屏幕帧就往 socket 传递数据、塞满缓冲区,而总是等待缓冲区相对较小时、再把最新的屏幕帧传给 socket,至于中间这些帧怎么办呢?直接丢掉就可以了,反正我们并不在乎!
It's available in Linux too because this option applies at the source of the data on the sending side. So for those of you who are running Linux servers, this option is available too. This option will be turned on automatically for all connections using the higher layer URLSession and CFNetwork APIs.
But most servers on the internet run on Linux and use BSD Sockets. Contact your server operators to ensure that they are using the TCP not sent low watermark socket option to reduce the delays at the source.
TCP Fast Open
TCP Fast Open combines the connection setup and the data exchange into one packet exchange.
This is not turned on by default. The reason is, if one of those packets is delayed and shows up much later, then to the server that looks like a perfectly valid TFO request, and whatever the operation was, it will do it again. If that operation was sending you a JPEG image, doing it twice may be no big deal. If that operation was sending you a pair of shoes from Zappos, then doing it twice might not be what you want.
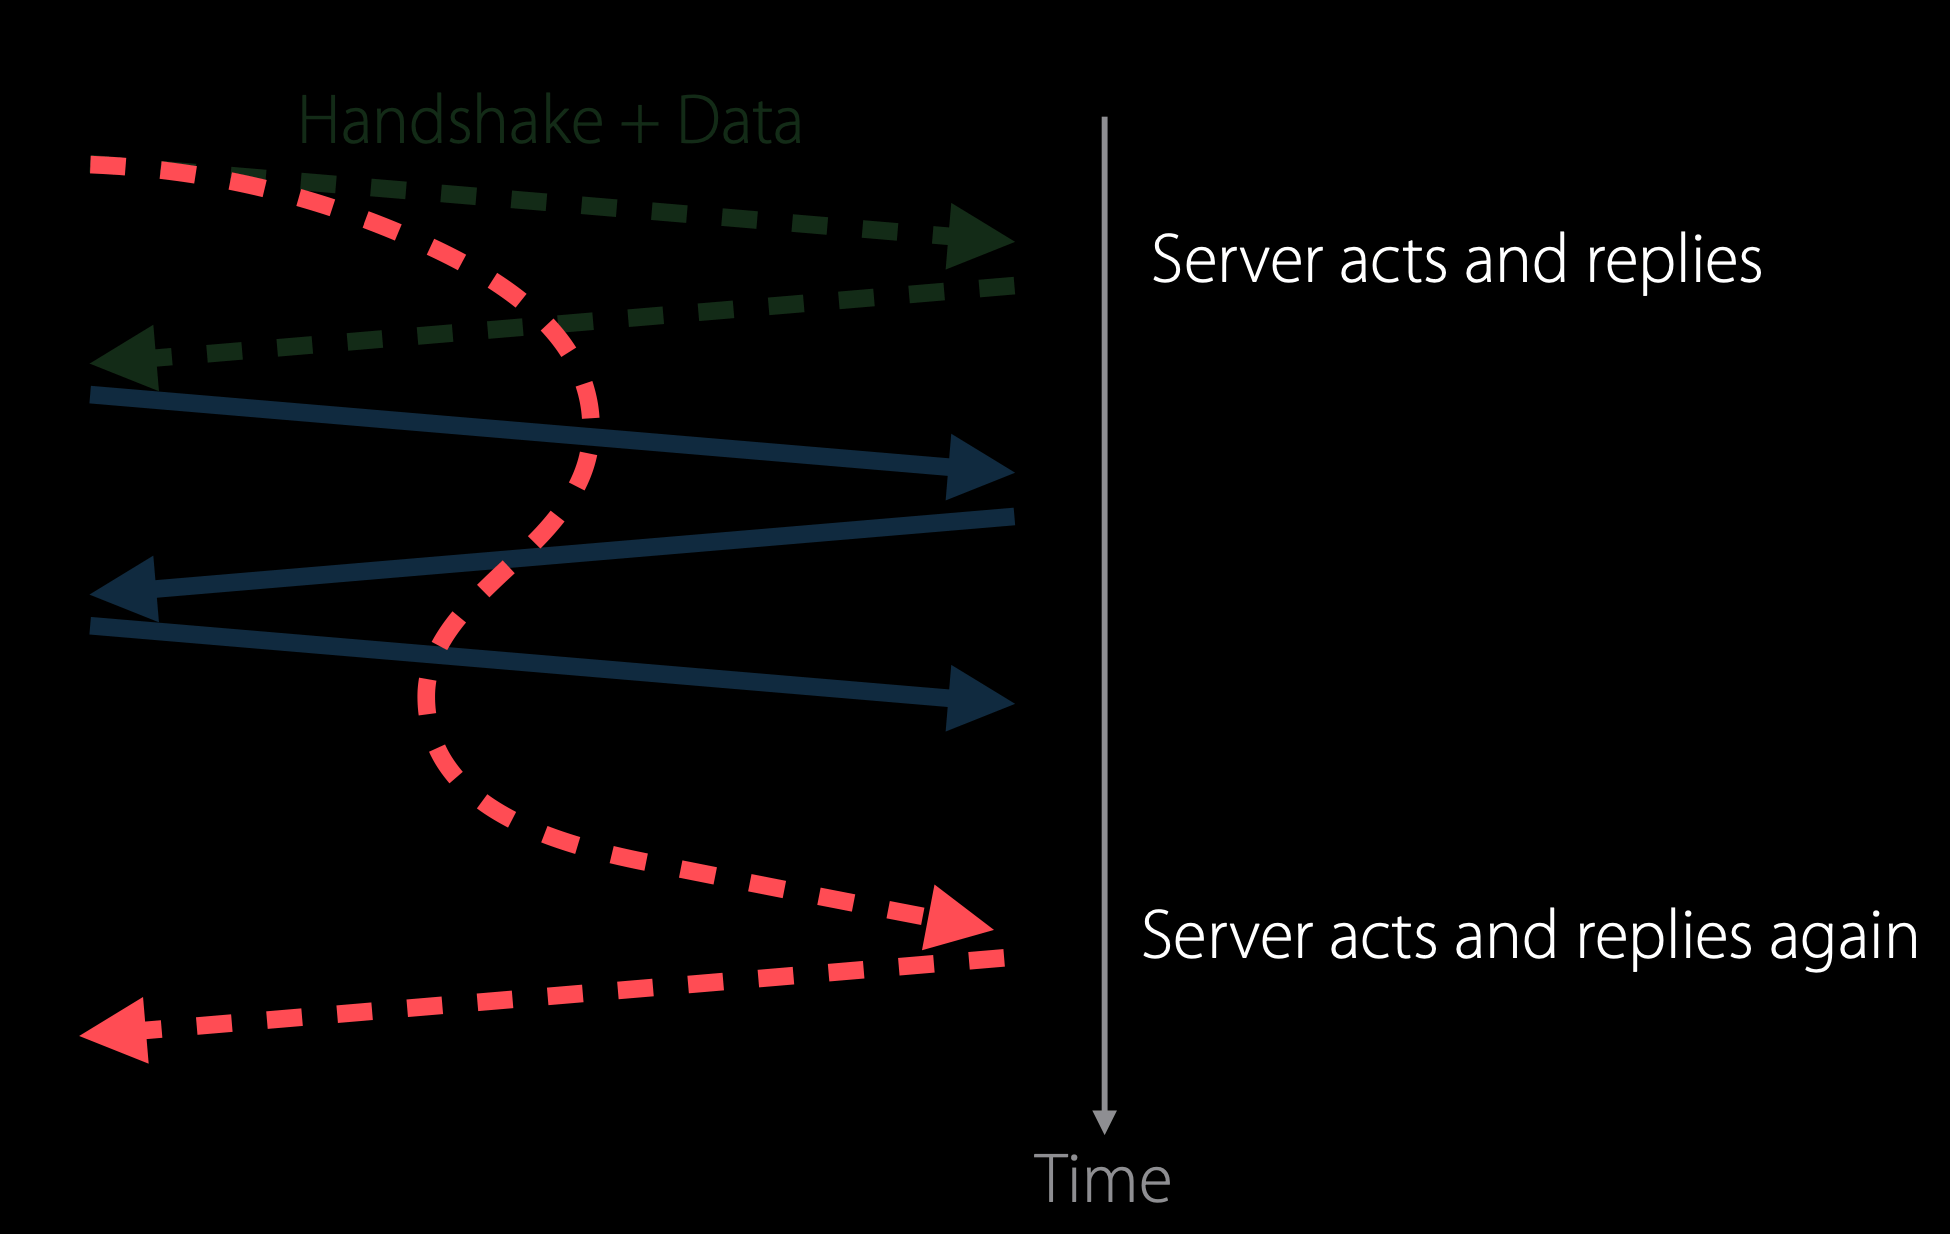
Reduce network delays for your app - WWDC 2021
TCP Fast Open is supported in Network framework and Sockets.
To use it with NWConnection, there are two options:
- First, your app provides the initial data to be sent out with the handshake.
- Second, send the TLS handshake message as the initial data.
When using TCP Fast Open, you have to be careful that you only send idempotent requests with the handshake. Idempotent basically means that the data is safe to be replayed over the network.
Supporting IPv6
Test IPv6: https://test-ipv6.com/index.html.zh_CN
Test IPv6 network: Mac - System Preferences - Sharing - Internet Sharing - Create NAT64 Network.
We realized that we were running out of IPv4 addresses way too fast. So we added a NAT in the middle. This works, but the larger scale NAT device is both expensive and fragile. LinkedIn reports that the page load time over IPv6 is 10 to 40 percent faster than over IPv4. They theorize that that is due to less overhead setting up connections through overloaded large scale NATs.
Subscribers are now connecting to cellular data networks over IPv6. The cellular carriers now have to support both IPv4 and IPv6 in their network. But what they really want to do is to drop IPv4 from their access network. So now they have deployed DNS64 and NAT64 in their network, and the way it works is when the application on the client device makes a hostname query to get the IPv6 address for an IPv4-only server, DNS64 and the network synthesizes an IPv6 address and gives it back to the client device. Now that the client device has this IPv6 address to work with, it can start writing traffic to the network.
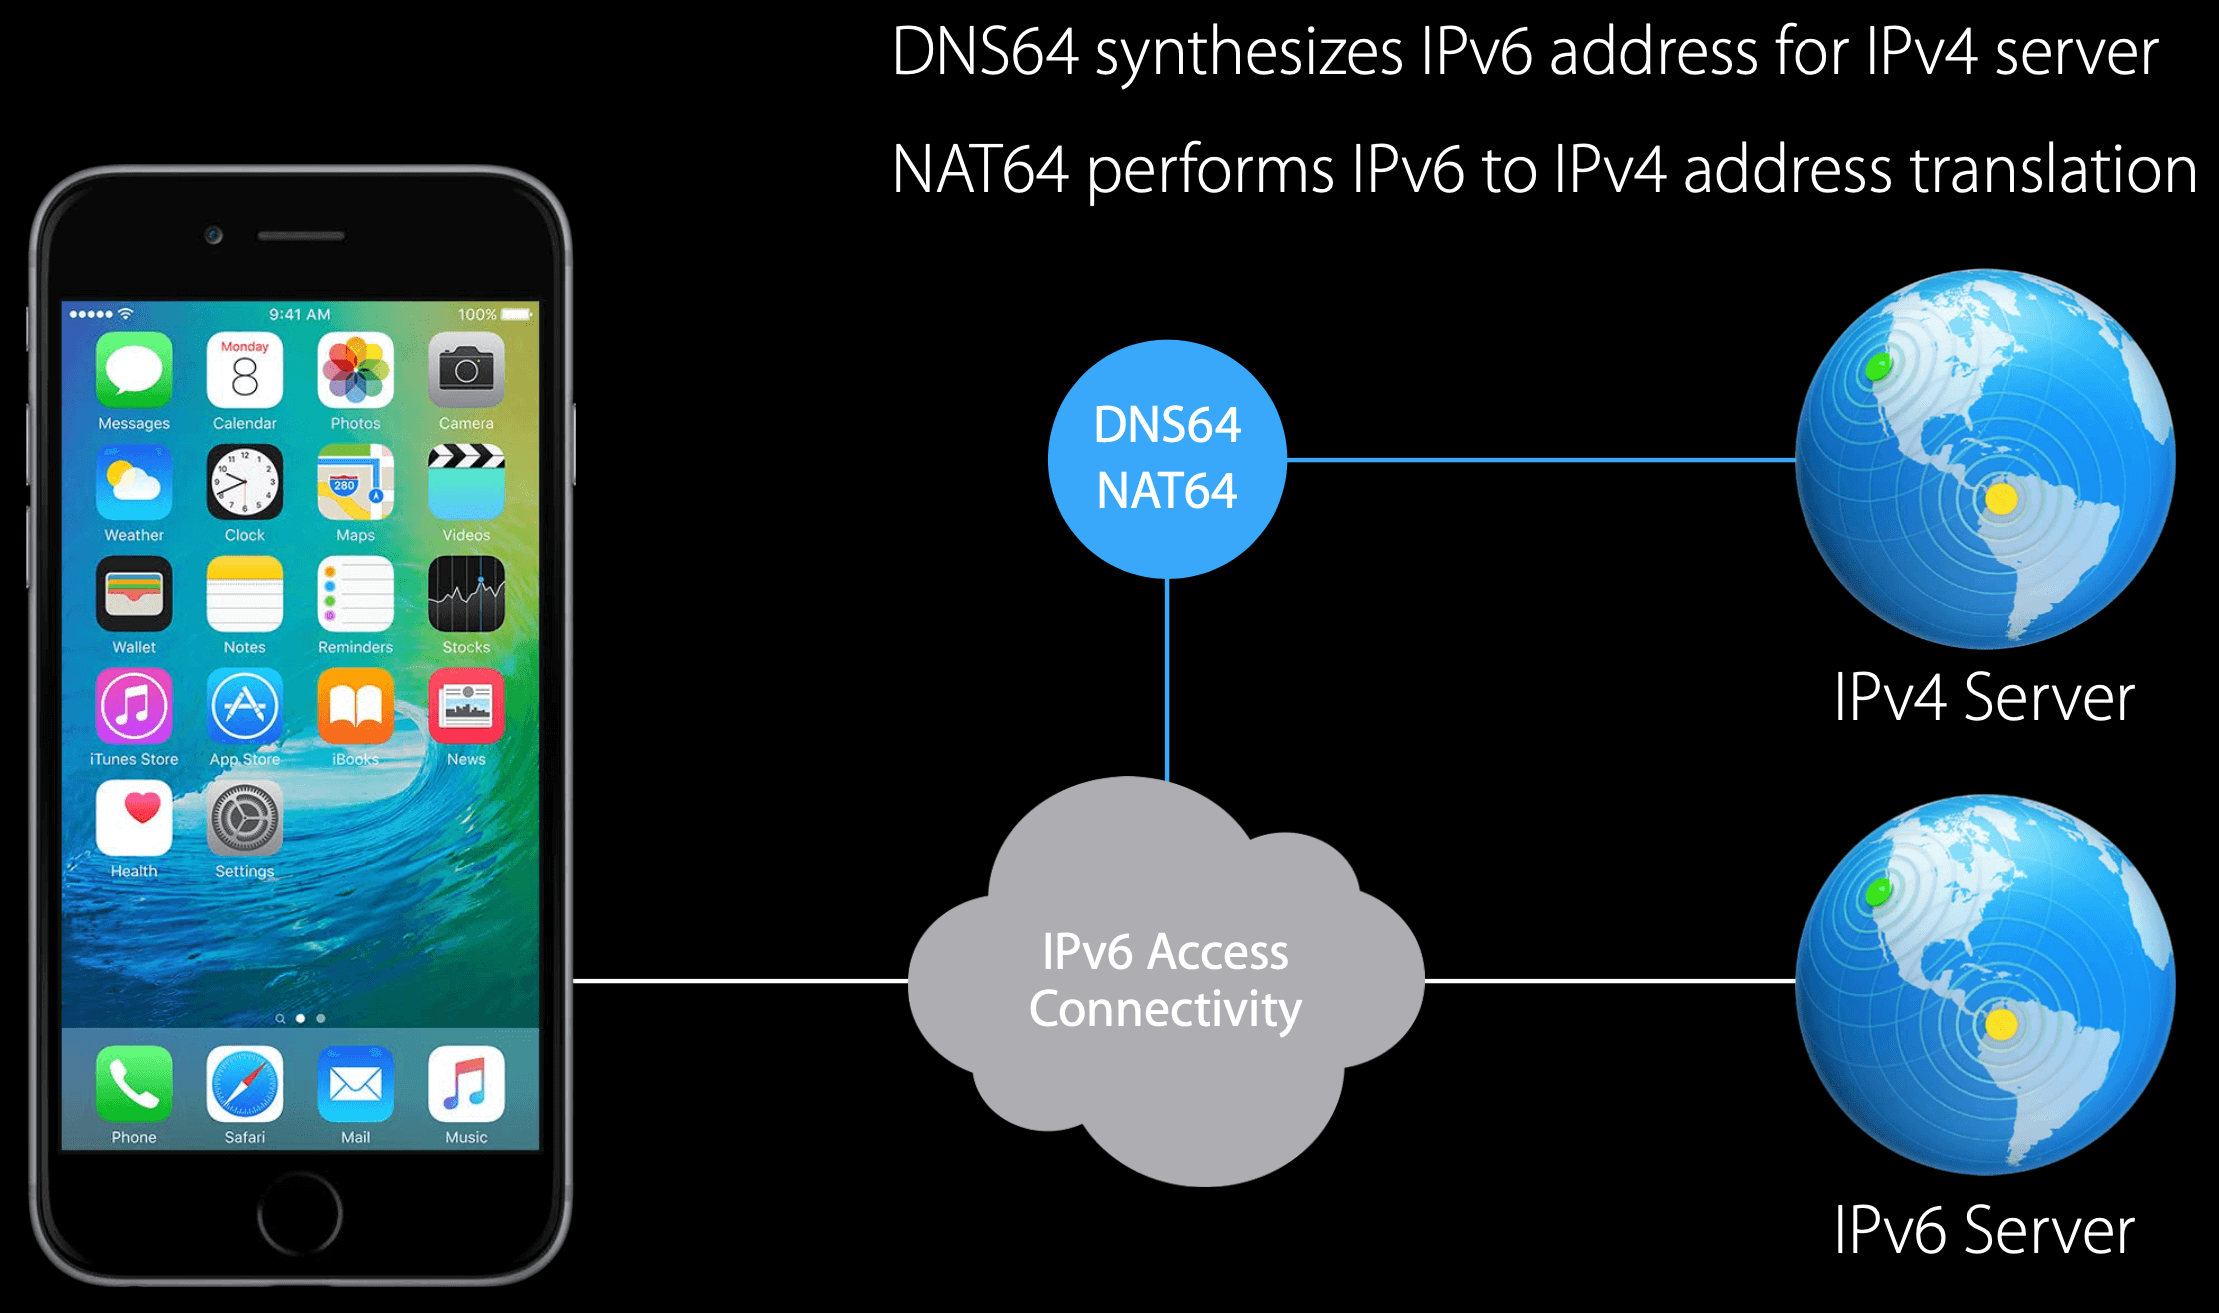
If you are working with an IPv4 address literal, new in OS X 10.11 and iOS 9, higher-layer networking frameworks (URLSession and CFNetwork-layer APIs) will works in even in IPv6-only network! The OS synthesizes IPv6 address for you. BUT, using literal IPv4 addresses will prevent direct IPv6 connection to a dual-stack server.(服务器同时支持 IPv4 和 IPv6,使用字面 IPv4 地址会连接到服务器 IPv4 的服务)
We recommend you use hostnames. That way you can get a v4 address on a v4 network and a v6 address on a v6 network.
Optimize for 5G networks
Each step in network evolution has brought dramatically new capabilities to mobile devices.
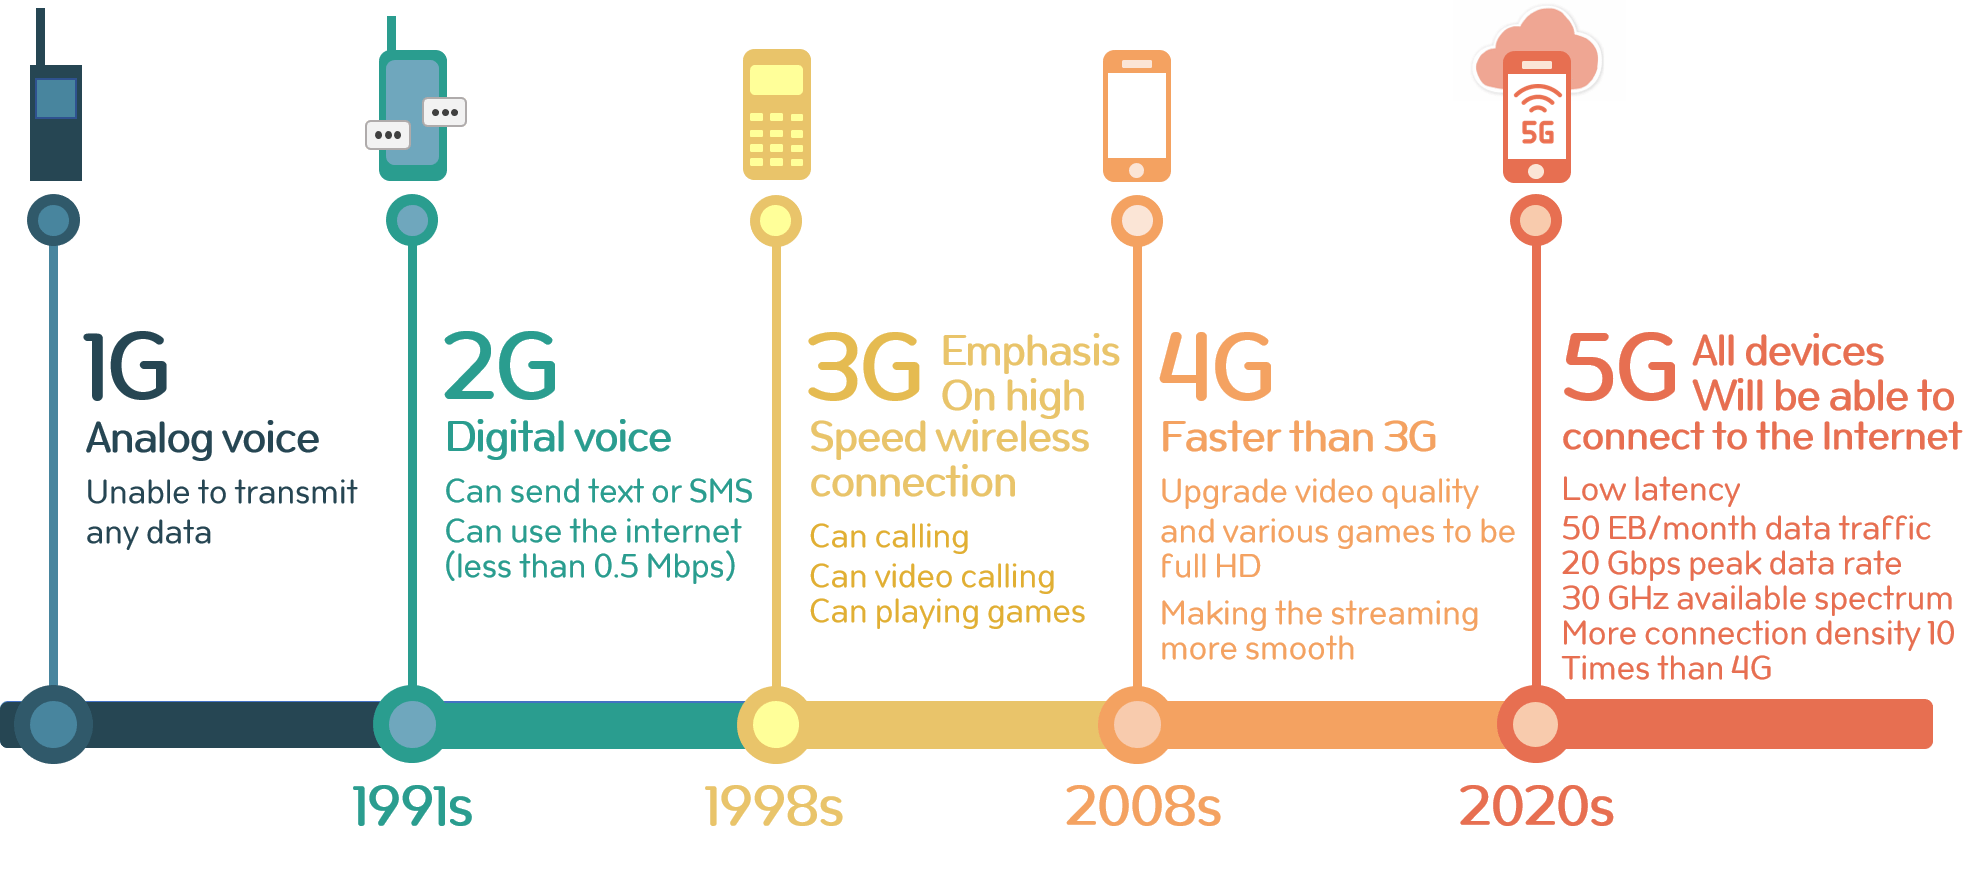
5G come primarily in two varieties, commonly referred to as Non-Standalone (NSA) and Standalone (SA).
Non-Standalone is built on the existing LTE core and can use both LTE and 5G links to schedule traffic, operates at frequencies below 7 GHz, and includes support for millimeter wave.
Standalone is built entirely on the new 5G core, also operates at frequencies below 7 GHz, and includes support for millimeter wave, and delivers improved latency performance over LTE.
We pick the best network using two techniques called "Automatic Switch to 5G" and "Smart Data Mode". Both technologies look at a combination of performance, security, and power characteristics to enable the best wireless connection for your app.
Best Practices:
- With the system choosing the best network on your behalf, you should stop considering the network type.
- Use our frameworks to take full advantage of 5G. (AVFoundation, CallKit, URLSession, Network.framework)
- Tune your application for constrained and expensive paths. "Allow More Data on 5G" indicating an inexpensive path, similar to Wi-Fi; "Standard mode" is usually considered as expensive; and "Low Data Mode" is considered constrained.
AVURLAssetAllowsCellularAccessKey
AVURLAssetAllowsConstrainedNetworkAccessKey
AVURLAssetAllowsExpensiveNetworkAccessKey
Network Security
WWDC 2017 - Your Apps and Evolving Network Security Standards
App Transport Security
App Transport Security is a new feature from Apple in iOS 9. ATS places restrictions on TLS versions, cipher suites used, certificate trusts, and certificate key sizes that are used in that transaction.
CFNETWORK_DIAGNOSTICS=1 to help you to find out TLS issues in your app. (Xcode -> Edit Scheme -> Arguments -> Environment Variables)
There is a command line tool on macOS called nscurl.
Certificate Revocation
The most common reason for revocation of certificate is the user no longer being in sole possession of the private key (e.g., the token containing the private key has been lost or stolen).
In cryptography, a certificate revocation list (or CRL) is "a list of digital certificates that have been revoked by the issuing certificate authority (CA) before their scheduled expiration date and should no longer be trusted".
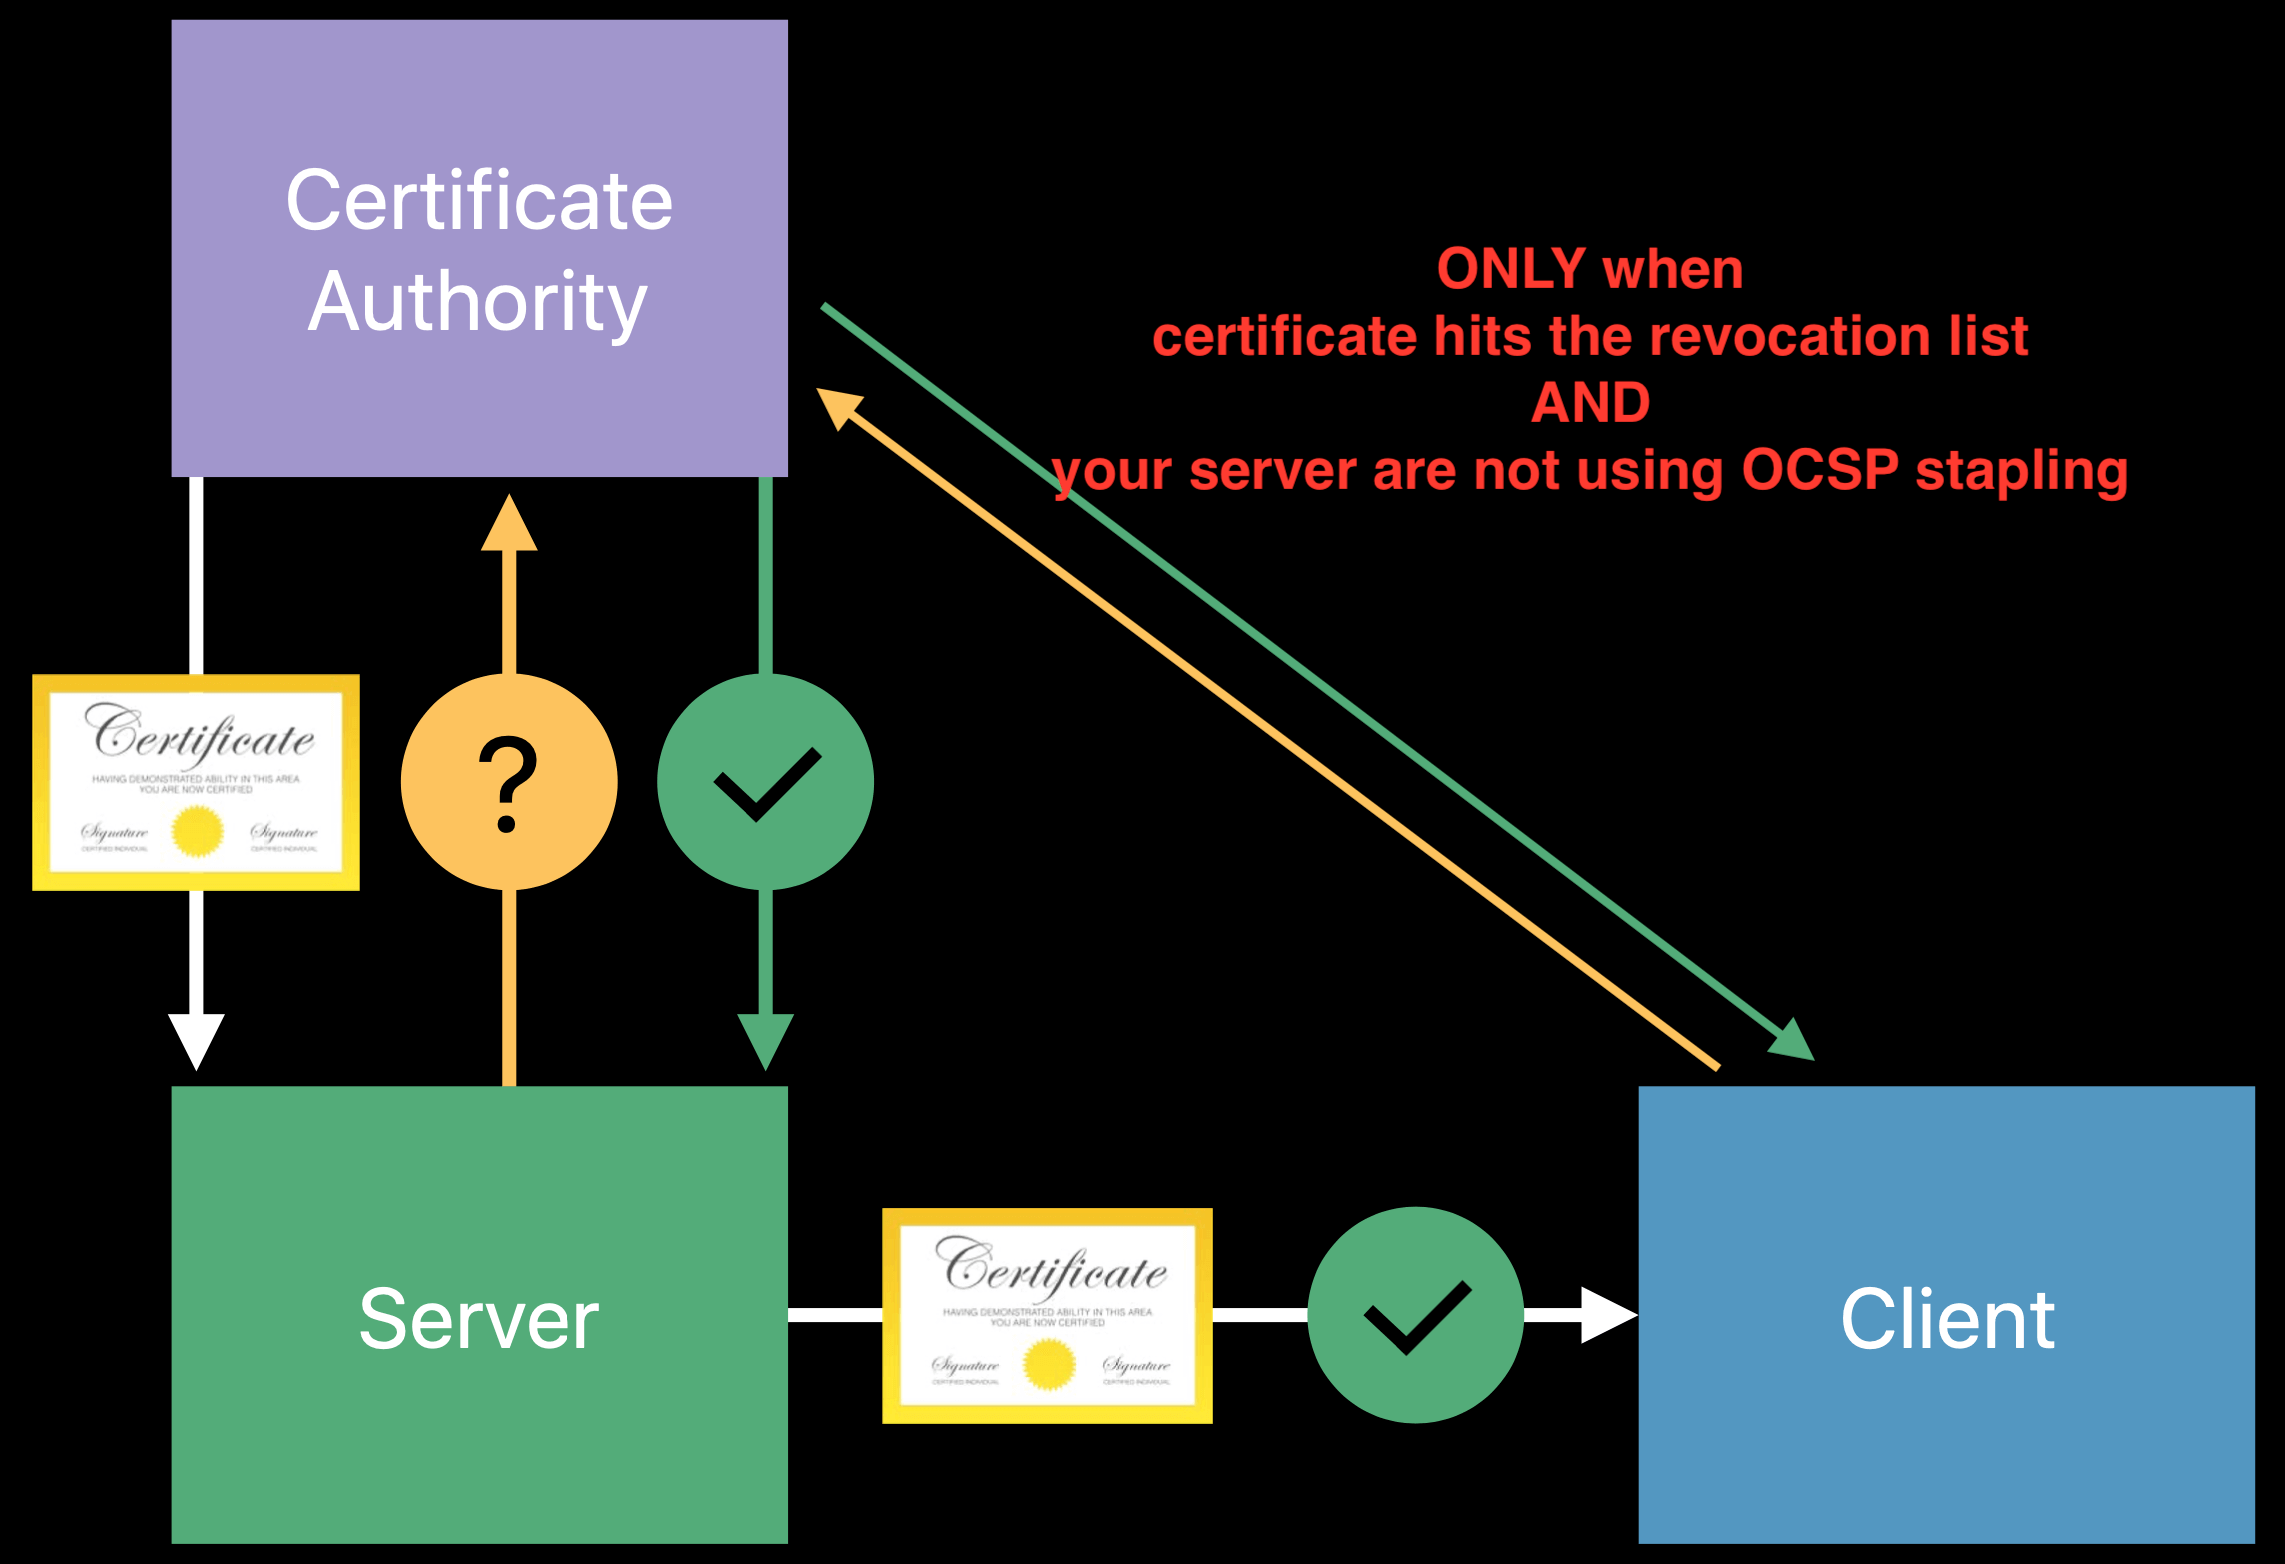
The Online Certificate Status Protocol (OCSP) stapling is a standard for checking the revocation status of X.509 digital certificates. It allows the presenter of a certificate to bear the resource cost involved in providing OCSP responses by appending ("stapling") a time-stamped OCSP response signed by the CA to the initial TLS handshake, eliminating the need for clients to contact the CA, with the aim of improving both security and performance.
But OCSP stapling actually doesn't protect users against malicious servers. In particular, the malicious server just need omit the stapled OCSP response and the client will never know that that malicious server has a revoked certificate.
Apple is enhanceing this. First, we gather information from certificate transparency logs. CT logs contain cryptographic proofs of the existence of a certificate. We request all of the revocation information from certificate authorities. We aggregate it into a single efficient bundle, and then make it available to all of our clients. Those clients check in periodically with us to get that bundled revocation information, and use that latest status revocation information when checking server certificates that they are using. If the client hits a certificate that is listed there and your servers are not using OCSP Stapling, the client will then perform OCSP.
Certificate Transparency
You've probably heard cases where certificate authorities, either through malice or incompetence, issue rogue certificates to entities that they should not. The solution to this is something called certificate transparency logs.
When a certificate authority issues a certificate to a server, it also records that with the log and the log gives the server a signed affidavit 宣誓书 that its certificate has been publicly recorded. And then when the client connects, the server can give all that information to the client and the client can verify that not only this is a signed certificate, it is a publicly logged signed certificate. The client will reject those doesn't have the affidavit to attest 证明 it being recorded in a public log.
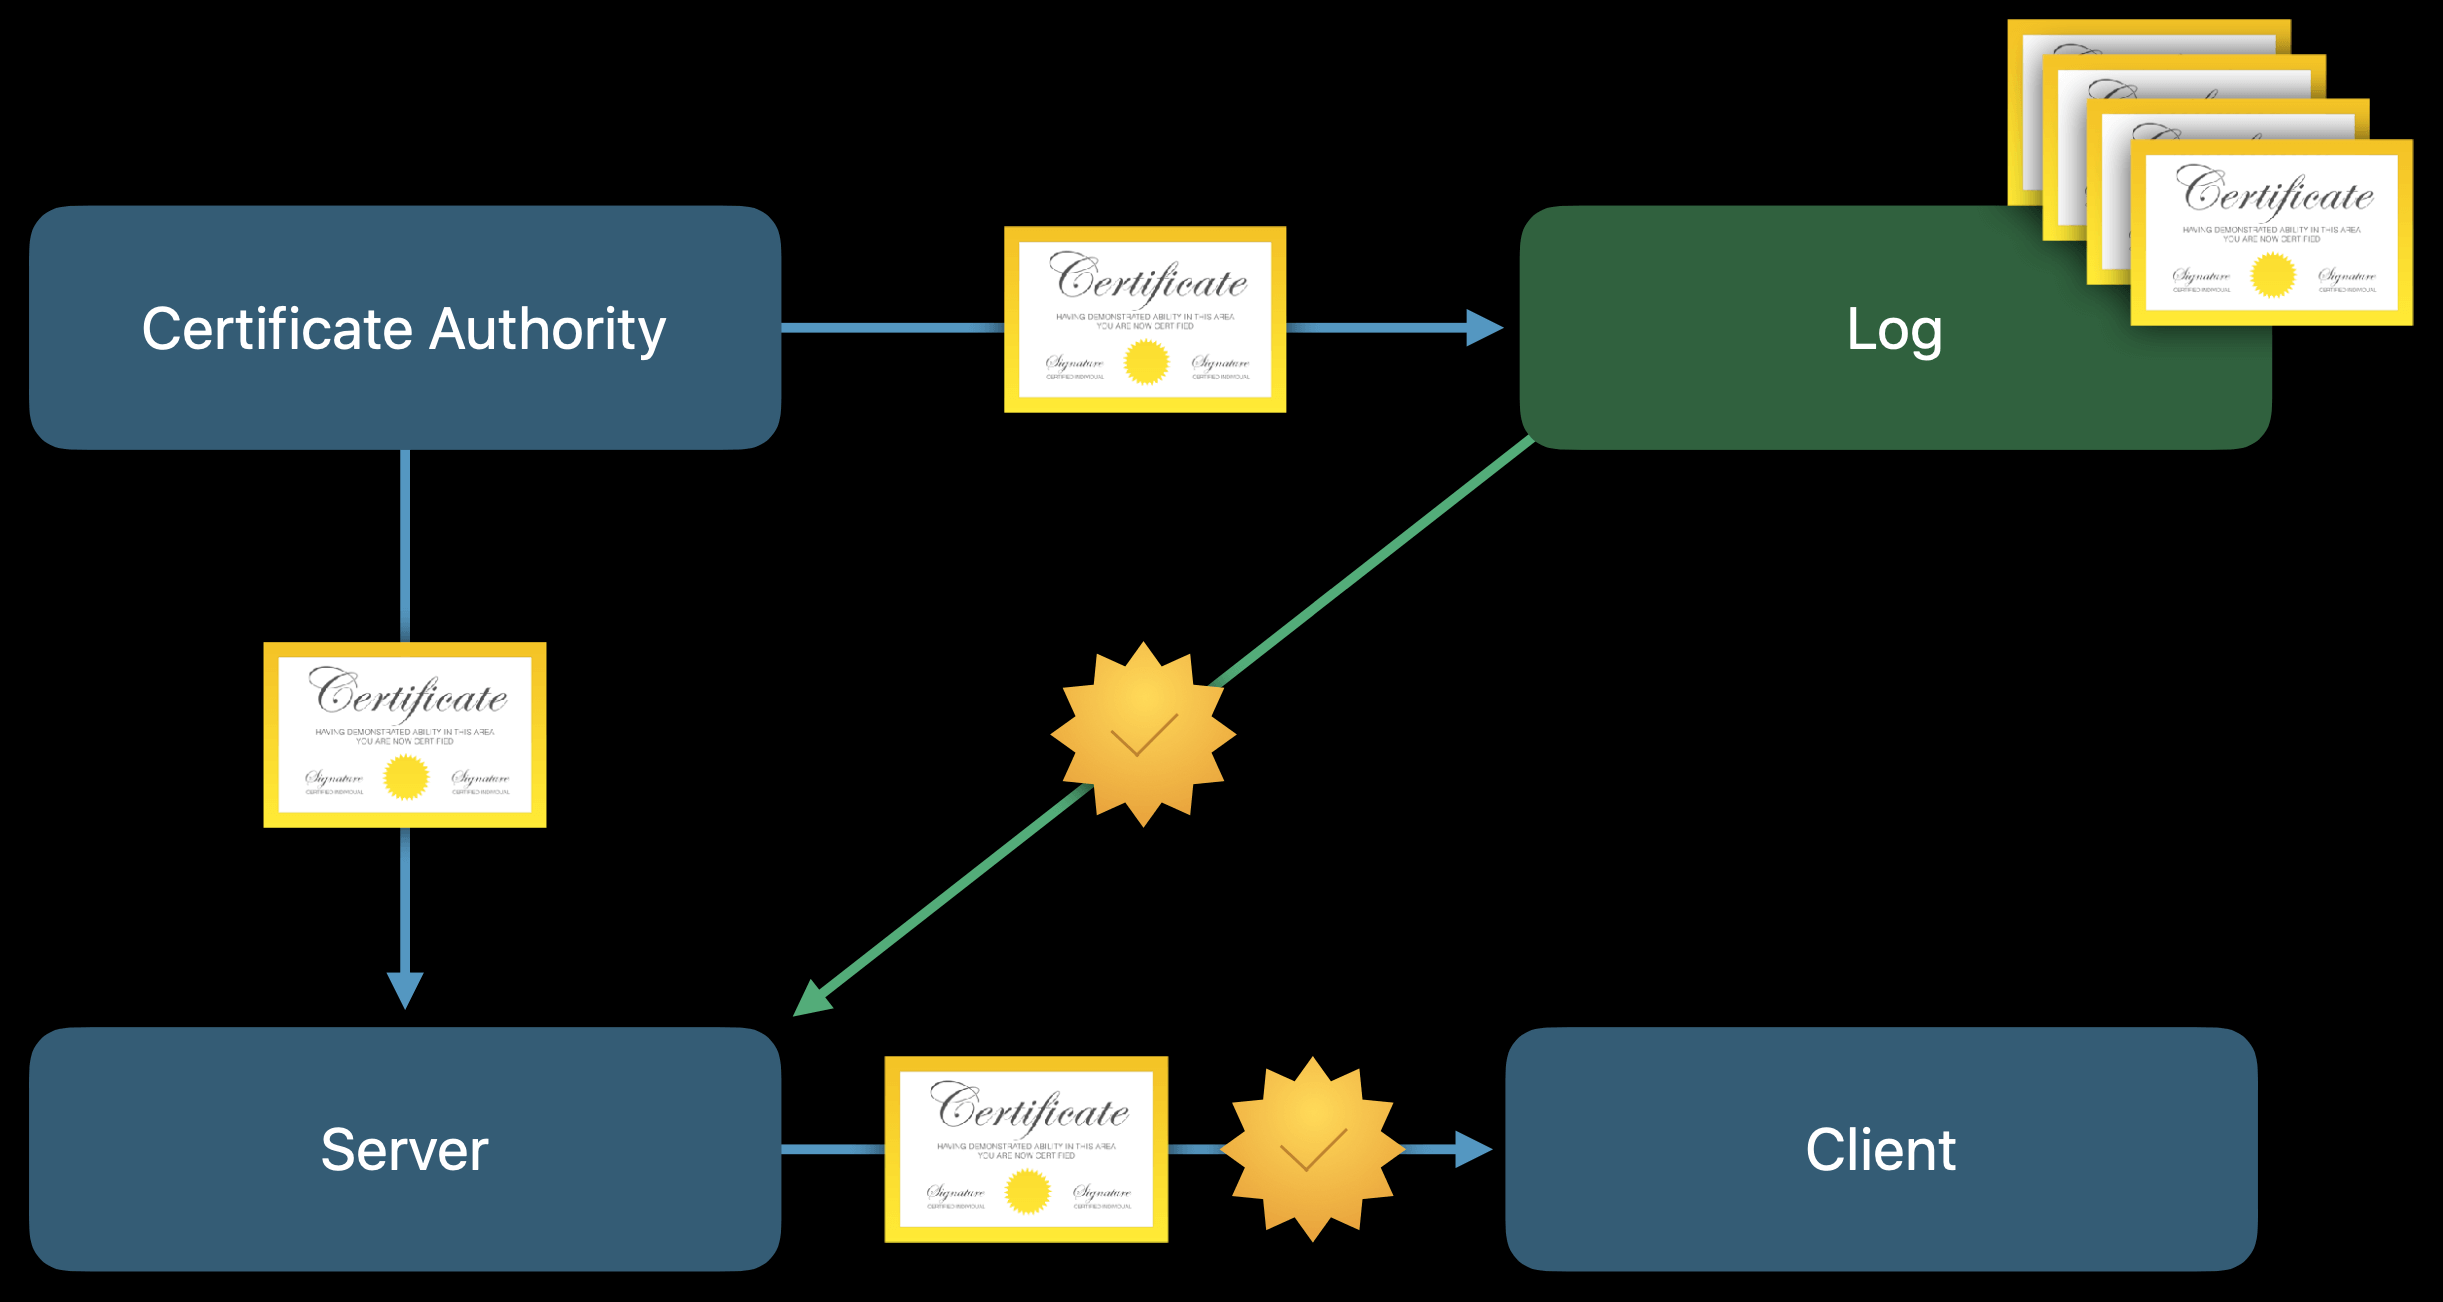
In iOS 12.1, certificates issued after October 15, 2018, from a system-trusted root certificate must be logged in a trusted Certificate Transparency log to be allowed for TLS connections.
TLS 1.3
TLS 1.3 is enabled by default for Network.framework and URLSession APIs since iOS 13.4.
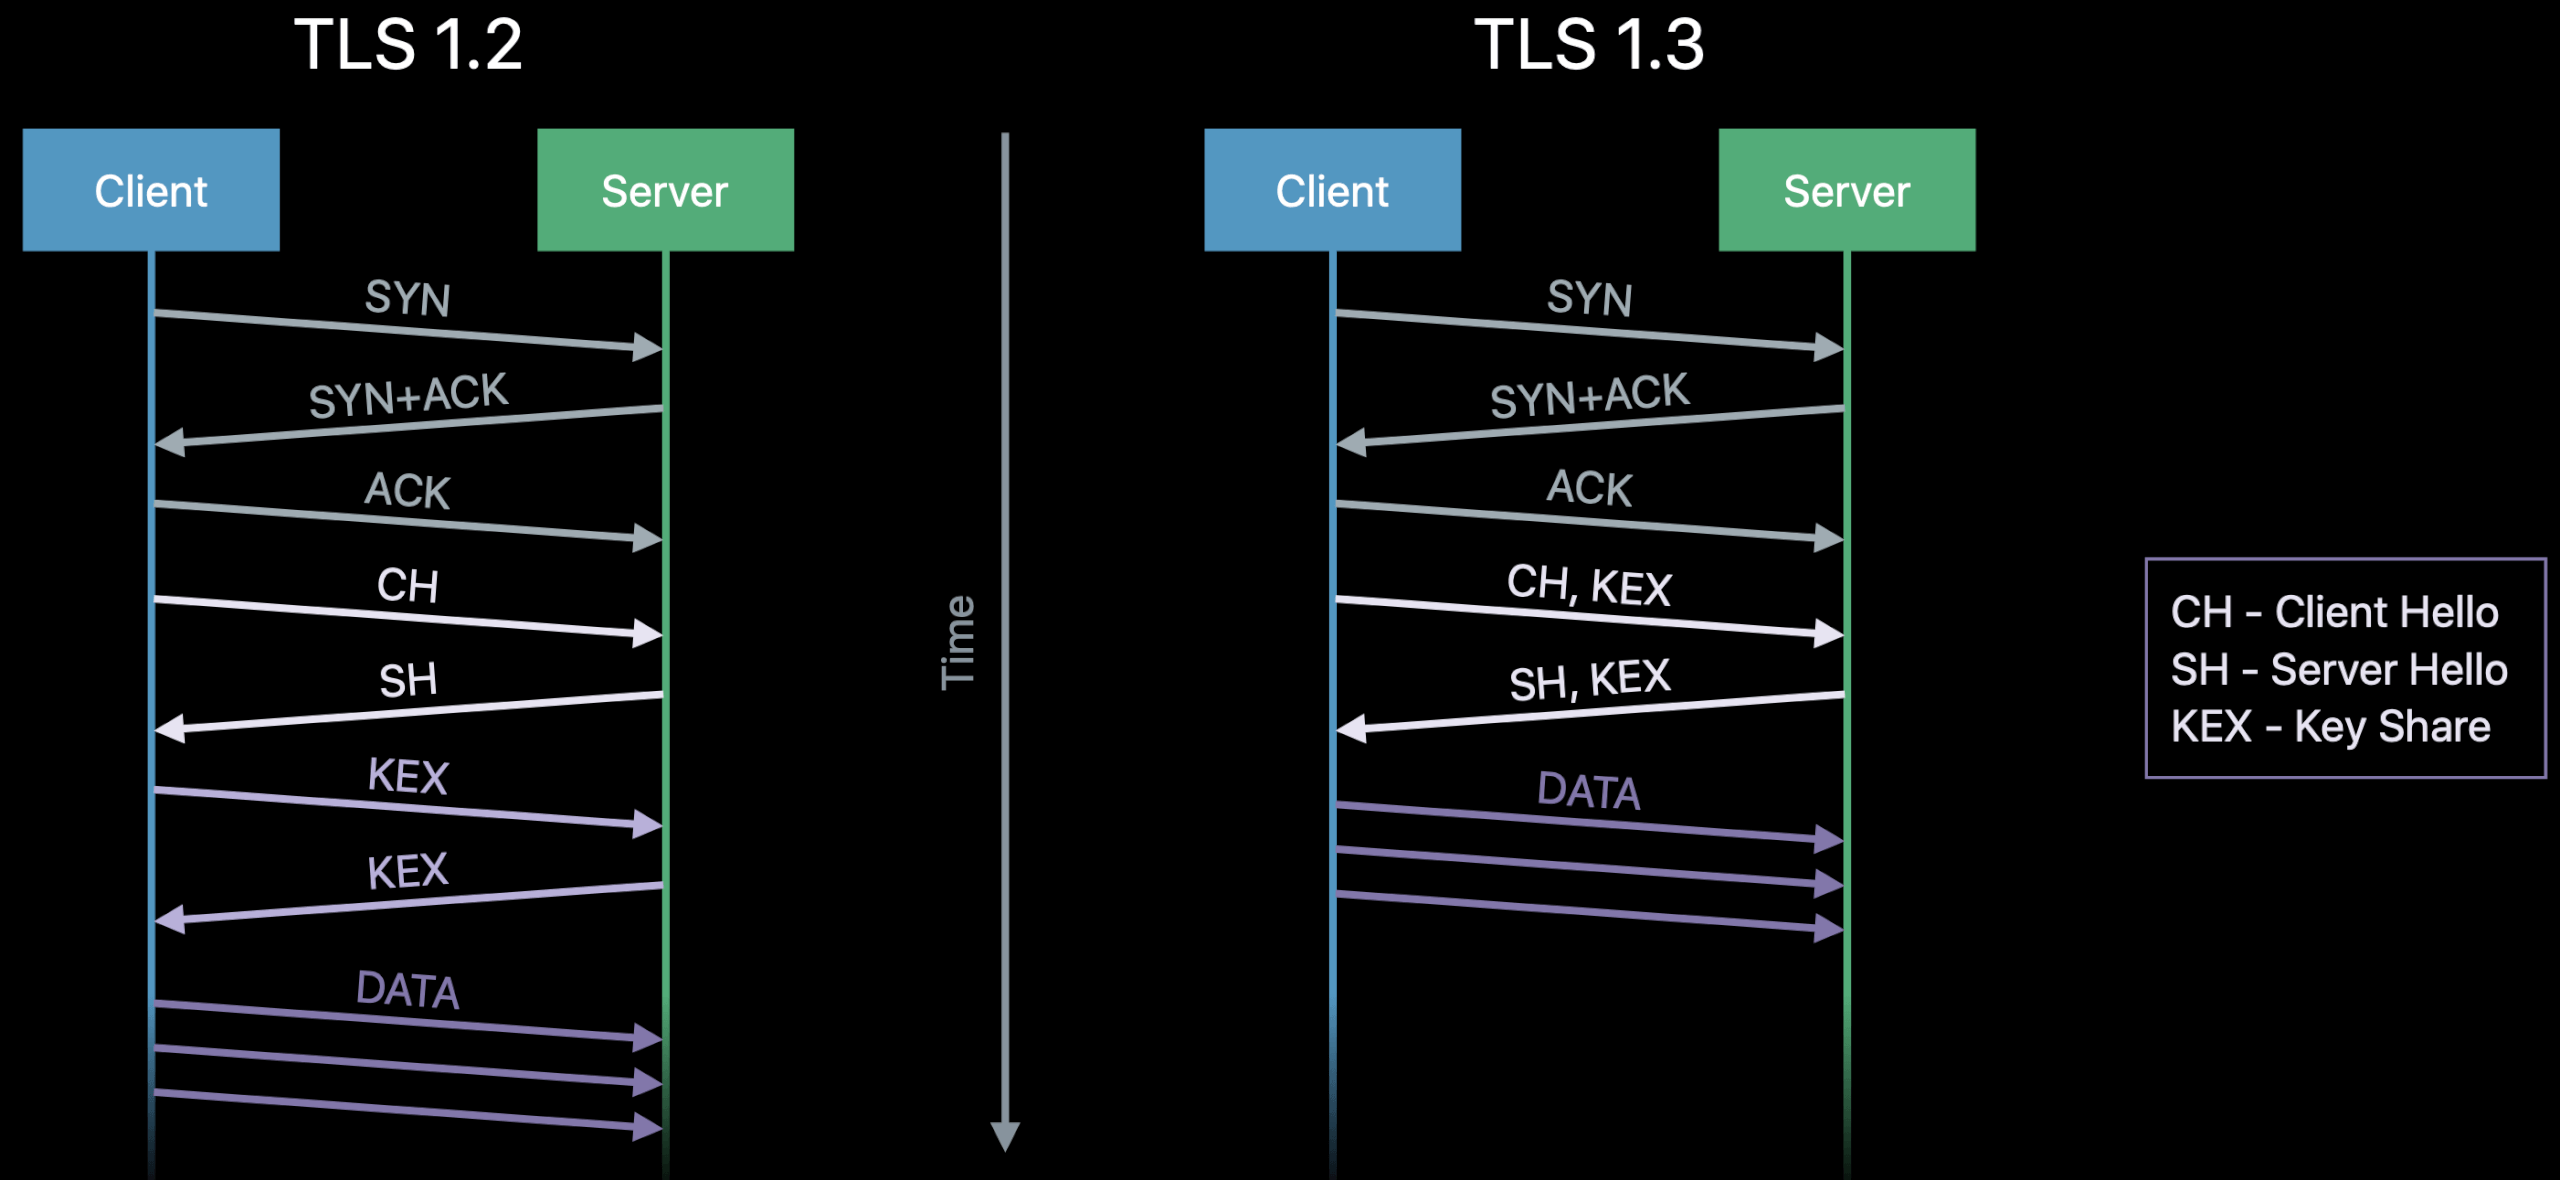
- One round trip (almost always) connection setup
- Strong cryptography AEAD with Forward Secrecy by default
- Privacy: certificates and most handshake fields are encrypted
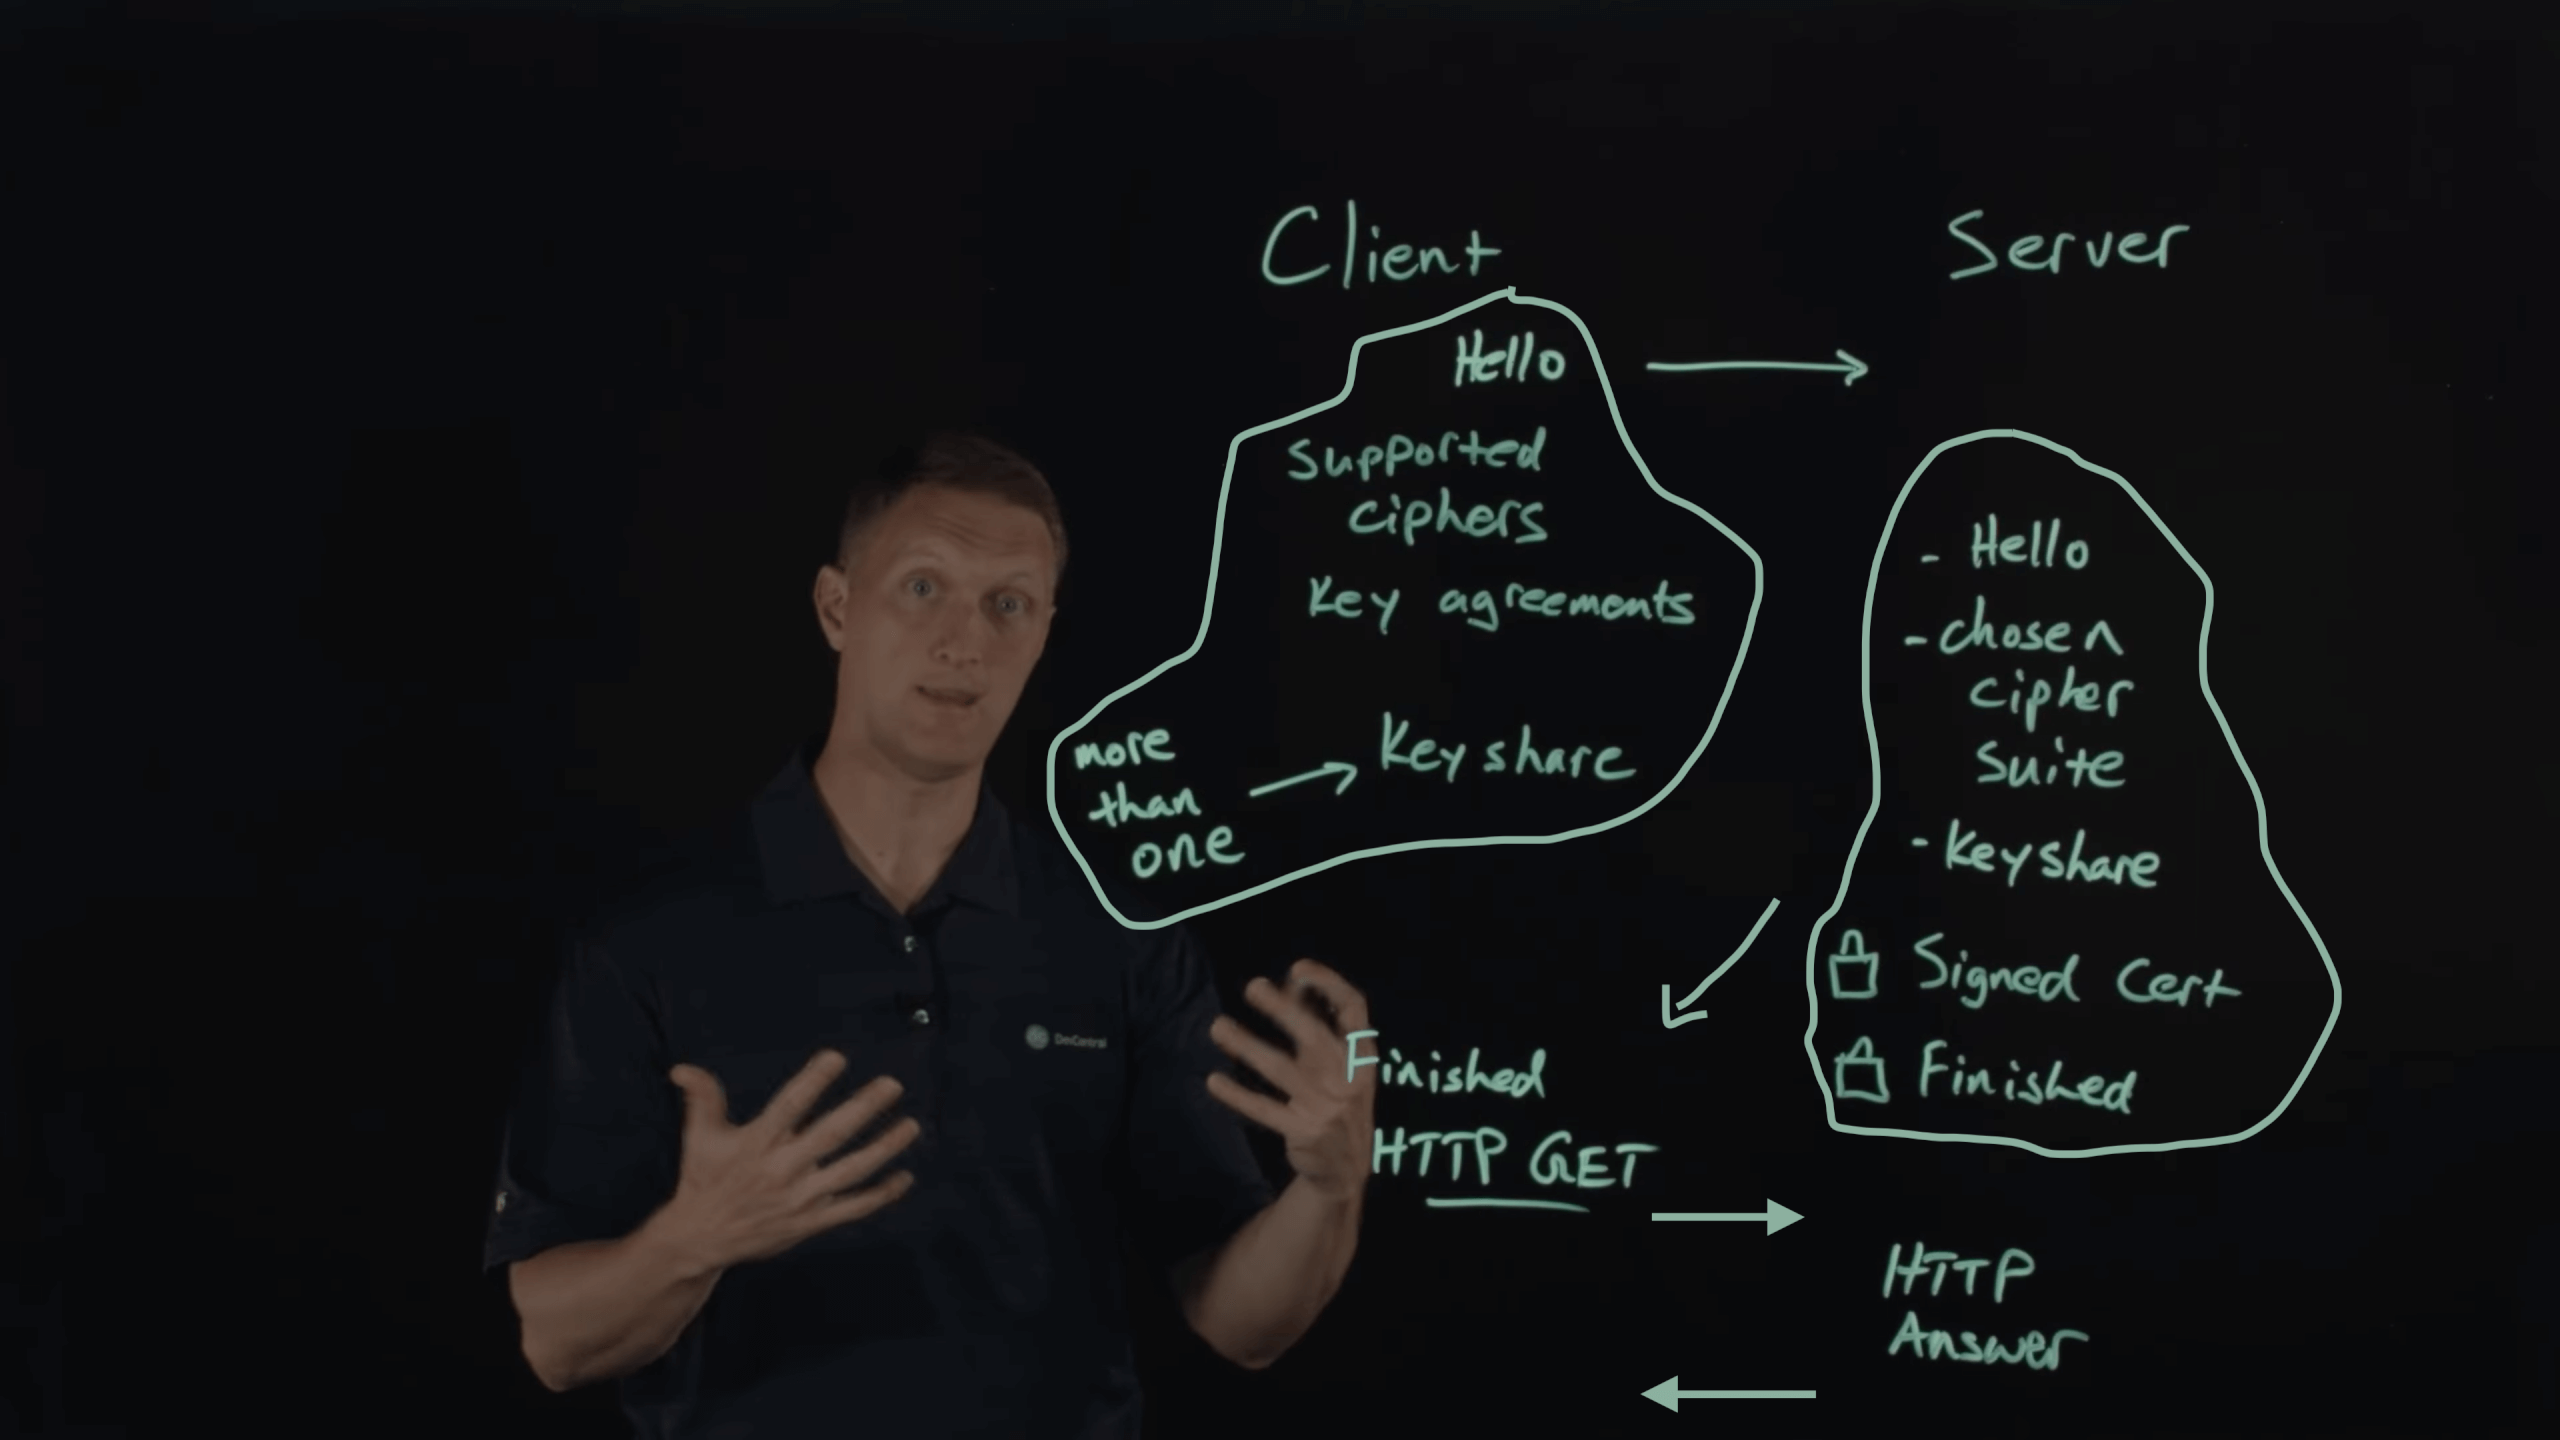
The TLS 1.3 protocol defines early data support, which can save yet another round trip by sending idempotent requests along with the TLS handshake message.
Forward Secrecy
Key exchange or key agreement: Before a client and server can begin to exchange information protected by TLS, they must securely exchange or agree upon an encryption key and a cipher to use when encrypting data.
The client and server need to exchange keys and ultimately come to a shared secret key to do the encryption. The essence of the Diffie-Hellman Key Exchange is working on how they actually exchange keys. The DHE does not rely on the client and server using the private/public key in order to exchange the premaster key. They generates PMS by their own random number!
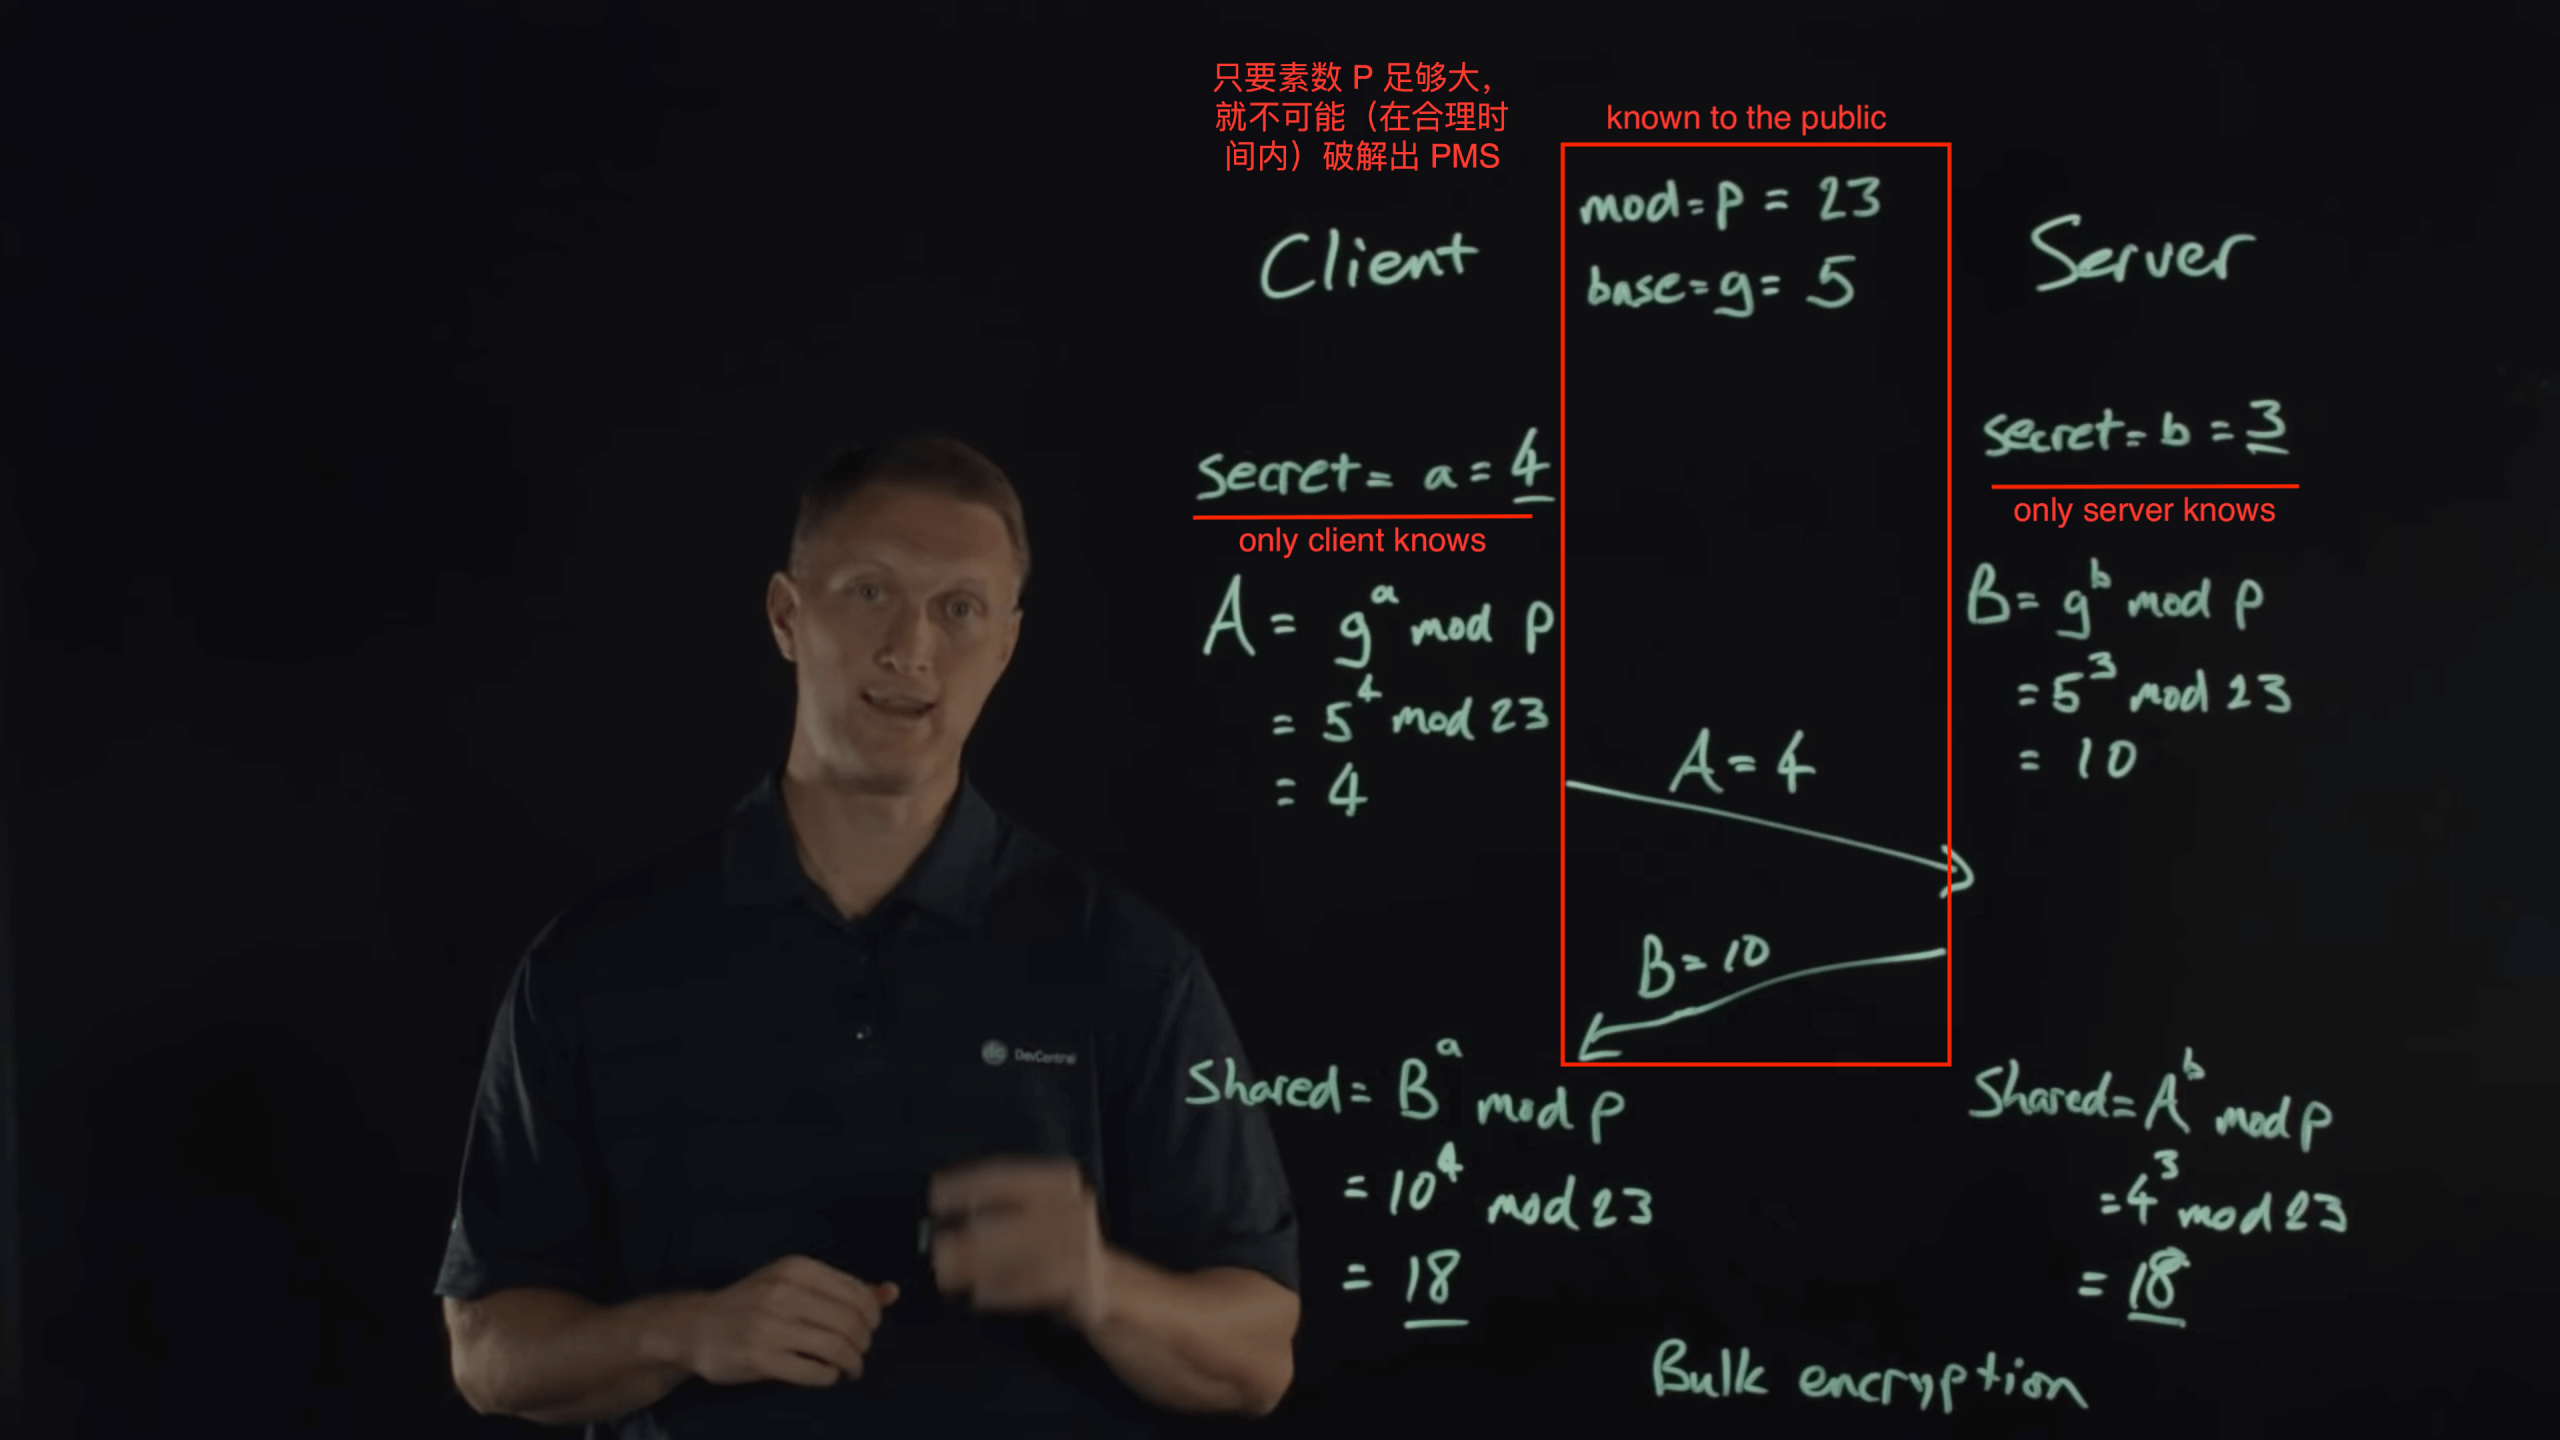
Forward Secrecy is an outcome if you choose the Diffie-Hellman Key Exchange as the cipher suite of your TLS handshake.
Perfect Forward Secrecy is an outcome if you use a brand new random number in the Diffie-Hellman Key Exchange every single session.
Bonjour and Local Network
Bonjour 是苹果开发的、基于 multicast DNS 的、开放性、零设置的网络标准。Bonjour 能让 IP 网络上的设备自动发现彼此,而不需输入 IP 地址或配置 DNS 服务器。使用 Bonjour 的设备在网络中自动传播自己的服务信息、并聆听其它设备的服务信息,设备之间就像在打招呼,这也是其命名为 Bonjour(法语:你好)的原因。
Bonjour is how you advertise and discover services on the network. It's used anytime you play peer-to-peer games, communicating with printers, cameras and home devices, anytime you are connecting to something without typing in an IP address or a host name. Bonjour is now available on every major platform.
We can now make peer-to-peer connections and use wide-area discovery.
There are several different APIs that allow your app to use Bonjour:
- Network.framework (
NWBrowser,NWListener.Service) - Foundation (NetService)
- MultipeerConnectivity
- dnssed APIs
On Apple devices, the best way to use the local network is with Bonjour. Some apps also interact with the local network at a lower level. Your app may configure a Wi-Fi router, or use a custom multicast or broadcast protocol to communicate with legacy hardware.
In iOS 14, users can now control which apps are allowed to access and interact with the local network.
If your app just accesses resources on the wide internet, you don't need to do anything different. You also don't need to update if you only interact with the local network using a system service, like AirPrint, AirPlay, AirDrop, or HomeKit. These system services handle device discovery without exposing the full list of devices to apps.
On the other hand, if your app accesses the local network directly within your app, either with unicast or multicast protocols, your app will require permission.
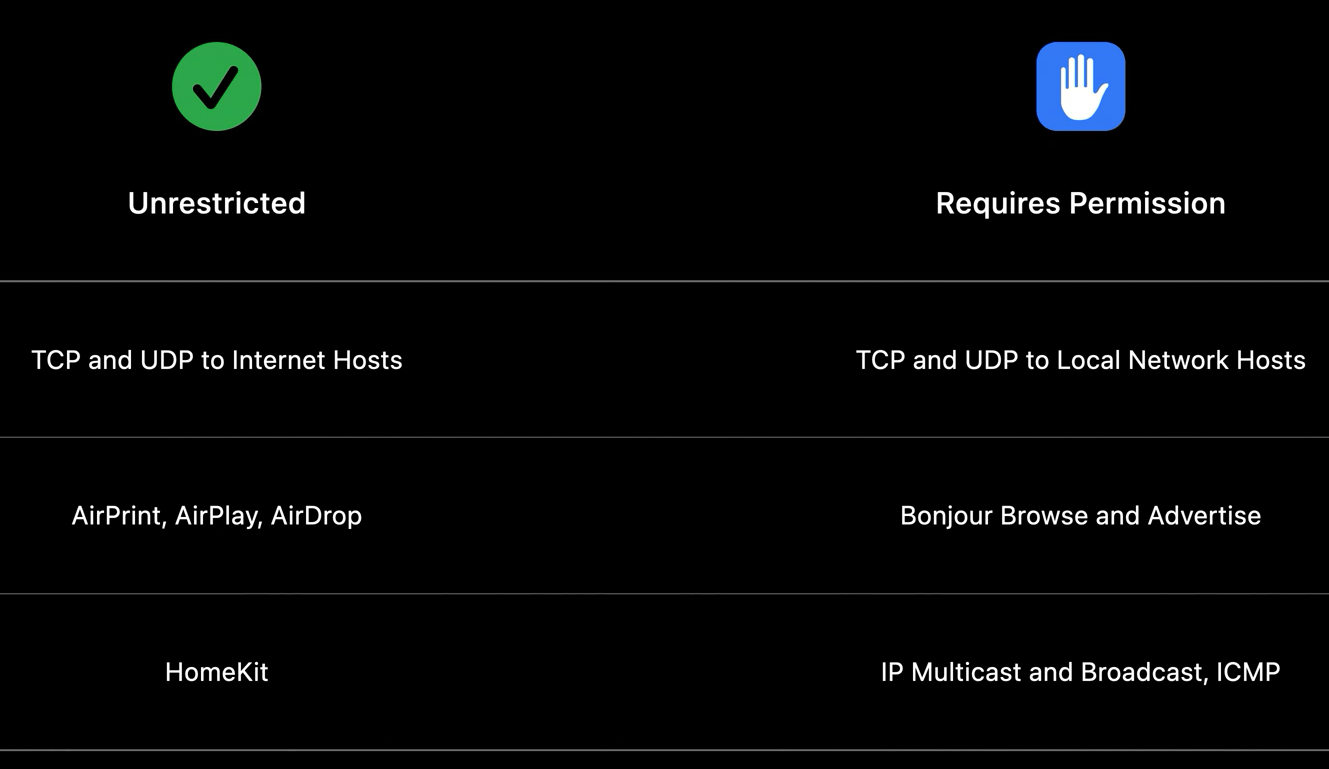
There are two new keys you can provide in your app's Info.plist.

NSLocalNetworkUsageDescription explains which features in your app require the local network.
NSBonjourServices: If your app uses Bonjour to browse or advertise, you must provide a list of the service types that you use. Each service type is a unique string registered with IANA (Internet Assigned Numbers Authority), that identifies your application protocol.
Network.framework
WWDC 2018 - Introducing Network.framework: A modern alternative to Sockets
Thirty years ago we had BSD Sockets. It was a great API. But now the Internet has become a lot more complicated.
You may have assumed that URLSession is also just a wrap around Sockets. Not quite. URLSession is actually built using Apple's user space networking code Network.framework. Now in iOS 12, we are exposing that same API that URLSession uses!
And if you're the developer of third-party libraries that are built on BSD Sockets, we encourage you to look at the Network.framework APIs.
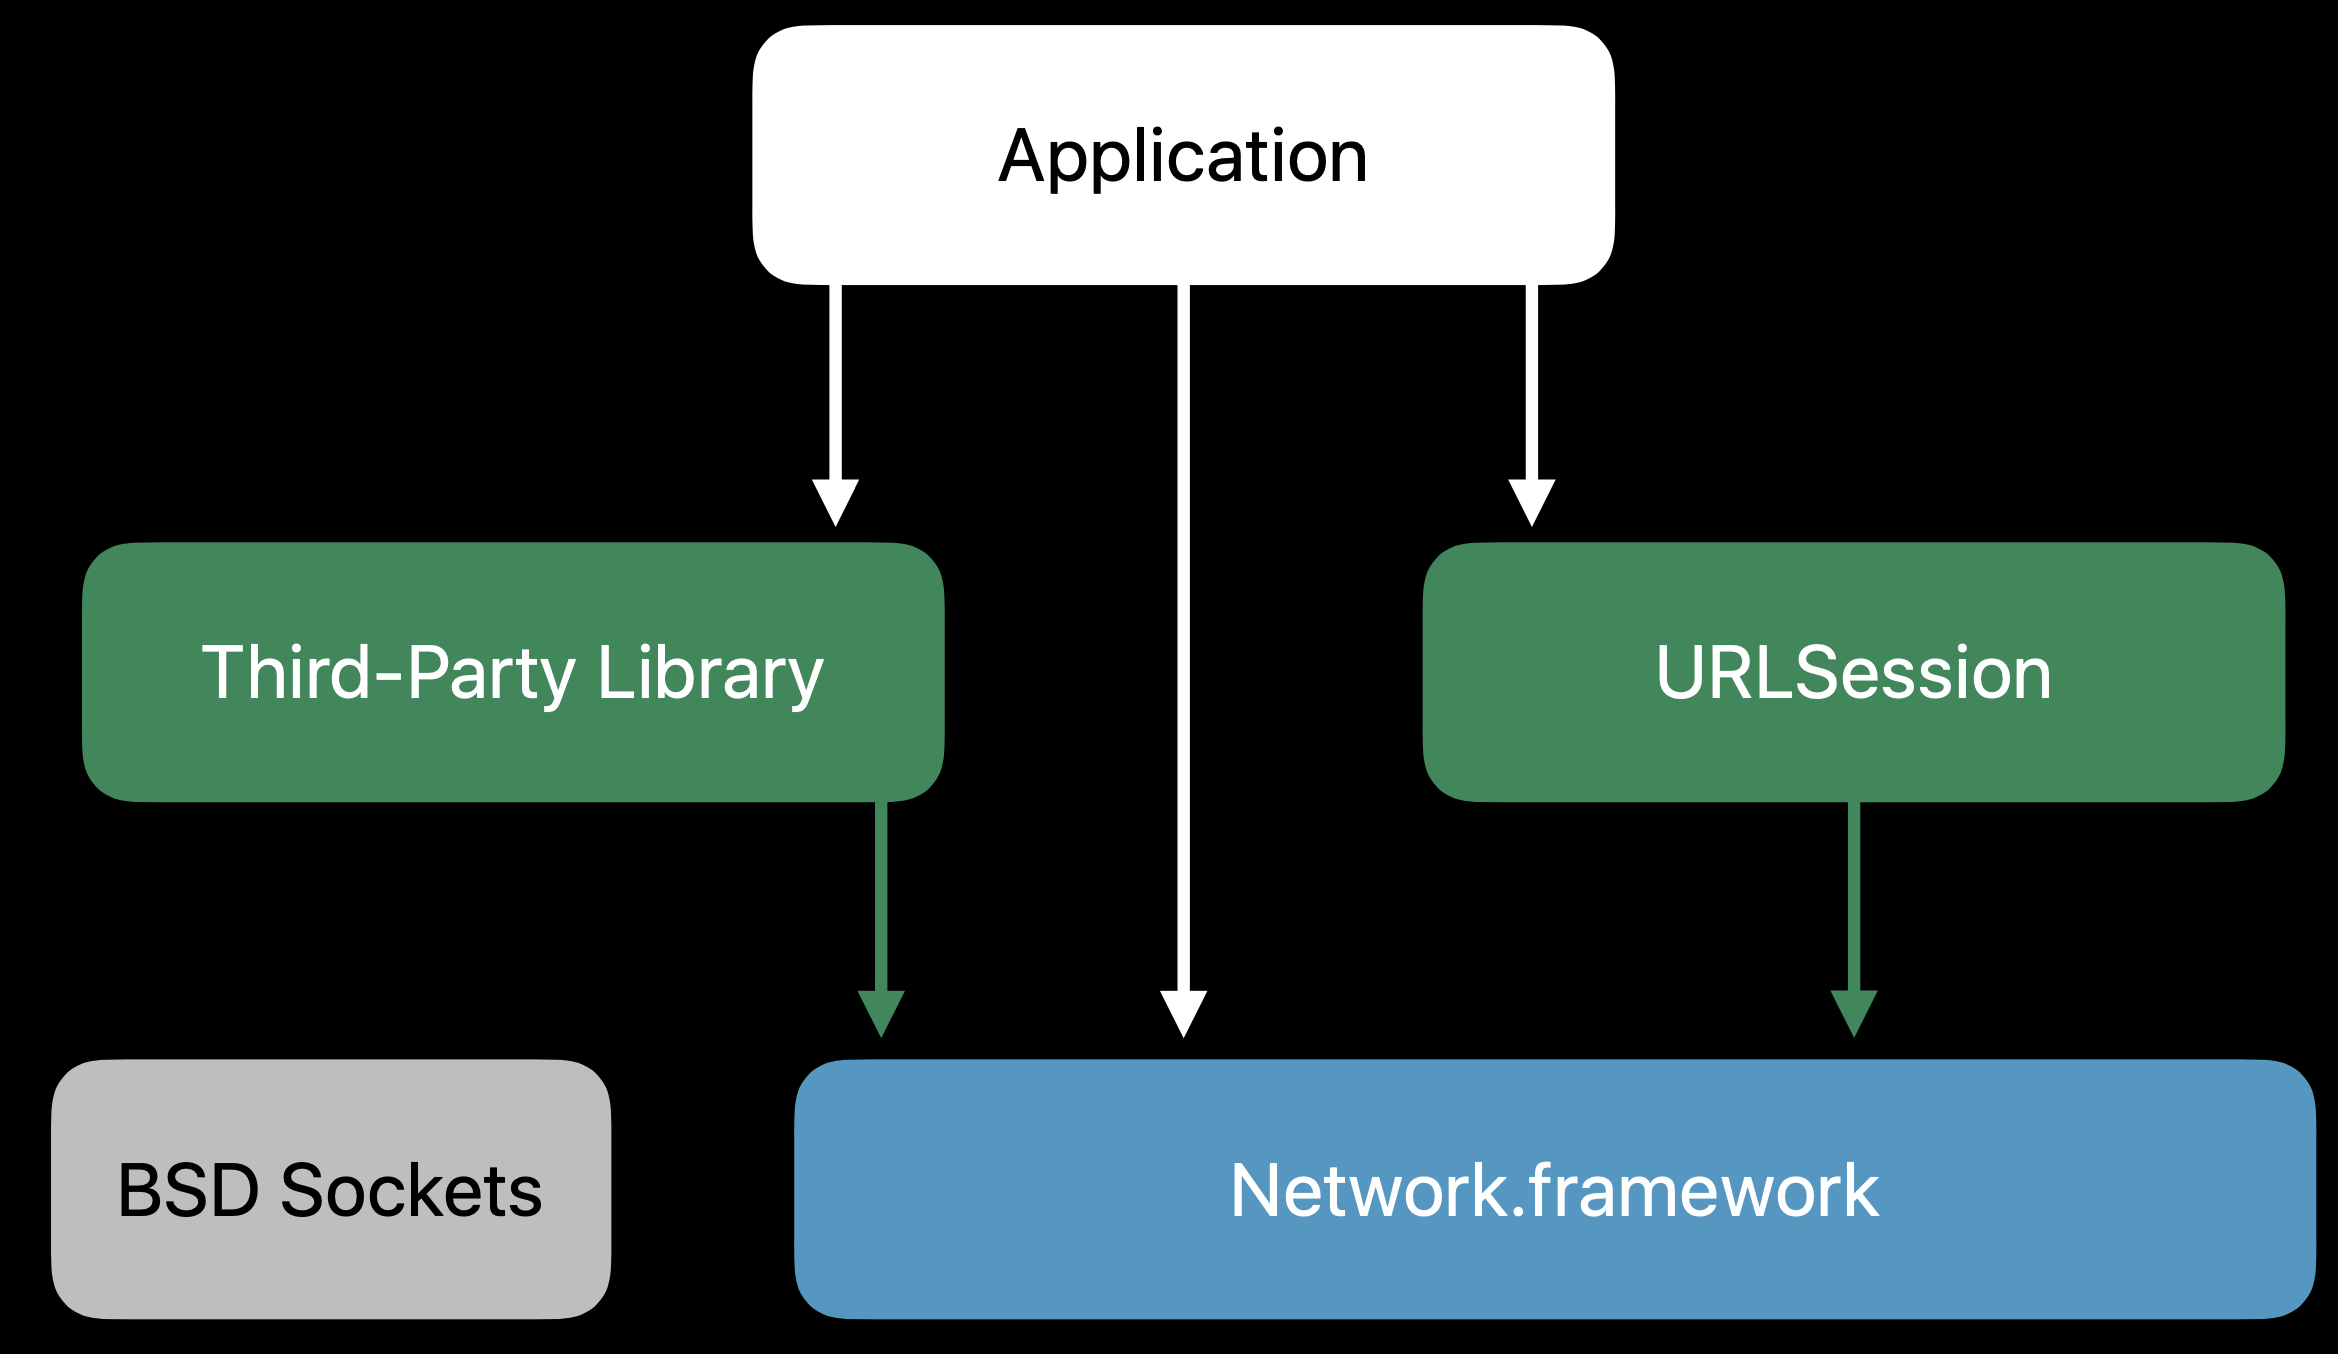
Use this framework when you need direct access to protocols like TLS, TCP, and UDP for your custom application protocols. Continue to use URLSession, which is built upon this framework, for loading HTTP- and URL-based resources.
Network Extension
With the NetworkExtension framework, you can customize and extend the core networking features.
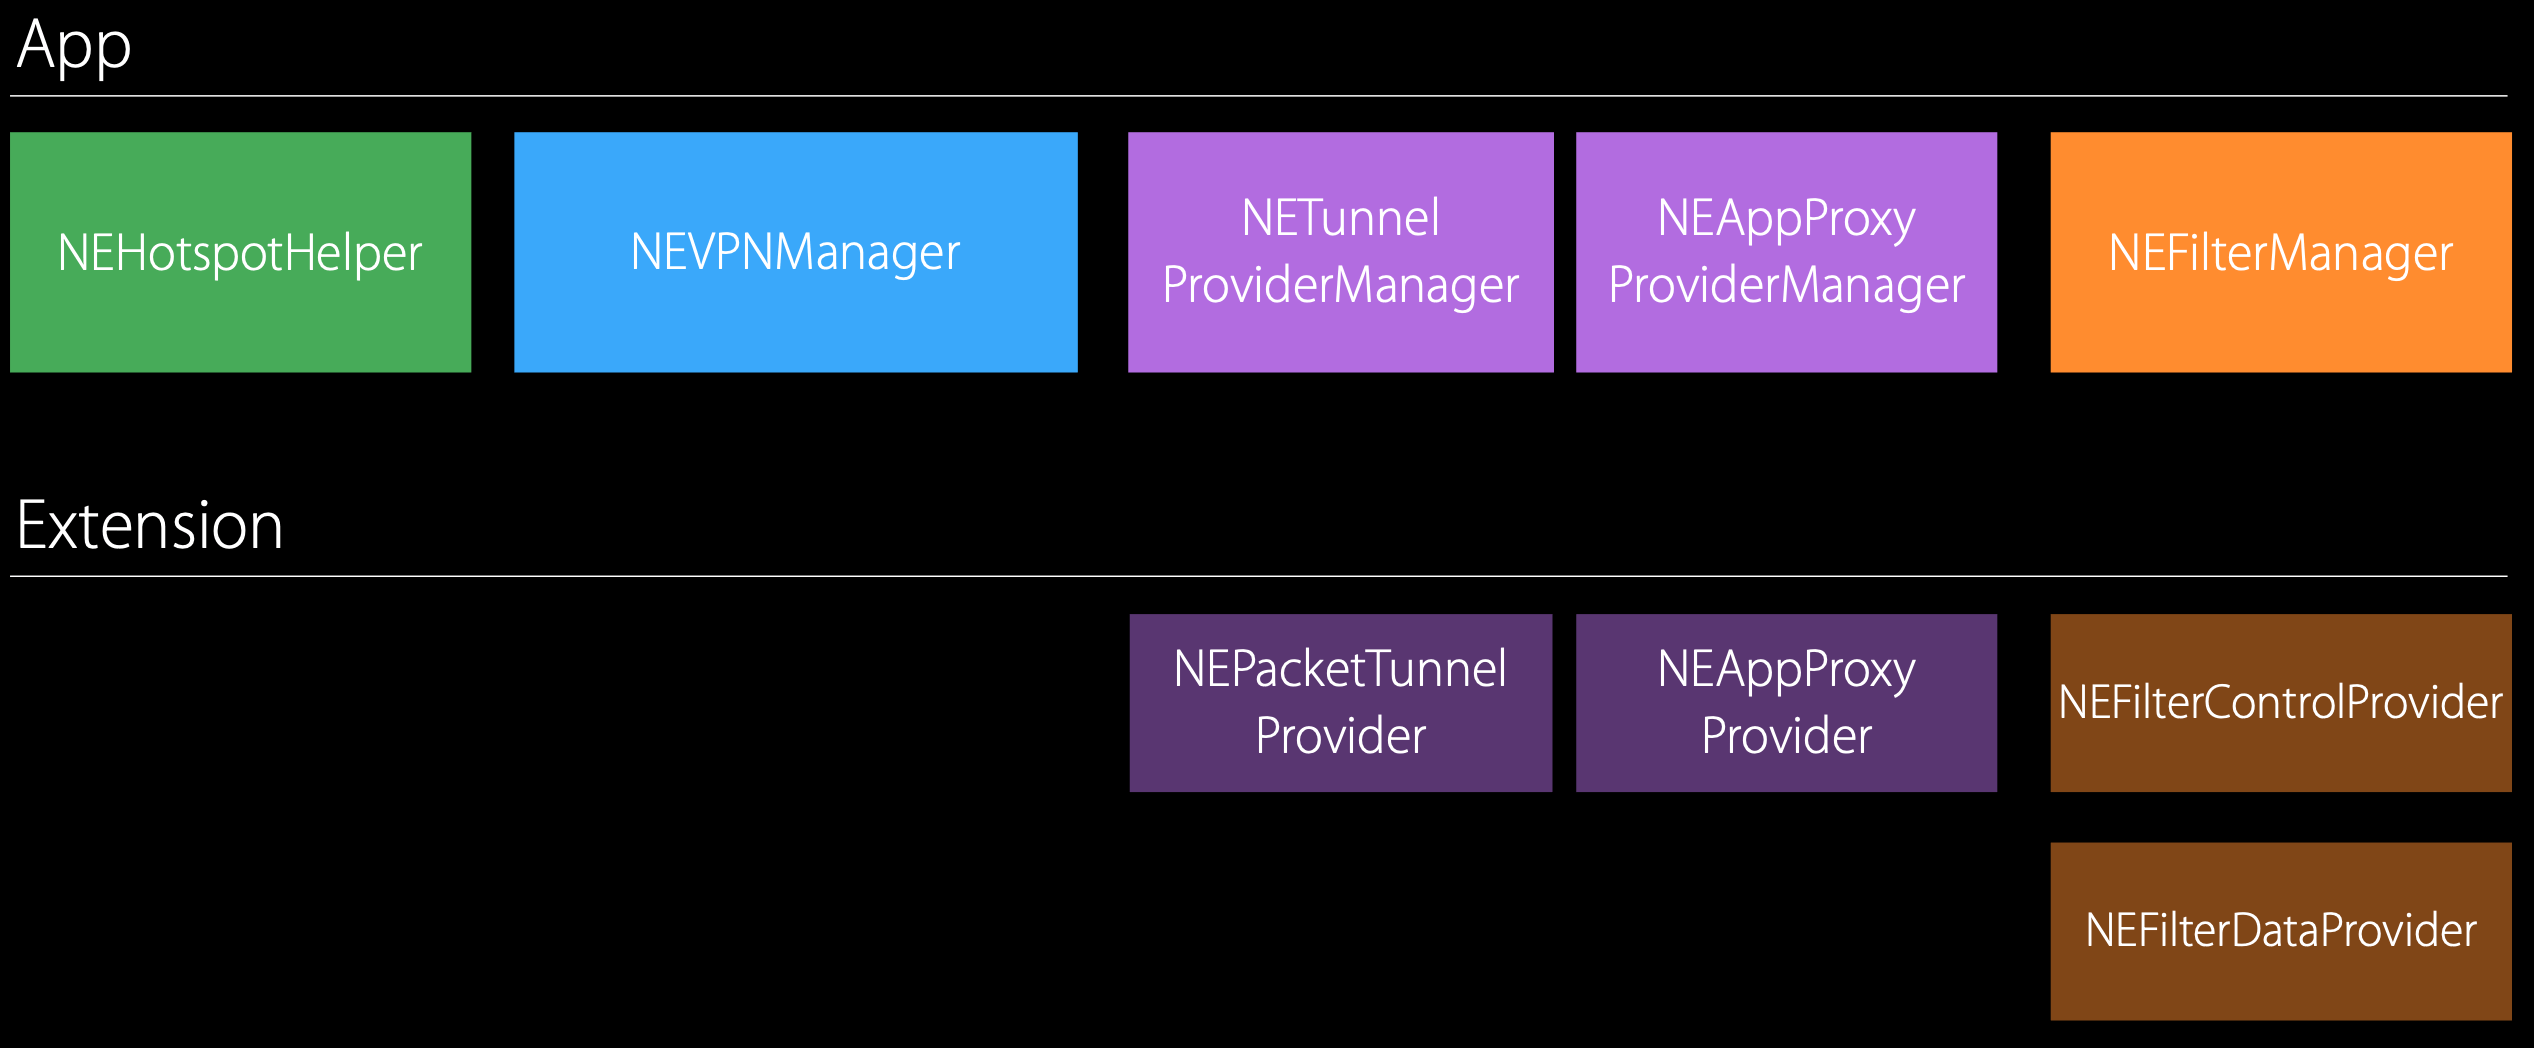
NEHotspotHelper
NEHotspotHelper API gives your app the ability to perform custom authentication for Wi-Fi Hotspots.
This works is you first register your app with the system as a Hotspot helper. Then as the device comes within range of Wi-Fi networks, scanning for Wi-Fi networks or the user selects a Wi-Fi network to connect to, the system run your app in the background, call into your app and give your app the opportunity to claim the Wi-Fi Hotspot with a level of confidence, high, medium or low. If you claim a Hotspot with a high level of confidence, the system will call you to actually perform the authentication with the Wi-Fi Hotspot. And it will periodically call you to maintain the authentication session.
The Hotspot helper API also allows you to annotate Wi-Fi networks that show up in the settings app and you can annotate these Wi-Fi networks with the name of your app or the name of your company.
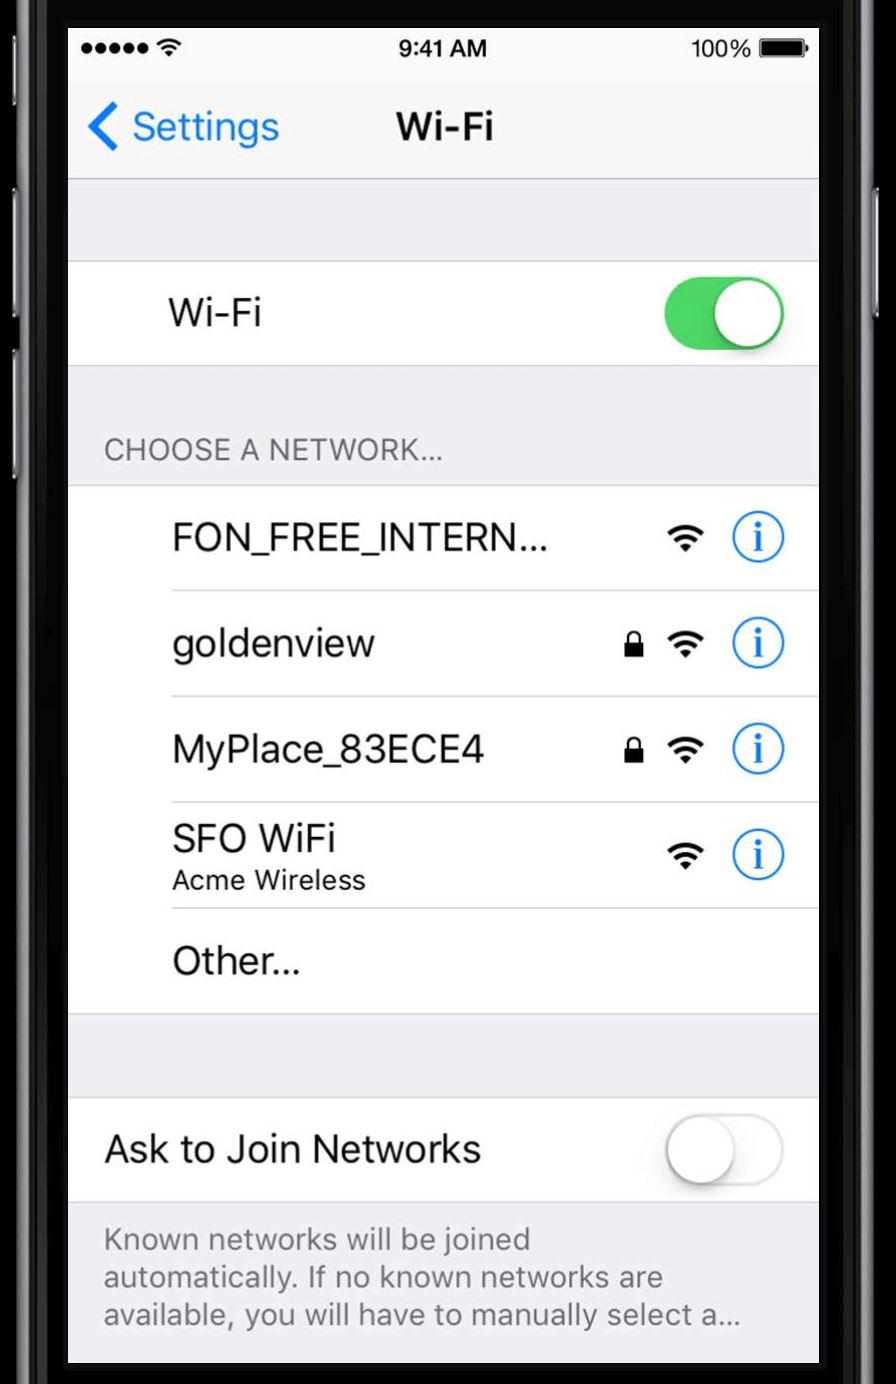
NEHotspotConfiguration
NEHotspotConfiguration:应用内通过这个接口快捷地连接到相机等设备开启的 Wi-Fi 热点,而不必离开 App、到设置 - Wi-Fi 去连接。当然,如果你开发了一个星巴克应用,也可以在用户到咖啡店时,自动提示他们加入店里的 Wi-Fi。
NEVPNManager
You can create a single personal VPN configuration for the app, which is represented by a single NEVPNManager object. And personal VPN configurations coexist and cooperate with enterprise VPN configurations.
import NetworkExtension
// Each app gets a single configuration.
let manager = NEVPNManager.sharedManager()
// Connect automatically on a matching network.
let connectRule = NEOnDemandRuleConnect()
// Match all Wi-Fi networks.
connectRule.interfaceTypeMatch = .WiFi
// Set rule in array.
manager.onDemandRules = [ connectRule ]
manager.saveToPreferencesWithCompletionHandler { error in
    // Handle error or success.
}
manager.loadFromPreferencesWithCompletionHandler { error in
    // Protocol is a keyword, so it needs to be quoted.
    if manager.`protocol` == nil {
        let newIPSec = NEVPNProtocolIKEv2()
        newIPSec.serverAddress = "my.personal.vpn"
        // Set all of the properties on newIPSec.
        manager.`protocol` = newIPSec
        manager.enabled = true
        manager.saveToPreferencesWithCompletionHandler { error in
            // Handle error or success.
        }
    }
}
graph LR NETunnelProviderManager --> NSVPNManager NEAppProxyProviderManager --> NETunnelProviderManager
Like its superclass NEVPNManager, you use the NETunnelProviderManager class to configure and control VPN connections. The difference is that NETunnelProviderManager is used to to configure and control VPN connections that use a custom VPN protocol.
NEPacketTunnelProvider
graph LR NETunnelProvider --> NEProvider NEPacketTunnelProvider --> NETunnelProvider NEAppProxyProvider --> NETunnelProvider
Implement a VPN client for a packet-oriented, custom VPN protocol. When the system starts a VPN configuration that uses your packet tunnel provider, it launches your app extension, instantiates your packet tunnel provider subclass within that app extension, and starts forwarding packets to your provider.
NEFilterProvider
There are some ways that schools can do network content filtering with iOS devices. They can deploy an on-site content filter, put a device on their local network and route all their Internet traffic through that. The draw back with this is that it's only available on the school's local network. If the students want to take the schools iPads or iPhones home they either can't browse the Internet at all when they are home or browse the Internet unfiltered.
The best solution for schools is to filter the network content on the device. Before it leaves the device and just before it's actually delivered to the user.
NEDNSProxyProvider
NEDNSProxyProvider allows you to, in its simplest mode, redirect all the inquiries to a resolver that you own. Or you can even use it to get the individual DNS queries and send them over a custom protocol such as DNS over TLS or DNS over HTTP.
Local Push Connectivity
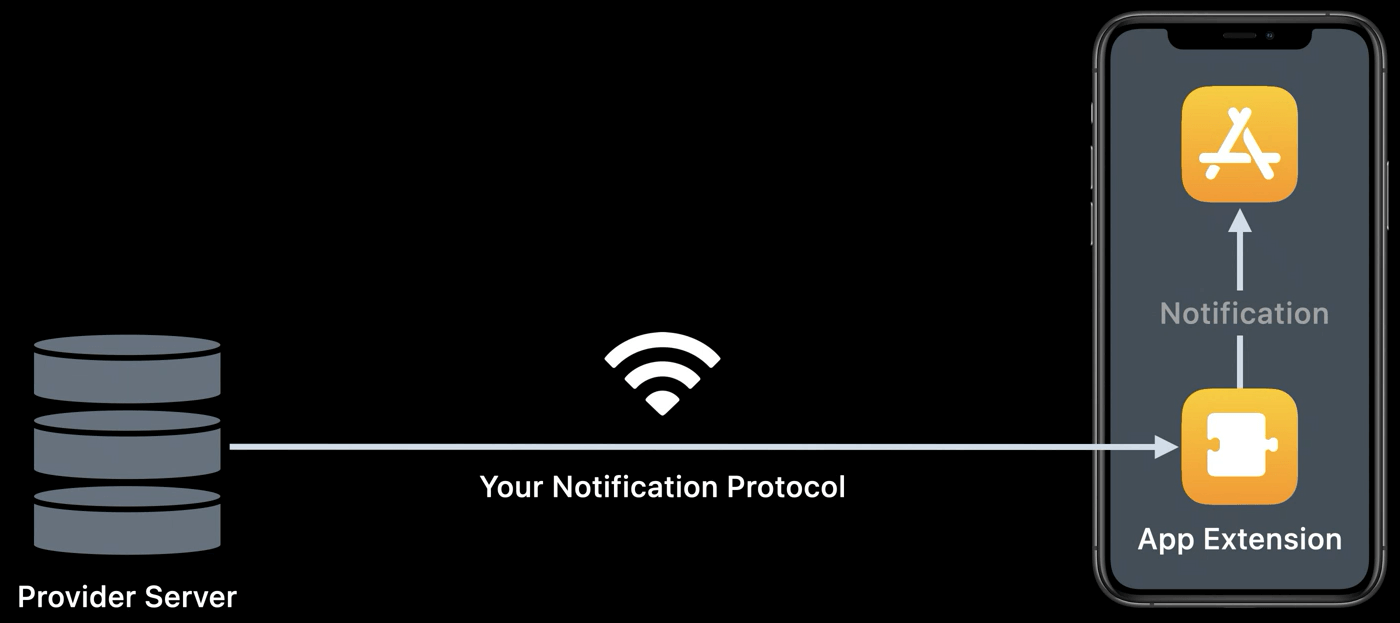
Let's review how APNs works. Your provider server sends a push notification request to the APNs. APNs conveys corresponding notification payloads to each targeted device. On receipt of a notification, the system delivers the payload to the appropriate app on the device. Depending on the notification type, your app uses either PushKit or the UserNotifications framework to receive the payload.
Push notifications is the right solution for your apps when used on networks that have APNs connectivity or the Internet. However, if your app is used in network environments where APNs cannot be reached, the app cannot receive these notifications. For example, places like cruise ships, airlines, camping sites or hospitals may have limited or no APNs connectivity.
Local Push Connectivity can be the right solution in scenarios where notifications are essential and network environments have constraints.It is all about direct communication between your provider server and your app extension using your protocol on your specified Wi-Fi networks.
APIs:
NEAppPushManager(App)NEAppPushProvider(App Extension)
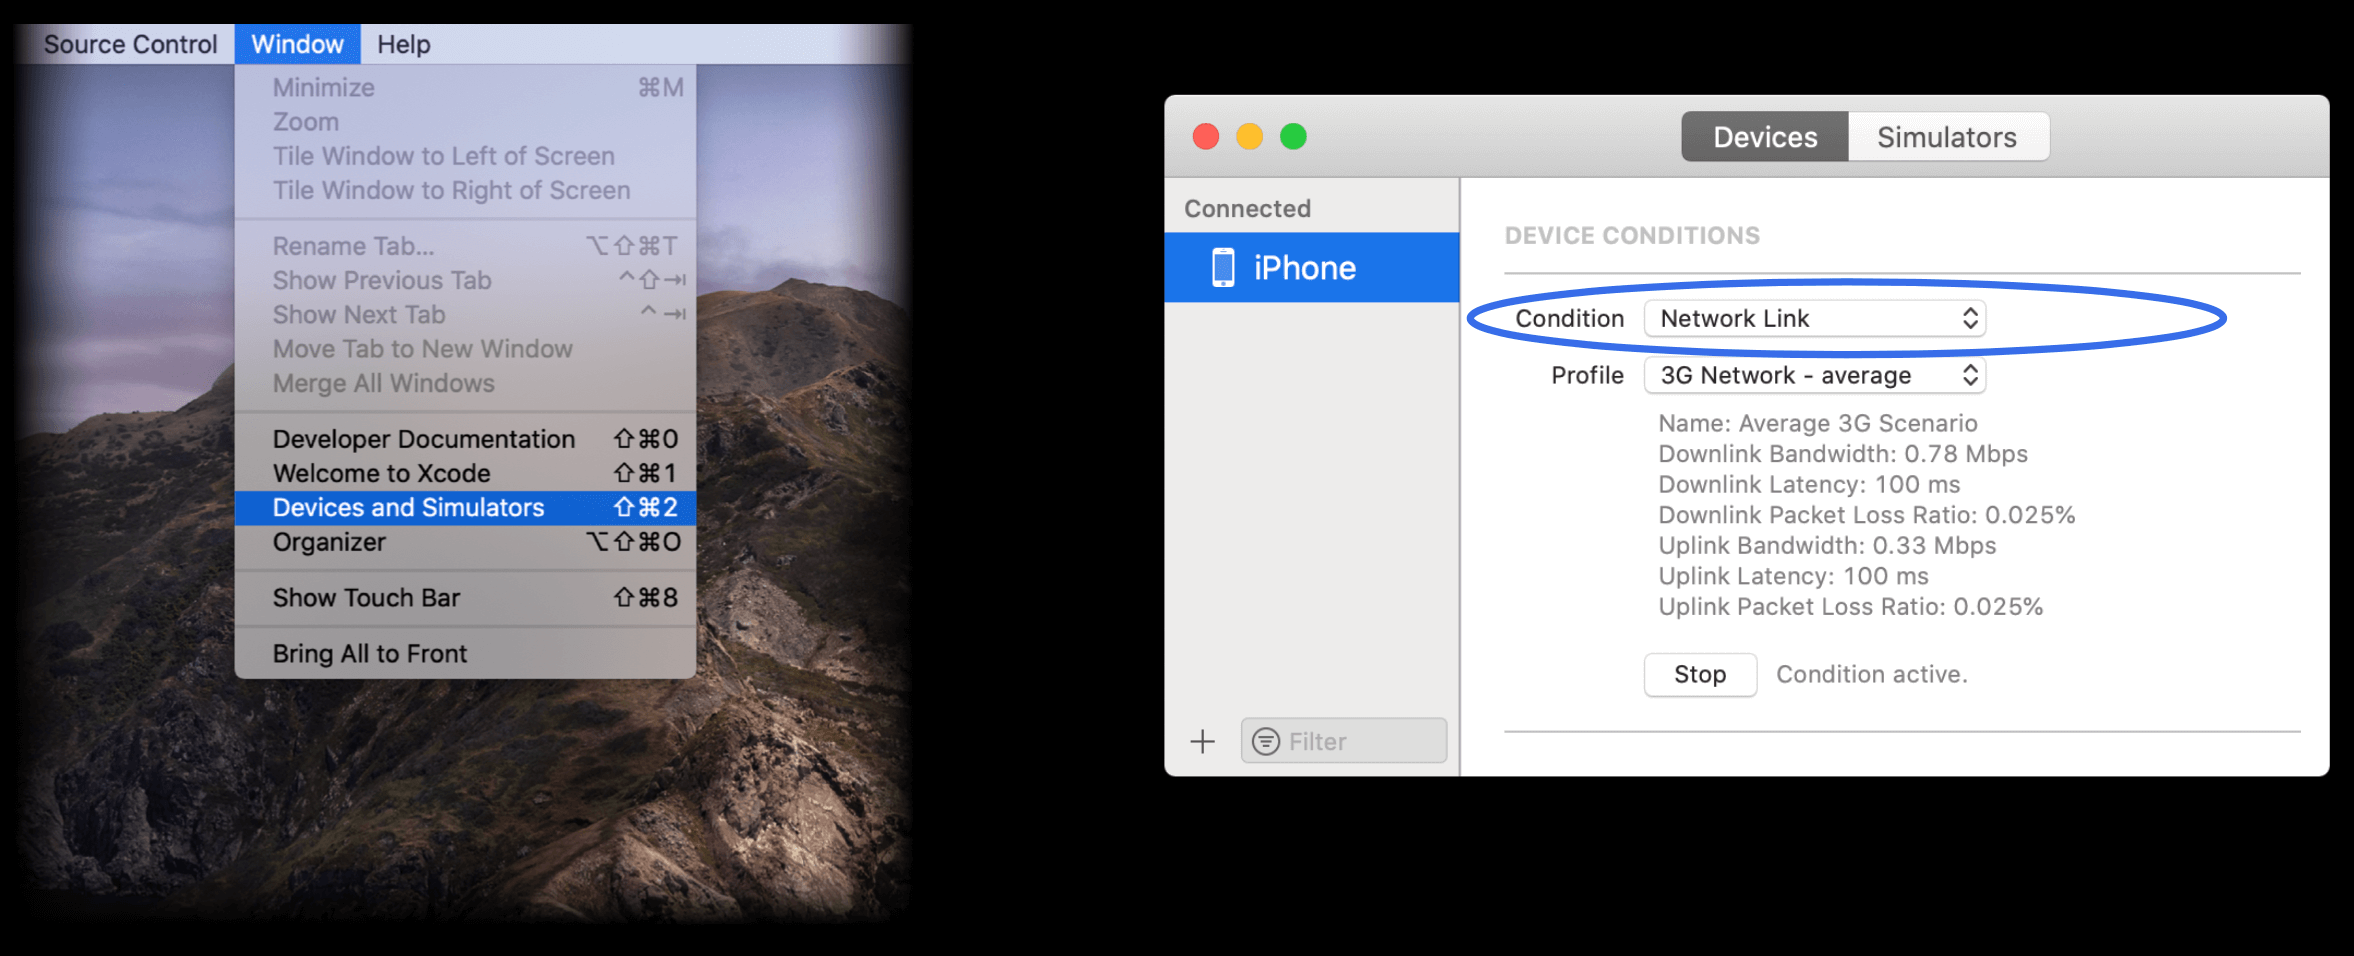
Network Link Conditioner
Designing for Adverse Temperature Conditions
WWDC 2019 - Designing for Adverse Network and Temperature Conditions
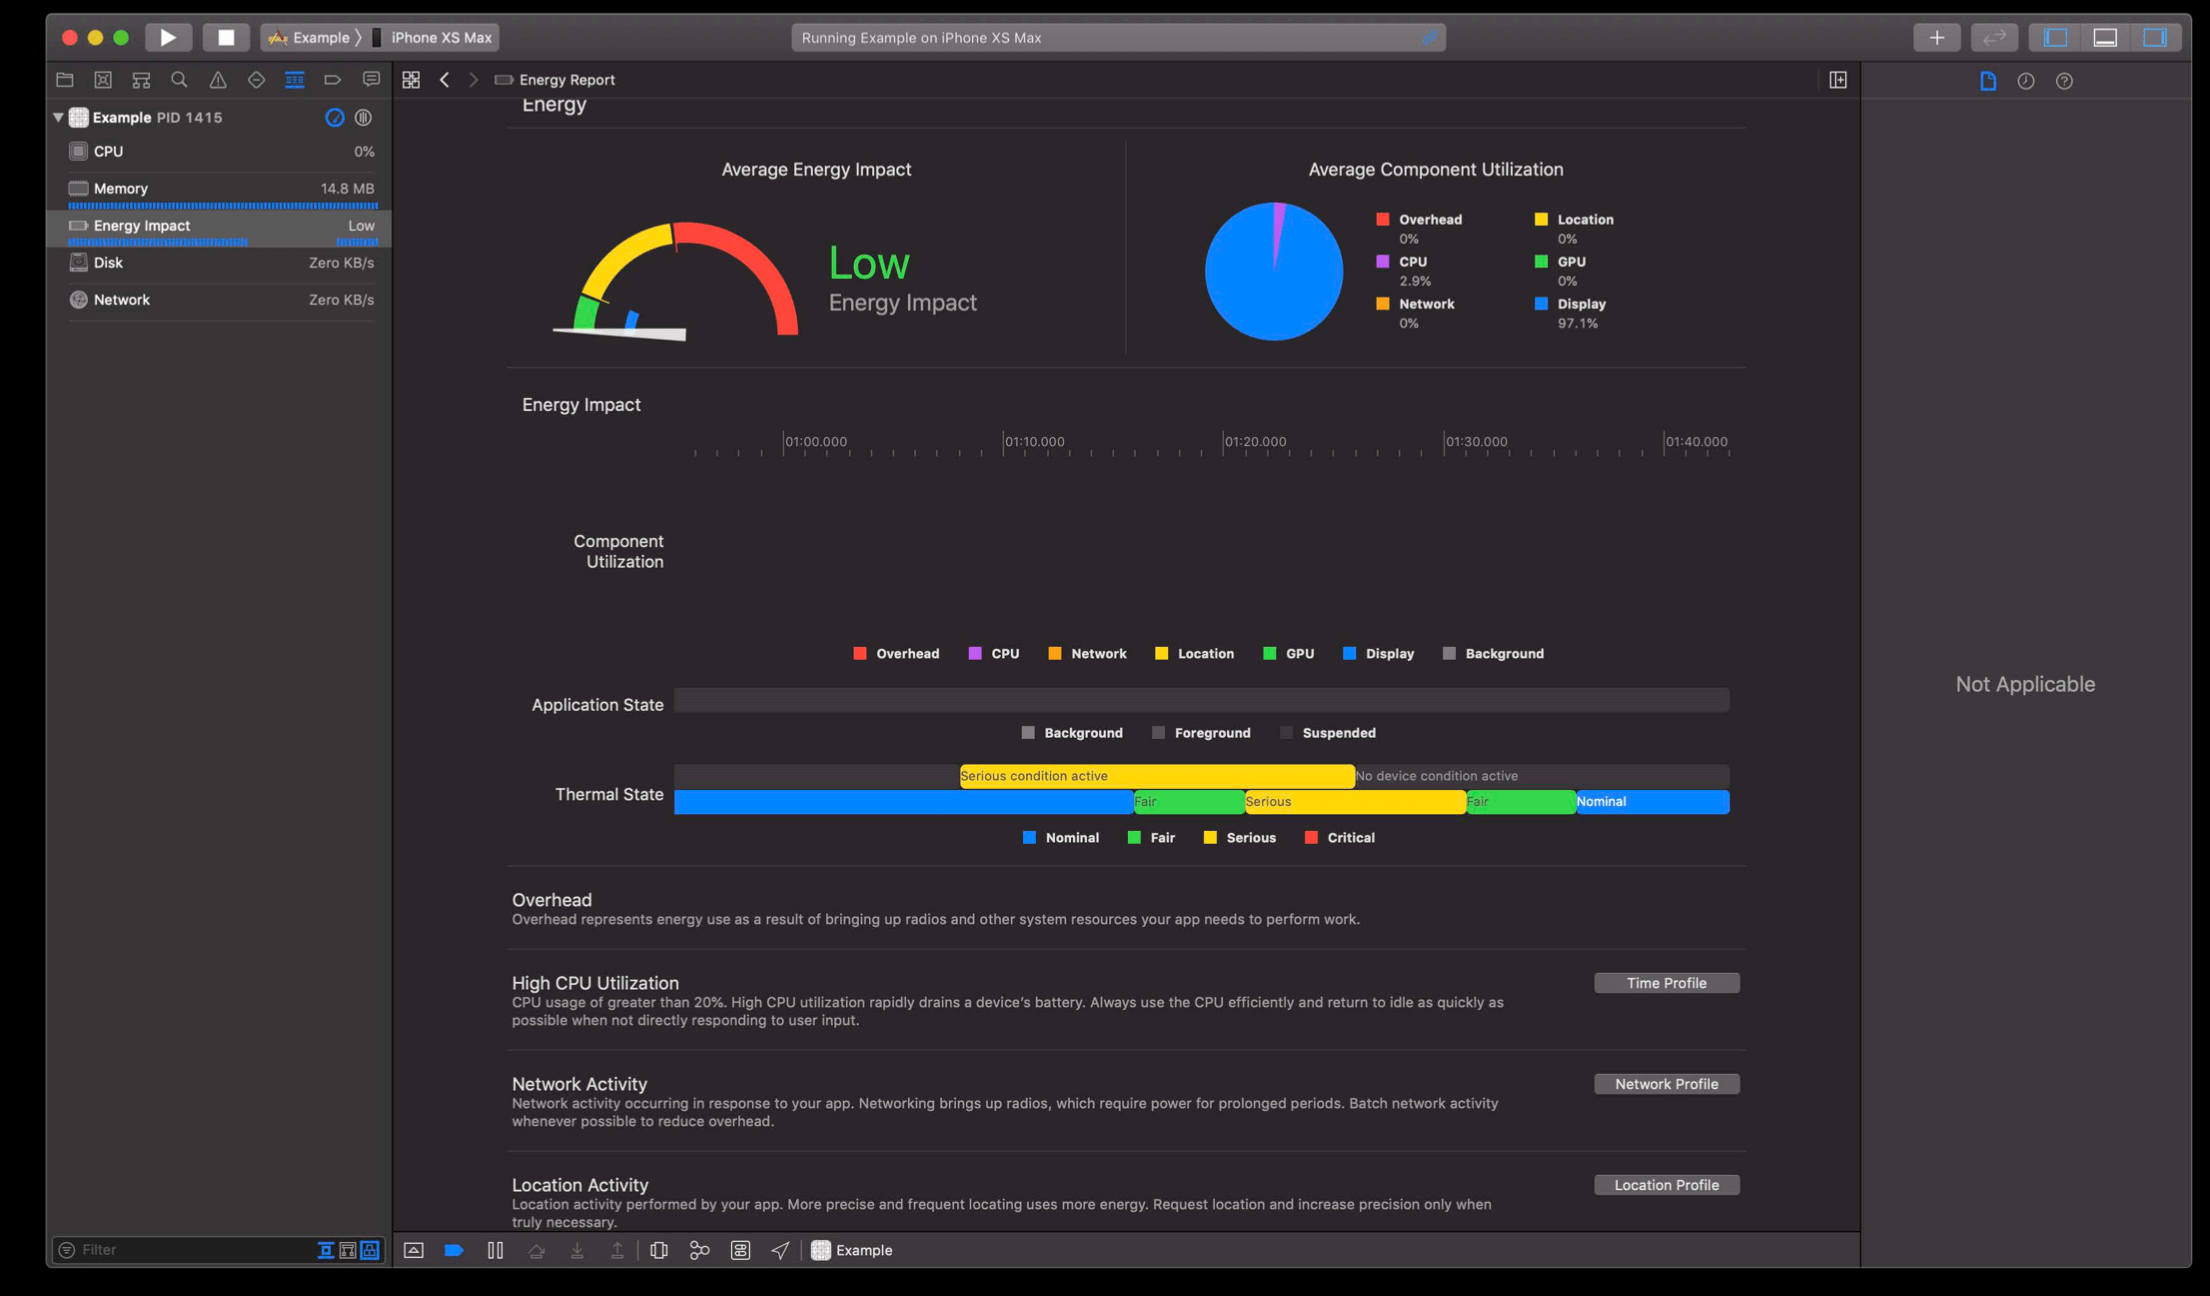
Register for ProcessInfo.thermalStateDidChangeNotification, use the ProcessInfo.ThermalState cases to react to thermal state changes.
NotificationCenter.default.addObserver(self, selector: #selector(reactToThermalStateChange(_:)),
                                       name: ProcessInfo.thermalStateDidChangeNotification,
                                       object: nil
)

@objc func reactToThermalStateChange(_ notification : Notification) {
    thermalState = ProcessInfo.processInfo.thermalState
}
New device conditions in Xcode 11 lets to you quickly and easily put your test devices in adverse network or temperature states.

UTF-8
Unicode is a big list of numbers, and corresponding to each number a human visible character. To use those integers in our computers, we need some way of representing those numbers, in memory, on disk, over the network.
One way of representing them is UTF-32, which is just a 32-bit number. You have to be concerned whether it's big endian or little endian. UTF-16 is more compact. It uses 16-bit numbers. But it still has the same problem.
什么是字节序?在计算机中单字节可以存储的数字范围是 0 - 127,128 或以上的数字必须有两个或更多字节存储。一个数字肯定是有高位和低位的,例如十进制数 13,1 是高位,3 是低位。那么,计算机进行数据存取是先处理高位、再处理低位呢,还是先处理低位、再处理高位?不同的硬件架构可能使用不同的字节序。先处理高位再处理低位,叫做大端字节序;先处理低位再处理高位,叫做小端字节序。
UTF-8 is an 8-bit byte-oriented encoding. Because of that, there are no byte order issues, and this is really what makes it the ideal encoding to use. And when I first heard about that, I immediately saw, this is the answer. This solves the problem for international text.
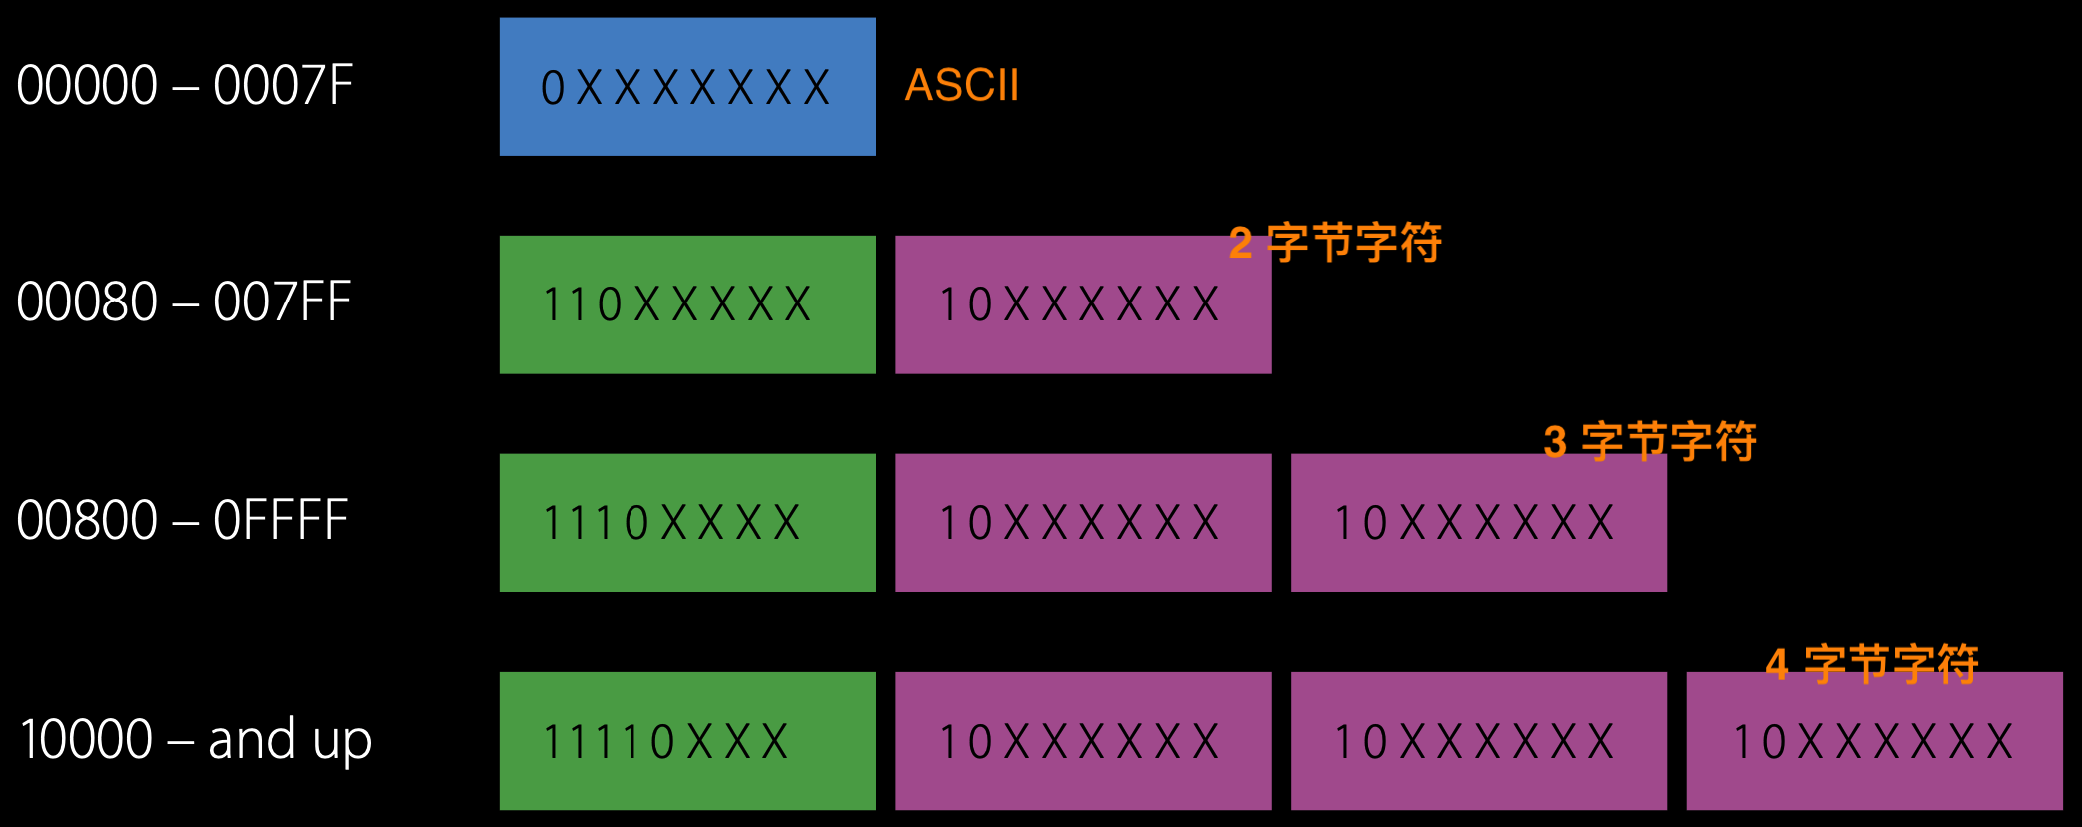
You can jump into the middle of a UTF-8 file anywhere, and by just looking at any byte, you can tell what you've got. So it's very, very robust to insertion and deletion errors. It's an encoding that is efficient enough to be compact but has just enough redundancy to be very reliable.
So, we recommend only use UTF-8, for everything!