图形渲染
GUI 框架
可以用于 iOS 开发的 GUI 框架:
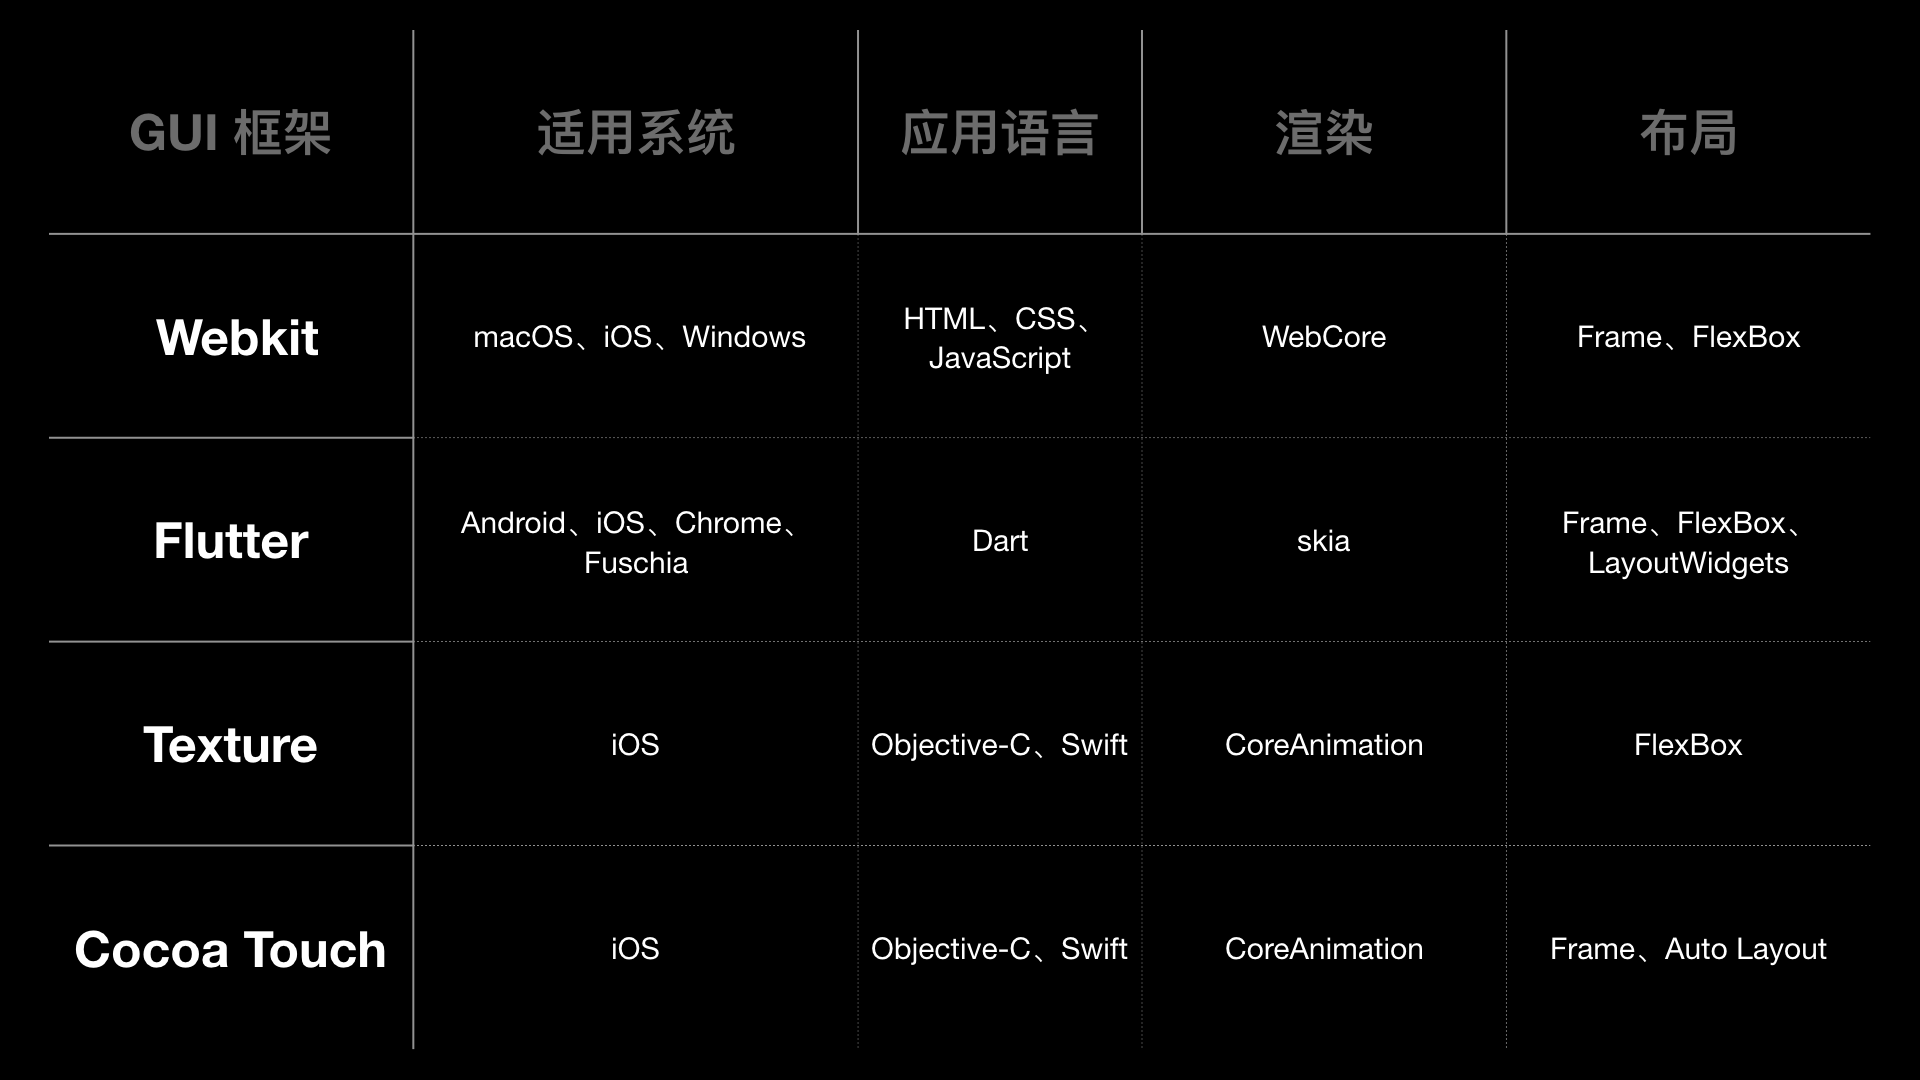
注:还有 SwiftUI
使用 WebKit 的网页显示慢,主要是由于 CSS 和 JavaScript 资源加载方式导致的。同时,解析时 HTML、CSS、JavaScript 需要兼容老版本,JavaScript 类型推断失败会重来,列表缺少重用机制等原因,导致 WebKit 框架的整体性能没有其他框架好。
我们看到屏幕上的图像,要经过布局、绘制、渲染、显示这几个阶段。
- 布局:更新视图树,计算出控件的大小和位置。
- 绘制:视图创建,计算每个控件的内容,图像解码等。
- 渲染:将 CPU 计算好的内容交给 GPU 渲染,生成 bitmap 放到帧缓冲区。
- 显示:视频控制器按照 VSync 信号读取帧缓冲区,传递给显示器显示。
原理
我们看到的 App 界面,是由 CPU 和 GPU 共同计算处理的。CPU 处理渲染内容的计算,比如视图创建、布局、图片解码等,内容计算完成后,再传输给 GPU 进行渲染。如果计算、渲染一帧的时间超过屏幕刷新频率要求的时间,界面就会出现卡顿。
原生界面更新渲染的流程,可以分为四步。
- 第一步,更新视图树,同步更新图层树。
- 第二步,CPU 计算要显示的内容,包括视图创建(设置 Layer 的属性)、布局计算、视图绘制(创建 Layer 的 Backing Image)、图像解码。当 RunLoop 在 BeforeWaiting 和 Exit 时,会通知注册的监听,然后对图层打包,打完包后,将打包数据发送给一个独立负责渲染的进程 Render Server。
- 第三步,数据到达 Render Server 后会被反序列化,得到图层树,按照图层树中图层顺序、RGBA 值、图层 frame 过滤图层中被遮挡的部分,过滤后将图层树转成渲染树,渲染树的信息会转给 OpenGL ES/Metal。前面 CPU 所处理的这些事情统称为 Commit Transaction。
- 第四步,Render Server 会调用 GPU,GPU 的主要工作是将 3D 坐标转化成 2D 坐标,然后再把 2D 坐标转成实际像素,具体实现可以分为顶点着色器(确定形状的点)、形状装配(确定形状的线)、几何着色器(确定三角形个数)、光栅化(确定屏幕像素点)、片段着色器(对像素点着色)、测试与混合(检查深度和透明度进行混合)六个阶段。
离屏渲染
要讲清楚离屏渲染这个问题,首先要了解计算机图形的渲染过程。CPU 处理好图片解码等工作、将计算好的图形内容交给 GPU 渲染,GPU 经过顶点着色、光栅化、片元着色,将渲染好的结果写入到帧缓冲区,随后视频控制器会根据 VSync 信号读取帧缓冲区的数据,输出到显示器显示。
如果有时因为一些限制,渲染服务无法一次性地把图形渲染到 frame buffer,而是需要分步骤完成——先开辟额外的缓冲空间,也称为离屏缓冲区,最后再将结果合成到 frame buffer,那么这个过程就称为离屏渲染。
一般情况下,你需要避免离屏渲染,因为这是很大的性能消耗,其中涉及两次昂贵的环境转换(转换环境到屏幕外缓冲区,然后转换环境到帧缓冲区)。
Instruments 的 Core Animation 工具有一个叫做 Color Offscreen-Rendered Yellow 的选项,它会将离屏渲染的区域标注为黄色(在模拟器中可以直接用)。同时记得检查 Color Hits Green and Misses Red 选项。绿色代表屏幕外缓冲区被复用,红色代表屏幕外缓冲区被重新创建。
代码示例:
// 触发离屏渲染
let button1 = UIButton(frame: CGRect(x: 0, y: 100, width: 100, height: 100))
button1.setImage(UIImage(named: "unnamed"), for: .normal)
button1.layer.cornerRadius = 50
button1.layer.masksToBounds = true

// iOS 9 的优化,设置单个图层的圆角不会触发离屏渲染
let button2 = UIButton(frame: CGRect(x: 150, y: 100, width: 100, height: 100))
button2.setImage(UIImage(named: "unnamed"), for: .normal)
button2.imageView?.layer.cornerRadius = 50
button2.imageView?.layer.masksToBounds = true // 设置这一层 masksToBounds 为 true
button2.layer.masksToBounds = false

// 背景色+图片,触发离屏渲染
let imageView1 = UIImageView(frame: CGRect(x: 0, y: 210, width: 100, height: 100))
imageView1.image = UIImage(named: "unnamed")
imageView1.backgroundColor = UIColor.blue
imageView1.layer.cornerRadius = 50
imageView1.layer.masksToBounds = true

// 只有图片、没有背景色,不会触发离屏渲染
let imageView2 = UIImageView(frame: CGRect(x: 150, y: 210, width: 100, height: 100))
imageView2.image = UIImage(named: "unnamed")
imageView2.layer.cornerRadius = 50
imageView2.layer.masksToBounds = true

// 图片+边框一起,触发离屏渲染
let imageView3 = UIImageView(frame: CGRect(x: 0, y: 320, width: 100, height: 100))
imageView3.image = UIImage(named: "unnamed")
imageView3.layer.cornerRadius = 50
imageView3.layer.masksToBounds = true
imageView3.layer.borderColor = UIColor.systemPink.cgColor
imageView3.layer.borderWidth = 3.0

// 不会触发离屏渲染
// 背景颜色、边框圆角不用设置 masksToBounds,也有圆角效果
let emptyView = UIView(frame: CGRect(x: 150, y: 320, width: 100, height: 100))
emptyView.layer.backgroundColor = UIColor.blue.cgColor
emptyView.layer.cornerRadius = 50.0
emptyView.layer.borderColor = UIColor.systemPink.cgColor
emptyView.layer.borderWidth = 3.0
emptyView.layer.masksToBounds = false

// 文字+背景色一起,触发离屏渲染
let label = UILabel(frame: CGRect(x: 0, y: 430, width: 100, height: 100))
label.text = "Hello world!Hello world!Hello world!Hello world!Hello world!"
label.layer.backgroundColor = UIColor.systemPink.cgColor
label.numberOfLines = 0
label.layer.cornerRadius = 50.0
label.layer.masksToBounds = true

// iOS 9 的优化,设置单个图层的圆角不会触发离屏渲染(content 层,文字)
let label2 = UILabel(frame: CGRect(x: 150, y: 430, width: 100, height: 100))
label2.text = "Hello world!Hello world!Hello world!Hello world!Hello world!"
label2.numberOfLines = 0
label2.layer.cornerRadius = 50.0
label2.layer.masksToBounds = true

// addSubview,父 view 和子 view 都没有离屏渲染,叠加也不会触发离屏渲染
let containerView = UIView(frame: CGRect(x: 150, y: 540, width: 100, height: 100))
containerView.backgroundColor = UIColor.systemPurple
containerView.layer.cornerRadius = 50.0
containerView.layer.masksToBounds = false
let imageView4 = UIImageView(frame: CGRect(x: 0, y: 0, width: 100, height: 100))
imageView4.image = UIImage(named: "unnamed")
imageView4.layer.cornerRadius = 50
imageView4.layer.masksToBounds = true
containerView.addSubview(imageView4)
在同等数量的规模下,对性能的影响等级:Shadow > RoundedCorner > Mask > GroupOpacity。
任何时候优先考虑避免触发离屏渲染,无法避免时优化方案有几种:
- AsyncDisplayKit(现已更名为 Texture)
- CoreGraphics 绘制,尤其对于部分圆角的图片。
- 设置 layer.opache = true
- 用叠加图层的方式来达到效果。如果图片大小固定,设计同学配合出图,直接 addSubview 盖住;视频也可以用这个办法。
- 阴影用 shadowPath
- 模糊效果可以自己计算,不用 UIBlurEffectView。
- 最后,打开 shouldRasterize:适用于静态内容的视图,也就是不做动画、内部结构和内容不发生变化的视图。
圆角
cornerRadius 的官方解释: By default, the corner radius does not apply to the image in the layer’s contents property; it applies only to the background color and border of the layer.
因此,对于背景色、边框,只需要 view.layer.cornerRadius = 10.0; 就可以设置圆角,只设置 cornerRadius 不会引发离屏渲染。
UIImageView 的 image、UILabel 的 text 等,都属于 content 层的东西,对 content 层做圆角,除了 cornerRadius 还要设置 layer.maskToBounds = true 才有效。iOS 9 的优化,对单个图层做圆角是不会触发离屏渲染的,但如果 content 层再加上 backgroundColor 或 border 任意一个一起做圆角,就会触发离屏渲染!
UIImageView 添加圆角:
@implementation UIImageView (CornerRadius)
- (void)addCornersWithRadius:(CGFloat)radius {
    UIGraphicsBeginImageContextWithOptions(self.bounds.size, false, UIScreen.mainScreen.scale);
    CGContextRef context = UIGraphicsGetCurrentContext();
    UIBezierPath * path = [UIBezierPath bezierPathWithRoundedRect:self.bounds byRoundingCorners:UIRectCornerAllCorners cornerRadii:CGSizeMake(radius, radius)];
    CGContextAddPath(context, path.CGPath);
    CGContextClip(context);
    [self.image drawInRect:self.bounds];
    UIImage *output = UIGraphicsGetImageFromCurrentImageContext();
    UIGraphicsEndImageContext();
    self.image = output;
}
Core Graphics
Core Graphics, also known as Quartz 2D, is an advanced, two-dimensional drawing engine available for iOS, tvOS and macOS application development. Quartz 2D provides low-level, lightweight 2D rendering with unmatched output fidelity regardless of display or printing device. Quartz 2D is resolution- and device-independent.
A bitmap image (or sampled image) is an array of pixels (or samples). Each pixel represents a single point in the image. JPEG, TIFF, and PNG graphics files are examples of bitmap images. Each sample in a bitmap contains one or more color components in a specified color space, plus one additional component that specifies the alpha value to indicate transparency. Each component can be from 1 to as many as 32 bits.
UIImage (UIKit): An object that manages image data in your app.
CIImage (Core Image): A representation of an image to be processed or produced by Core Image filters. You use CIImage objects in conjunction with other Core Image classes—such as CIFilter, CIContext, CIVector, and CIColor—to take advantage of the built-in Core Image filters when processing images. You can create CIImage objects with data supplied from a variety of sources, including Quartz 2D images, Core Video image buffers (CVImageBuffer), URL-based objects, and NSData objects.
CGImage (Core Graphics): A bitmap image or image mask.
UIImage(named:) vs UIImage(contentsOfFile:)
UIImage(named:) This method checks the system caches for an image object with the specified name and returns the variant of that image that is best suited for the main screen. If a matching image object is not already in the cache, this method creates the image from an available asset catalog or loads it from disk. The system may purge cached image data at any time to free up memory.
UIImage(contentsOfFile:) This method loads the image data into memory and marks it as purgeable. If the data is purged and needs to be reloaded, the image object loads that data again from the specified path.
官方文档明确说了,用 UIImage(named:) 加载图片后会缓存在内存中,即使 UIImage * 对象被自动释放池释放了,这份缓存也不会释放(缓存在系统需要的时候释放,时机不可预计)。因为缓存的原因,渲染效率会更高,但如果图像很大、数量很多,则会消耗较多的内存。加载很大的图片并一次性地使用,是没有必要做缓存的,这种情况下用 UIImage(contentsOfFile:) 更好。