UIKit
UIResponder 及其所有子类,以及任何操纵用户界面的行为,都要在主线程进行,见 Apple Developer Documentation。
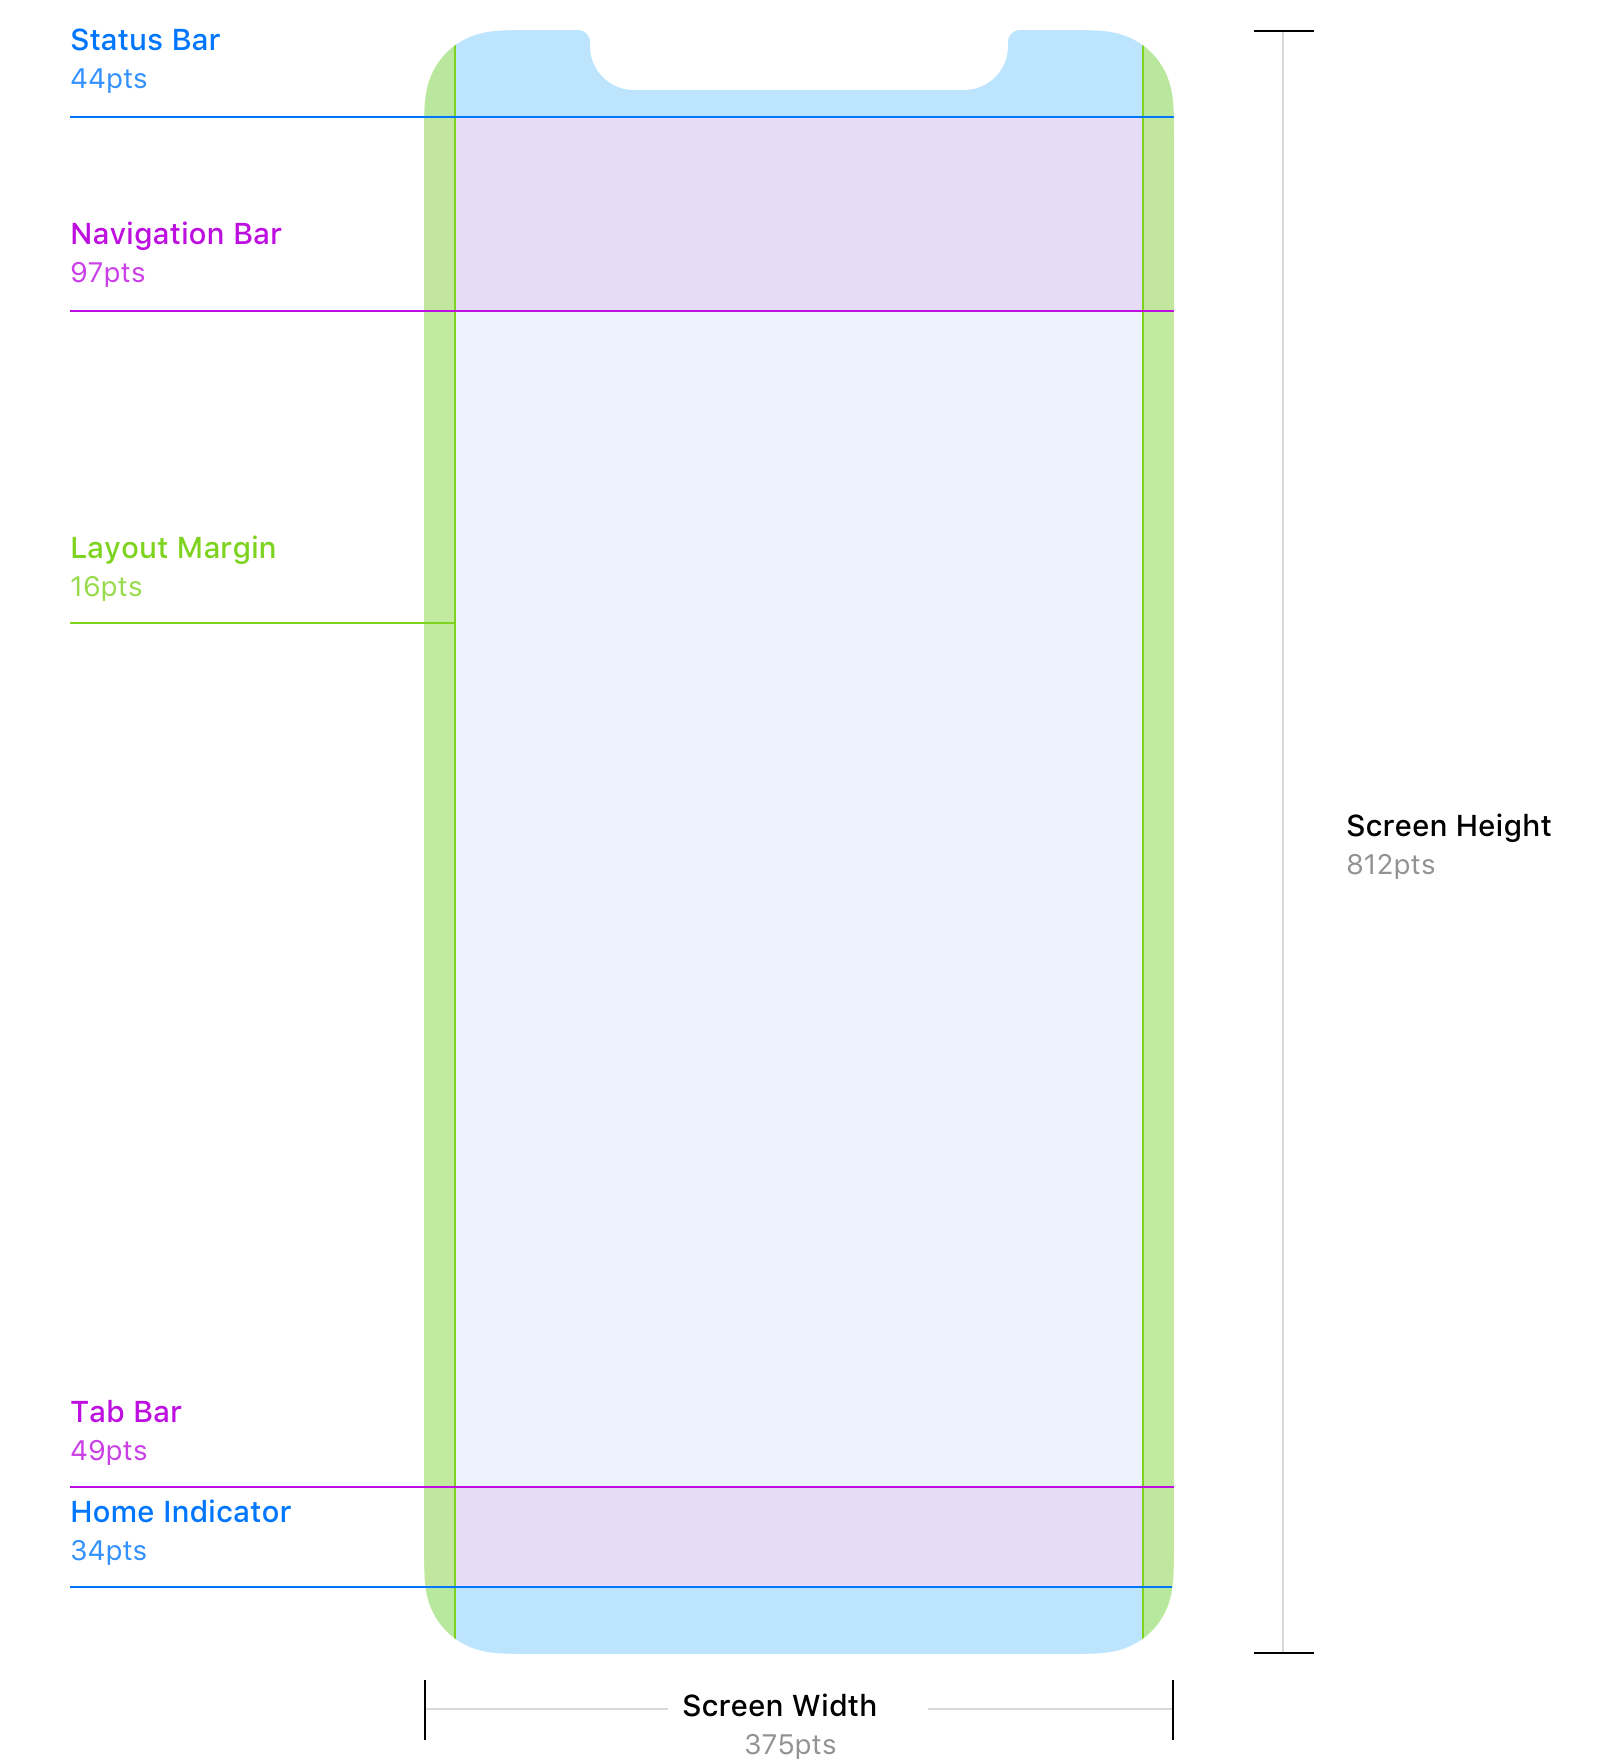
iPhone X Screen
The iOS Design Guidelines - Ivo Mynttinen / User Interface Designer
Render Loop
The Render Loop is the process that runs potentially at 120 times every second. That makes sure that all the content is ready to go for each frame.
First every view that needs it will receive updateConstraints(). And that runs from the leaf most views up to the view hierarchy towards the window. Next, every view receives layoutSubViews(). This runs the opposite direction starting from the window going down towards the leaves. Last, every view gets draw(_:) if it needs it also from the window towards the leaves.
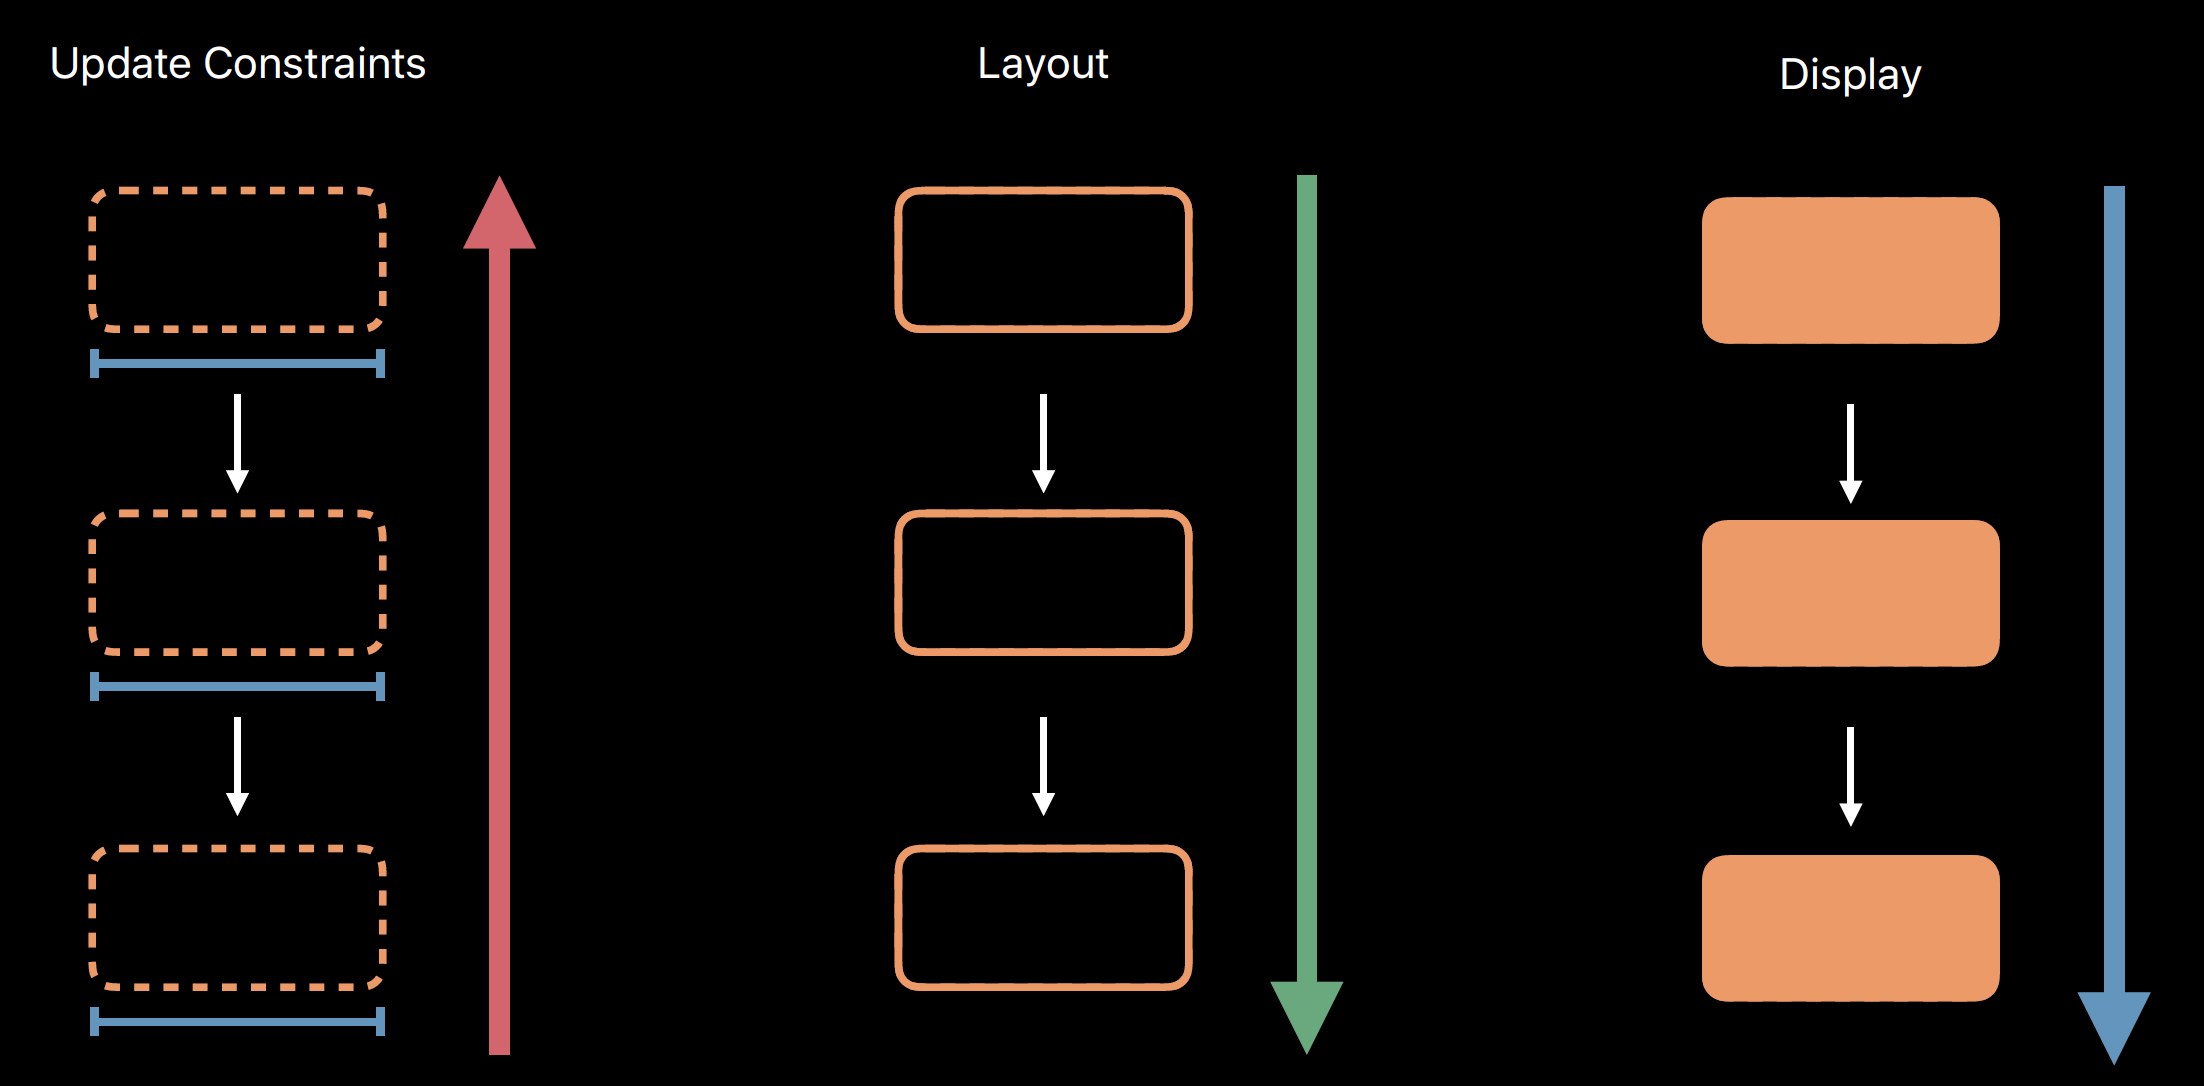
The Render Loop consists of three phases -- Update Constraints, Layout, and Display. They all have the exact same purpose and they have exact parallel sets of methods.
| Update Constraints | Layout | Display |
|---|---|---|
| updateConstraints() | layoutSubViews() | draw(_:) |
| setNeedsUpdateConstraints() | setNeedsLayout() | setNeedsDisplay() |
| updateConstraintsIfNeeded() | layoutIfNeeded() |
setNeedsLayout 是异步的,不要直接调用 layoutSubviews,我们自定义的 UIView 可以重载 layoutSubviews,用于调整子视图的 frame。
You should not call layoutSubviews directly. If you want to force a layout update, call the setNeedsLayout method instead to do so. This method makes a note of the request and returns immediately. Because this method does not force an immediate update, but instead waits for the next update cycle, you can use it to invalidate the layout of multiple views before any of those views are updated. This behavior allows you to consolidate all of your layout updates to one update cycle, which is usually better for performance.
If you want to update the layout of your views immediately, call the layoutIfNeeded() method. If no layout updates are pending, this method exits without modifying the layout or calling any layout-related callbacks.
setNeedsDisplay 是异步的,不要直接调用 drawRect:,我们自定义的 UIView 可以重载 drawRect:,用于绘制自定义的内容。
drawRect: Subclasses that use technologies such as Core Graphics and UIKit to draw their view’s content should override this method and implement their drawing code there. UIKit creates and configures a graphics context for drawing and adjusts the transform of that context so that its origin matches the origin of your view’s bounds rectangle. You can get a reference to the graphics context using the UIGraphicsGetCurrentContext function, but do not establish a strong reference to the graphics context because it can change between calls to the drawRect: method.
Auto Layout
WWDC 2018 - High Performance Auto Layout
iOS 布局发展:Frame -> AutoLayout (iOS 6, Apple VSL, Masonry, SnapKit) -> UIStackView (iOS 9, 模仿前端 Flexbox 布局思路) -> SwiftUI (iOS 13)
1997 年 Auto Layout 用到的布局算法 Cassowary 被发明了出来,它能够有效解析线性等式系统和线性不等式系统,用来表示用户界面中那些相等关系和不等关系。
使用 Auto Layout 和手写布局的区别,就是多了自动布局引擎(统一管理布局的创建、更新和销毁),以及约束的计算。
iOS 12 的 Auto Layout 更多地利用了 Cassowary 算法的界面更新策略,使其真正完成了高效的界面线性策略计算。可以放心使用了。
Auto Layout 与 Frame 的区别是多了布局引擎。当约束发生变化后时,会触发 Deffered Layout Pass(延迟布局传递),并做容错处理(约束丢失、冲突等情况),并把 view 标记为 dirty。当下一次刷新屏幕动作来临(或者是调用 layoutIfNeeded)时,引擎会从顶向下调用 layoutSubviews,通过 Cassowary 算法计算各个子视图的位置,得到 frames,接下来的过程就跟手写 frame 是一样的了。
抗拉伸、抗压缩
Content Hugging Priority: 值越大,越不容易被拉伸
Content Compression Resistance Priority: 值越大,越不容易被压缩
|UIImageView|UILabel|UILabel|
两个 Label 都是根据内容自适应动态宽度;
当两个 Label 的长度加起来不足屏幕宽度时,Auto Layout 不知道优先拉伸哪一个,此时 Content Hugging Priority 起作用;
当两个 Label 的长度加起来超过了屏幕宽度时,Auto Layout 不知道先压缩哪个,此时 Content Compression Resistance Priority 起作用。
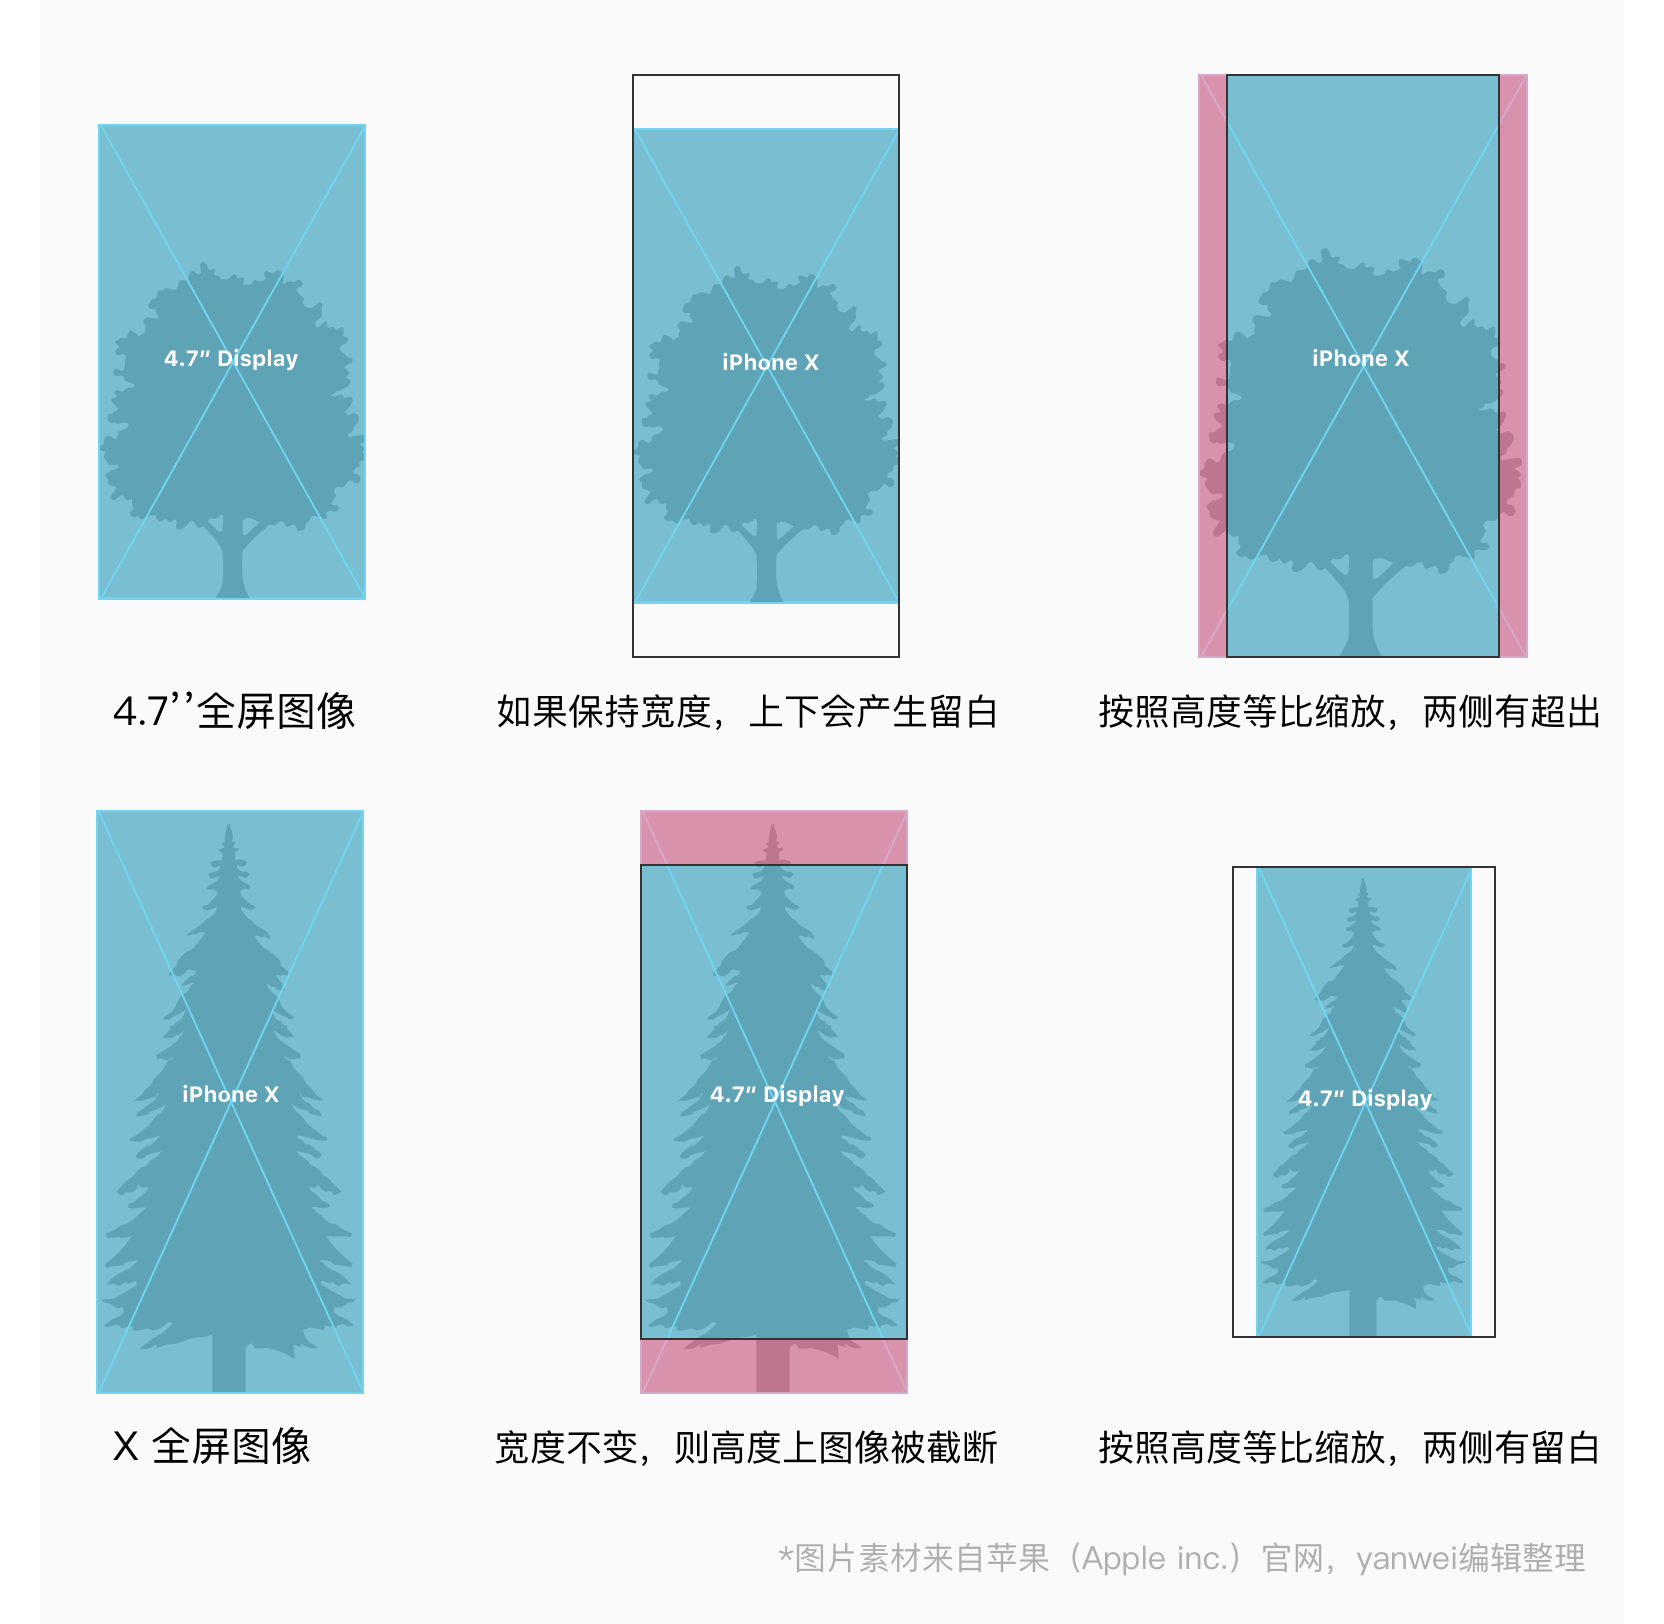
contentMode
hitTest
func hitTest(_ point: CGPoint, with event: UIEvent?) -> UIView?
Returns the farthest descendant of the receiver in the view hierarchy (including itself) that contains a specified point.
This method traverses the view hierarchy by calling the point(inside:with:) method of each subview to determine which subview should receive a touch event. If point(inside:with:) returns true, then the subview’s hierarchy is similarly traversed until the frontmost view containing the specified point is found.
func point(inside point: CGPoint, with event: UIEvent?) -> Bool
Returns a Boolean value indicating whether the receiver contains the specified point.
clipsToBounds
By default, when a subview’s visible area extends outside of the bounds of its superview, no clipping of the subview's content occurs. Use the clipsToBounds property to change that behavior.
frame and bounds
frame: The frame rectangle, which describes the view’s location and size in its superview’s coordinate system.
bounds: The bounds rectangle, which describes the view’s location and size in its own coordinate system.
UIView 自己的坐标系的原点,就是它的 frame 的 origin
autoresizingMask
autoresizingMask is an integer bit mask that determines how the receiver resizes itself when its superview’s bounds change.
When a view’s bounds change, that view automatically resizes its subviews according to each subview’s autoresizing mask. You specify the value of this mask by combining the constants described in UIView.AutoresizingMask using the C bitwise OR operator. Combining these constants lets you specify which dimensions of the view should grow or shrink relative to the superview. The default value of this property is none, which indicates that the view should not be resized at all.
When more than one option along the same axis is set, the default behavior is to distribute the size difference proportionally among the flexible portions. The larger the flexible portion, relative to the other flexible portions, the more it is likely to grow. For example, suppose this property includes the flexibleWidth and flexibleRightMargin constants but does not include the flexibleLeftMargin constant, thus indicating that the width of the view’s left margin is fixed but that the view’s width and right margin may change. Thus, the view appears anchored to the left side of its superview while both the view width and the gap to the right of the view increase.
If the autoresizing behaviors do not offer the precise layout that you need for your views, you can use a custom container view and override its layoutSubviews() method to position your subviews more precisely.
translatesAutoresizingMaskIntoConstraints is a Boolean value that determines whether the view’s autoresizing mask is translated into Auto Layout constraints.
If this property’s value is true, the system creates a set of constraints that duplicate the behavior specified by the view’s autoresizing mask. This also lets you modify the view’s size and location using the view’s frame, bounds, or center properties, allowing you to create a static, frame-based layout within Auto Layout.
Note that the autoresizing mask constraints fully specify the view’s size and position; therefore, you cannot add additional constraints to modify this size or position without introducing conflicts. If you want to use Auto Layout to dynamically calculate the size and position of your view, you must set this property to false, and then provide a non ambiguous, nonconflicting set of constraints for the view.
By default, the property is set to true for any view you programmatically create. If you add views in Interface Builder, the system automatically sets this property to false.
横屏
-[UIViewController shouldAutorotate]
-[UIViewController supportedInterfaceOrientations]
When the device orientation changes, the system calls this method on the root view controller or the topmost modal view controller that fills the window. If the view controller supports the new orientation, the system rotates the window and the view controller. The system only calls this method if the view controller's shouldAutorotate method returns YES.
To determine whether to rotate, the system compares the view controller's supported orientations with the app's supported orientations — as determined by the Info.plist file or the app delegate's application:supportedInterfaceOrientationsForWindow: method — and the device's supported orientations.(iOS devices without a Home button, such as iPhone 12, don’t support UIInterfaceOrientationMaskPortraitUpsideDown orientation)
#pragma mark - 禁止横屏

- (BOOL)shouldAutorotate {
    return NO;
}

- (UIInterfaceOrientationMask)supportedInterfaceOrientations {
    return UIInterfaceOrientationMaskPortrait;
}
状态栏颜色
状态栏的颜色由 UIViewController 决定,AppDelegate 调用 rootViewController 的 preferredStatusBarStyle 方法决定状态栏颜色。
- (UIStatusBarStyle)preferredStatusBarStyle {} 通常用这个方法返回状态栏颜色。
- (UIViewController *)childViewControllerForStatusBarStyle {} 通常用在 UINavigationController 的场景,告诉 UIKit 我希望用哪个 UIViewController 返回的状态栏颜色。
setNeedsStatusBarAppearanceUpdate Call this method if the view controller's status bar attributes, such as hidden/unhidden status or style, change. If you call this method within an animation block, the changes are animated along with the rest of the animation block.
prefersStatusBarHidden 状态栏隐藏
UIViewController
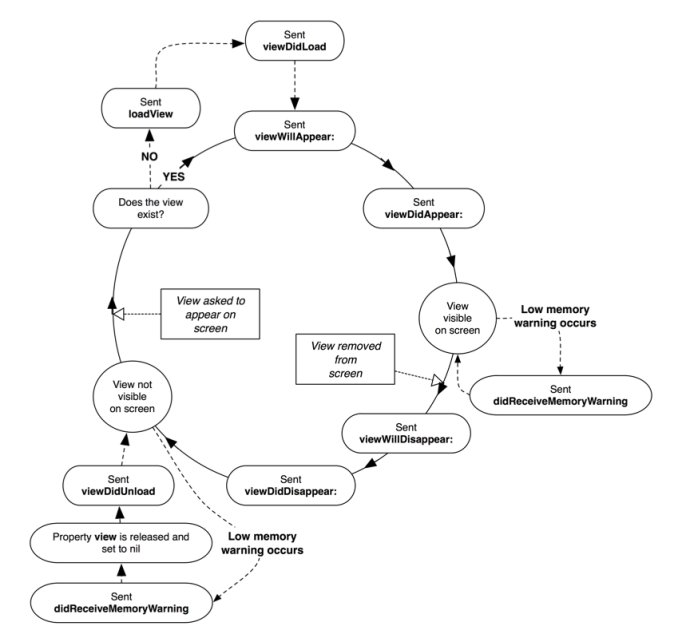
添加子 VC:
// 来自 UIKit 的接口注释:
// addChildViewController: will call [child willMoveToParentViewController:self] before adding the child.
// However, it will not call didMoveToParentViewController:.
[self addChildViewController:self.flutterVC];
[self.view addSubview:self.flutterVC.view];
[self.flutterVC didMoveToParentViewController:self];
移除子 VC:
// 来自 UIKit 的接口注释:
// Similarly, removeFromParentViewController does not call [self willMoveToParentViewController:nil] before removing the child.
[self.flutterVC willMoveToParentViewController:nil];
[self.flutterVC.view removeFromSuperview];
[self.flutterVC removeFromParentViewController];
self.flutterVC = nil;
添加子 VC 后,父 VC 的事件会向子 VC 传递:
- 生命周期事件:
viewWillAppear,viewDidAppear,viewWillDisappear,viewDidDisappear - 旋转事件:
willRotateToInterfaceOrientation:duration:,willAnimateRotationToInterfaceOrientation:duration:,didRotateFromInterfaceOrientation:
A presents B, B presents C:
以 B 为参照:A 为 presentingViewController,C 为 presentedViewController
UIApplication
ignoreSnapshotOnNextApplicationLaunch
Swipe up from the bottom to the middle of your screen and hold until you see the App Switcher.
进入 App Switcher 时不会触发 applicationDidEnterBackground,要回到主屏幕时才会触发。
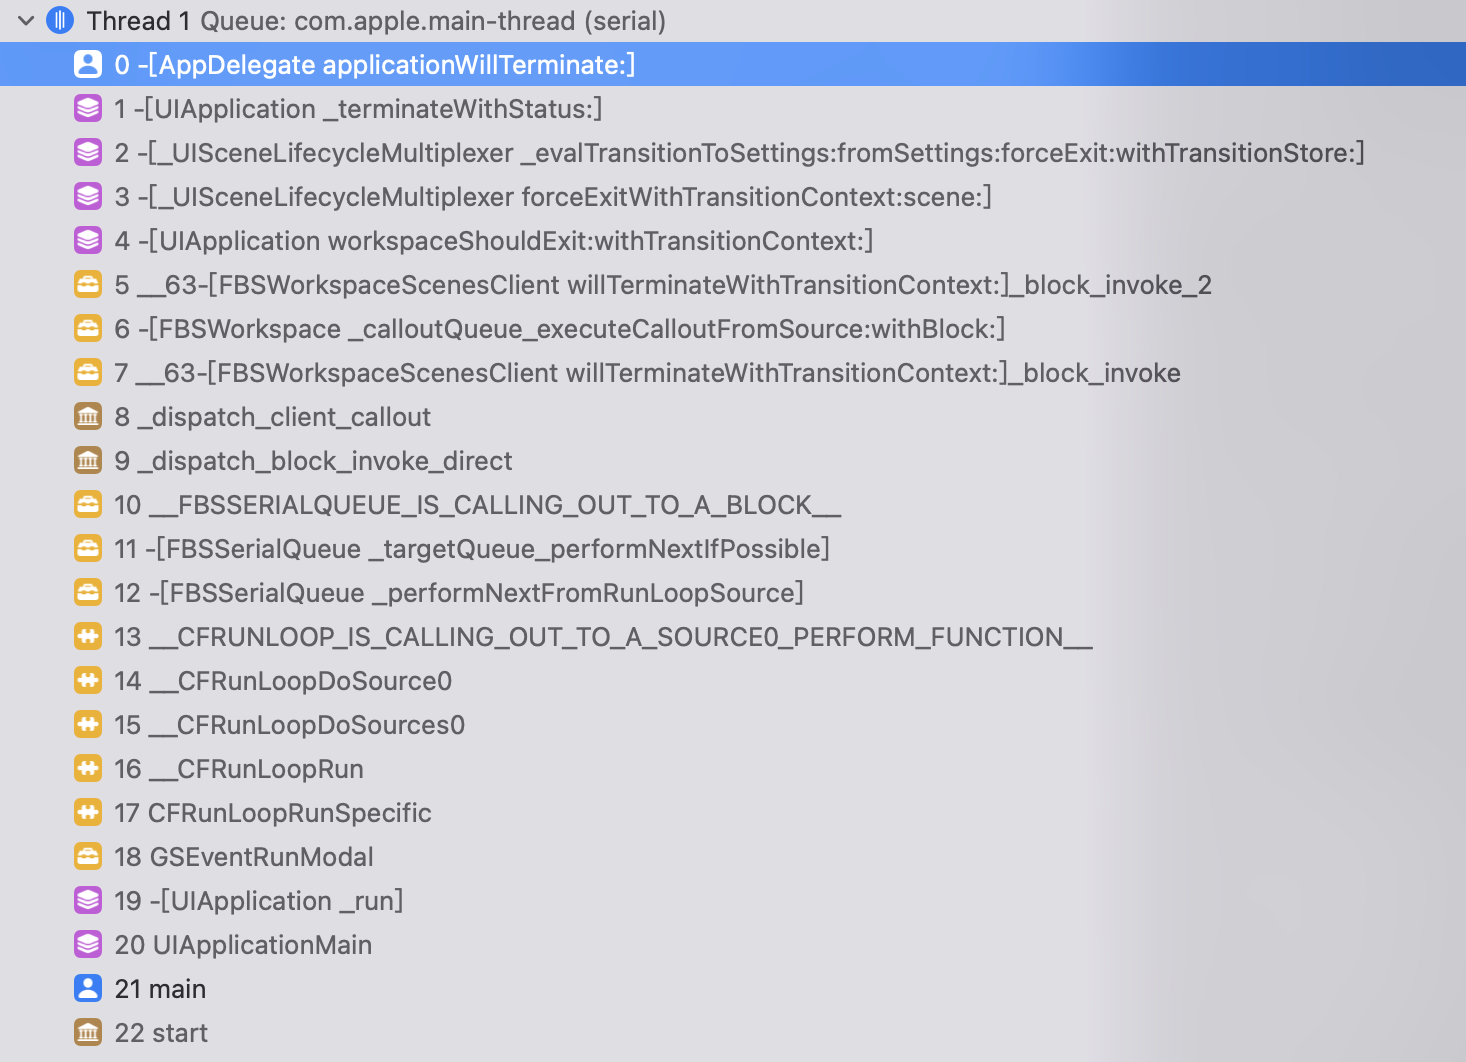
进入 App Switcher 后退出 App(iOS 13+):(注意,applicationDidEnterBackground 没有调用的)
Demo[9565:1006064] -[SceneDelegate sceneWillResignActive:]
Demo[9565:1006064] -[SceneDelegate sceneDidDisconnect:]
Demo[9565:1006064] -[AppDelegate applicationWillTerminate:]
进入 App Switcher 后退出 App(iOS 12):
Demo[9598:1013427] -[AppDelegate applicationDidEnterBackground:]
Demo[9598:1013427] -[AppDelegate applicationWillTerminate:]
UIGestureRecognizer
UIGestureRecognizer 有个方法叫做 requireGestureRecognizerToFail,他可以指定某一个 recognizer,即便自己已经满足条件了,也不会立刻触发,会等到该指定的 recognizer 确定失败之后才触发。
// 优先响应屏幕右滑返回
for (UIGestureRecognizer *gestRecognizer in self.navigationController.view.gestureRecognizers) {
    if ([gestRecognizer isKindOfClass:[UIScreenEdgePanGestureRecognizer class]]) {
        [自定义手势 requireGestureRecognizerToFail:gestRecognizer]; // 我们自己添加的手势,需要抠边返回手势确认失败再触发
    }
}
截图
仅网页场景需要使用 renderLayerInContext 进行重绘,其它的缩略图统一都用 drawViewHierarchyInRect(快)。
- (UIImage *)thumbnail {
    if (!_thumbnail) {
        UIGraphicsImageRendererFormat *format = [[UIGraphicsImageRendererFormat alloc] init];
        format.scale = 1; // 控制内存消耗
        UIGraphicsImageRenderer *renderer = [[UIGraphicsImageRenderer alloc] initWithSize:self.bounds.size format:format];
        _thumbnail = [renderer imageWithActions:^(UIGraphicsImageRendererContext *_Nonnull rendererContext) {
            [self drawViewHierarchyInRect:self.bounds afterScreenUpdates:NO];
        }];
    }
    return _thumbnail;
}

- (UIImage *)thumbnail {
    if (!_thumbnail) {
        UIGraphicsImageRendererFormat *format = [[UIGraphicsImageRendererFormat alloc] init];
        format.scale = 1; // 控制内存消耗
        UIGraphicsImageRenderer *renderer = [[UIGraphicsImageRenderer alloc] initWithSize:self.bounds.size format:format];
        _thumbnail = [renderer imageWithActions:^(UIGraphicsImageRendererContext *_Nonnull rendererContext) {
            @try {
                [self.layer renderInContext:rendererContext.CGContext];
            } @catch (NSException *exception) {
            }
        }];
    }
    return _thumbnail;
}
UIPasteboard
For sharing data with any other app, use the systemwide general pasteboard.
For sharing data with another app from your team—that has the same team ID as the app to share from—use named pasteboards.
侧滑返回
webView.allowsBackForwardNavigationGestures = NO;
[self.scrollView.panGestureRecognizer requireGestureRecognizerToFail:self.navigationController.interactivePopGestureRecognizer];