Core Animation
Core Animation 是 iOS 的 UIView 的基础和底层,属于 UIKit;在 macOS 上也有对应的封装 NSView,属于 AppKit。
CALayer
CALayer 类在概念上和 UIView 类似,同样也是一些被层级关系树管理的矩形块;实际上 UIView 背后关联的图层,才是真正在屏幕上显示的,它们很多的属性也是相对应的。和 UIView 最大的不同是,CALayer 不处理用户的交互。
为什么 iOS 要基于 UIView 和 CALayer 提供两个平行的层级关系呢?原因在于要做职责分离。在 iOS 和 macOS 两个平台上,事件和用户交互有很多地方的不同,基于多点触控的用户界面和基于鼠标键盘的有着本质的区别,它们共享 Core Animation 对图形的绘制,并分别实现用户交互的各�种接口。
既然有了简洁的 UIView 的高级接口,为什么还要了解 Core Animation 呢?虽然这个框架的名字叫做 Core Animation,实际上很多丰富的、自定义的视觉效果,我们要通过 CALayer 才能实现,而这些是 UIView 没有暴露出来的,包括:
- 阴影、圆角、边框
- 3D 变换
- 非矩形范围
- 透明遮罩
- 多级非线性动画
- 粒子效果 (CAEmitterLayer)
- 渐变效果 (CAGradientLayer)
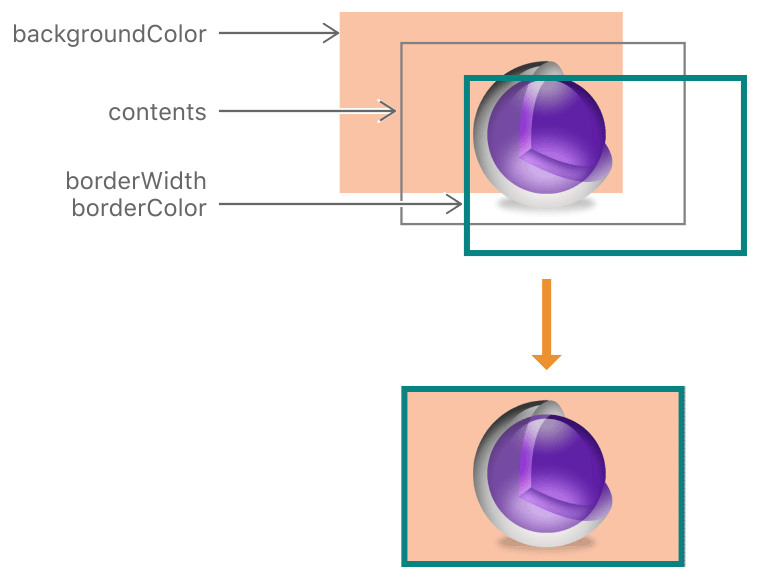
CALayer 有三个视觉元素,中间的 contents 属性是这样声明的:var contents: AnyObject?,实际上它必须是一个 CGImage 才能显示。
隐式动画
你并不需要在 Core Animation 中手动打开动画,任何对 CALayer 属性的改变都不是瞬间完成的,而是从先前的值平滑地过渡到新的值,除非你明确禁用了这个功能,这是框架默认的“隐式动画”。
在这个示例中我们仅仅是改变了 CALayer 的一个属性,并没有指定任何动画的类型,而 Core Animation 自动帮我们实现了一个平滑的动画效果。
import UIKit

class ViewController: UIViewController {
    private let colorLayer = CALayer()

    override func viewDidLoad() {
        super.viewDidLoad()
        self.view.backgroundColor = .white

        colorLayer.frame = CGRect(origin: CGPoint.zero, size: CGSize(width: 100, height: 100))
        colorLayer.backgroundColor = UIColor.blue.cgColor
        self.view.layer.addSublayer(colorLayer)
    }

    override func touchesEnded(_ touches: Set<UITouch>, with event: UIEvent?) {
        // randomize the layer background color
        let red = CGFloat(arc4random()) / CGFloat(UInt32.max)
        let green = CGFloat(arc4random()) / CGFloat(UInt32.max)
        let blue = CGFloat(arc4random()) / CGFloat(UInt32.max)
        colorLayer.backgroundColor = UIColor(red: red, green: green, blue: blue, alpha: 1.0).cgColor
    }
}
Core Animation 在每个 RunLoop 周期中自动开始一次新的事务(RunLoop 是 iOS 负责收集用户输入,处理未完成的定时器或者网络事件,最终重新绘制屏幕的东西),即使你不显式地使用 [CATransaction begin],在一个特定 RunLoop 循环中的任何属性的变化都会被收集起来,然后做一次 0.25 秒的动画。
我们可以通过把改变属性的代码放在 CATransaction 里执行,来修改动画的时间、叠加不同的动画。
import UIKit

class MyViewController: UIViewController {
    @objc func nestedTransaction(_ sender: UIButton) {
        // 嵌套的 CATransaction 中,动画效果是叠加的
        CATransaction.begin() // push a transaction to the stack
        CATransaction.setAnimationDuration(1.0)
        colorLayer.backgroundColor = UIColor.red.cgColor
        // push another transaction to the stack, transaction can be nested
        CATransaction.begin()
        CATransaction.setAnimationDuration(3.0)
        colorLayer.transform = CATransform3DMakeScale(3, 3, 3)
        CATransaction.commit() // pop
        CATransaction.commit() // pop
    }
}
UIView 中也提供了这组方法的封装,+beginAnimations:context: 和 +commitAnimations
iOS 4+,苹果对 UIView 添加了一种基于 block 的动画方法:+animateWithDuration:animations:completion:,block 中所有属性的改变都会自动被 CATransaction 包含,可以避免开发者手动对 +begin 和 +commit 匹配容易造成的失误。
UIView 关联的图层禁用了隐式动画,如果想对这个图层做动画可以:
- 使用 UIView 的动画函数
- 或者继承 UIView,并 override
-actionForLayer:forKey:方法,返回动画(默认返回 nil 即无动画) - 或者直接创建一个显式动画
显式动画
Implicit animations are a straightforward way to create animated user interfaces on iOS, and they are the mechanism on which UIKit’s own animation methods are based, but they are not a completely general-purpose animation solution.
In this chapter, we will look at explicit animations, which allow us to specify custom animations for particular properties or create nonlinear animations, such as a movement along an arbitrary curve.
The first type of explicit animation we will look at is the property animation. Property animations target a single property of a layer and specify a target value or range of values for that property to animate between. Property animations come in two flavors: basic and keyframe.
类的继承关系:
graph TD CAAnimation(["CAAnimation (Abstract)"]) CATransition(["CATransition"]) CAAnimation --> CATransition CAPropertyAnimation(["CAPropertyAnimation (Abstract)"]) CABasicAnimation(["CABasicAnimation"]) CAKeyframeAnimation(["CAKeyframeAnimation"]) CAAnimation --> CAPropertyAnimation CAPropertyAnimation --> CABasicAnimation CAPropertyAnimation --> CAKeyframeAnimation
CABasicAnimation is interesting in that it shows us the underlying mechanism behind most of the implicit animations on iOS, but adding a CABasicAnimation to a layer explicitly is a lot of work for little benefit when there are simpler ways to achieve the same effect (either using implicit animations for hosted layers, or UIView animation for views and backing layers).
CAKeyframeAnimation, however, is considerably more powerful and has no equivalent interface exposed in UIKit. It still operates on a single property, but it is not limited to just a single start and end value, and instead can be given an arbitrary sequence of values to animate between.
import UIKit

class MyViewController: UIViewController {
    private let shipLayer = CALayer()
    override func viewDidLoad() {
        super.viewDidLoad()
        /* 我们创建一个宇宙飞船,它会沿着我们指定的路径运动 */
        shipLayer.frame = CGRect(x: 0, y: 0, width: 64, height: 64)
        shipLayer.position = CGPoint(x: 0, y: 150) // start point
        shipLayer.contents = UIImage(named: "train")!.cgImage
        self.view.layer.addSublayer(shipLayer)
        demo()
    }

    private func demo() {
        // create path
        let path = UIBezierPath()
        path.move(to: CGPoint(x: 0, y: 150))
        path.addCurve(to: CGPoint(x: 300, y: 150), controlPoint1: CGPoint(x: 75, y: 0), controlPoint2: CGPoint(x: 225, y: 300))

        // draw the path using CAShapeLayer 实际可以不用画出来,这里是为了方便验证
        let pathLayer = CAShapeLayer()
        pathLayer.path = path.cgPath
        pathLayer.fillColor = UIColor.clear.cgColor
        pathLayer.strokeColor = UIColor.red.cgColor
        pathLayer.lineWidth = 3.0
        self.view.layer.addSublayer(pathLayer)

        // create the key frame animation
        let animation = CAKeyframeAnimation(keyPath: "position") // the key path of the property that you want to animate on the layer.
        animation.duration = 5.0
        // The path for a point-based property to follow.
        animation.path = path.cgPath
        // Determines whether objects animating along the path rotate to match the path tangent(切线).
        animation.rotationMode = CAAnimationRotationMode.rotateAuto
        // set timing function 设置时间函数让动画效果更接近真实,当时用 UIView 动画时,默认就是 EaseInEaseOut 效果,但当我们自己创建显式动画时,需要自己设置
        // 如果內置的时间函数不能满足要求,还可以自己定义贝塞尔曲线,或者利用关键帧实现完全自定义的时间函数
        animation.timingFunction = CAMediaTimingFunction(name: CAMediaTimingFunctionName.easeInEaseOut)

        // Determines if the receiver’s presentation is frozen or removed once its active duration has completed.
        animation.fillMode = CAMediaTimingFillMode.forwards
        // Determines if the animation is removed from the target layer’s animations upon completion.
        animation.isRemovedOnCompletion = false

        shipLayer.add(animation, forKey: nil)
        shipLayer.position = CGPoint(x: 300, y: 150) // end point
    }

    func demo2() {
        let tintAnimation = CAKeyframeAnimation(keyPath: "backgroundColor")
        tintAnimation.duration = 5.0
        // An array of objects that specify the keyframe values to use for the animation.
        tintAnimation.values = [UIColor.red.cgColor,
                                UIColor.green.cgColor,
                                UIColor.blue.cgColor]
        // An optional array of NSNumber objects that define the time at which to apply a given keyframe segment.
        tintAnimation.keyTimes = [0.0, 0.9, 1.0]
        shipLayer.add(tintAnimation, forKey: nil)

        /*
         @keyTimes: If the calculationMode is set to linear or cubic or discrete, the first value in the array must be 0.0 and the last value must be 1.0.
         */
    }
}
Multiple such animations can be gathered together using a CAAnimationGroup. Adding an animation group to a layer is not fundamentally different from adding the animations individually. It only really becomes apparent when it comes to hierarchical timing, which is explained in Chapter 9.
modelLayer and presentationLayer
当你改变一个图层的属性,属性值的确是立刻更新的(如果你读取它的数据,你会发现它的值在你设置它的那一刻就已经生效了),但是屏幕上并没有马上发生改变。
当我们设置 CALayer 的属性,实际上是在定义当前事务结束之后图层如何显示的 model。
在 iOS 中,屏幕每秒钟重绘 60 次。在你设置的新值完全生效之前,Core Animation 扮演了 Controller 的角色,图层属性的显示值,被存储在 presentationLayer 当中,它的值才是当前屏幕上真正显示出来的值。
presentationLayer 仅仅当图层第一次在屏幕上显示的时候创建,在那之前调用将会返回 nil。
print(colorLayer.model().description)
print(colorLayer.presentation().description)
转场
Property animations only work on animatable properties of a layer, so if you need to change a nonanimatable property (such as an image) or actually add and remove layers from the hierarchy, property animations won’t work.
Transitions affect an entire layer instead of just a specific property.
import UIKit

class MyViewController: UIViewController {
    private var imageView: UIImageView!
    private var imageNames = ["aut.jpg", "decep.jpg"]
    private var imageIndex = 0

    override func viewDidLoad() {
        super.viewDidLoad()

        imageView = UIImageView(frame: CGRect(origin: CGPoint.zero, size: CGSize(width: 400, height: 400)))
        imageView.image = UIImage(named: imageNames[0])
        imageIndex = 0
        self.view.addSubview(imageView)
    }

    private func transformByCA() {
        imageIndex = imageIndex > 0 ? 0 : 1
        let transition = CATransition()
        transition.type = CATransitionType.fade
        self.imageView.layer.add(transition, forKey: nil)
        self.imageView.image = UIImage(named: imageNames[imageIndex])
    }

    private func transformByUIKit() {
        imageIndex = imageIndex > 0 ? 0 : 1
        UIView.transition(with: self.imageView, duration: 0.5, options: .transitionCrossDissolve, animations: {
            self.imageView.image = UIImage(named: self.imageNames[self.imageIndex])
        })
    }
}
手动动画
timeOffset 可以让你手动控制动画进程,通过设置 speed 为 0,可以禁用动画的自动播放,然后使用 timeOffset 来回显示动画序列。这可以使得运用手势来手动控制动画变得很简单。
坐标系
UIView
UIView 可以实现动画的属性包括:
- frame
- bounds
- center
- transform
- alpha
- backgroundColor
iOS 4 以前,使用 +beginAnimation 和 commitAnimation 实现,是对 CATransaction 的封装。
iOS 4+,使用代码块的方式,实际还是对 CATransaction 的封装。
iOS 10+,使用 UIViewPropertyAnimator,实现出了很多以前要用显式动画才能做到的特性,比如时间曲线等。

当出现退后台的情况时,这里的 finished 会为 NO,要注意。
Lottie
动画设计师使用 After Effects,安装插件 Bodymovin,制作动画并输出 JSON。