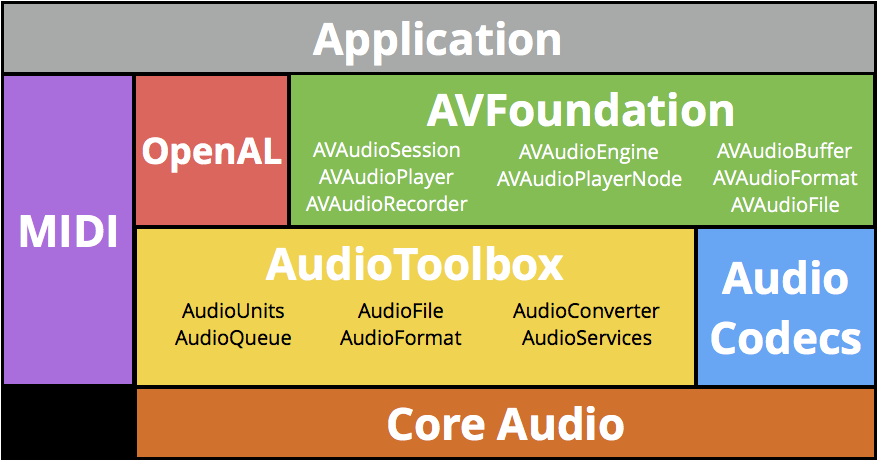
AVFoundation
AVFoundation Stack on iOS:
播放和录制音频
音频会话
AVAudioSession 在应用程序和操作系统之间扮演了中间人的角色。AVAudioSessionCategory 定义了 7 种分类来描述应用程序的音频行为。
| Category | 是否被锁屏和静音开关静音 | 是否允许混音 | 音频输入 | 音频输出 |
|---|---|---|---|---|
| ambient | ✅ | ✅ | ✅ | |
| soloAmbient(默认) | ✅ | ✅ | ||
| playback | Optional | ✅ | ||
| record | ✅ | |||
| playAndRecord | Optional | ✅ | ✅ | |
| multiRoute | ✅ | ✅ |
音频会话在应用程序的生命周期中是可以修改的,但通常我们只对其配置一次,最佳位置就是在启动时:
- (BOOL)application:(UIApplication *)application didFinishLaunchingWithOptions:(NSDictionary *)launchOptions {
    AVAudioSession *session = [AVAudioSession sharedInstance];
    NSError *error;
    if (![session setCategory:AVAudioSessionCategoryPlayback error:&error]) {
        NSLog(@"Category Error: %@", [error localizedDescription]);
    }
    if (![session setActive:YES error:&error]) {
        NSLog(@"Activation Error: %@", [error localizedDescription]);
    }
    return YES;
}
想要在后台播放音频,除了设置合适的音频会话外,需要在 Info.plist 里面增加配置:
<key>UIBackgroundModes</key>
<array>
    <string>audio</string>
</array>
AVAudioPlayer 和 AVAudioRecorder 都构建于 CoreAudio 之上,提供了音频播放和记录的功能。
播放音频
创建 AVAudioPlayer:
- (AVAudioPlayer *)playerForFile:(NSString *)name {
    NSURL *fileURL = [[NSBundle mainBundle] URLForResource:name withExtension:@"caf"]; // 例子中的文件后缀名是 "caf"
    NSError *error;
    AVAudioPlayer *player = [[AVAudioPlayer alloc] initWithContentsOfURL:fileURL error:&error];
    if (player) {
        player.numberOfLoops = -1; // loop indefinitely
        player.enableRate = YES; // 可调节播放速率
        [player prepareToPlay]; // 这样做会取得需要的音频硬件、并预加载 AudioQueue 的缓冲区,可降低调用 play 方法到听到声音输出的延时
    } else {
        NSLog(@"Error creating player: %@", [error localizedDescription]);
    }
    return player;
}
-[AVAudioPlayer stop] 会撤销 prepareToPlay 中所做的设置,调用 pause 方法不会。
volumn 属性是播放器的音量,从 0.0(静音)到 1.0(最大,默认值)。
pan 属性是立体声平移,从 -1.0(全左声道)到 1.0(全右声道)。默认值为 0.0 (居中)。
rate 属性是播放速率,从 0.5 到 2.0,默认 1.0。
numberOfLoops 属性代表循环次数,-1 代表无限循环。MP3 音频要实现无缝循环,需要特殊工具进行处理,通常建议使用 AAC。
本节的例子中我们创建了三个 AVAudioPlayer 的实例,分别播放吉他、贝斯、鼓的声音。为了使三个播放器实例的播放紧密同步,需要捕捉设备的时间并增加一个小的延时,让三个实例按照这个参照时间开始播放。
- (void)play {
    if (!self.playing) {
        NSTimeInterval delayTime = [self.players[0] deviceCurrentTime] + 0.01;
        for (AVAudioPlayer *player in self.players) {
            [player playAtTime:delayTime];
        }
        self.playing = YES;
    }
}
停止播放时,开发者可能还需要设置 currentTime 属性为 0.0f,以让播放进度回到原点。
- (void)stop {
    if (self.playing) {
        for (AVAudioPlayer *player in self.players) {
            [player stop];
            player.currentTime = 0.0f;
        }
        self.playing = NO;
    }
}
音频会话的中断在手机系统上很常见,例如电话呼入、闹钟响起、FaceTime 请求等情况。
// 处理中断事件,首先需要注册中断的通知
NSNotificationCenter *nsnc = [NSNotificationCenter defaultCenter];
[nsnc addObserver:self
         selector:@selector(handleInterruption:)
             name:AVAudioSessionInterruptionNotification
           object:[AVAudioSession sharedInstance]];

- (void)handleInterruption:(NSNotification *)notification {
    NSDictionary *info = notification.userInfo;
    // 通知的字典里有附带中断的信息,通过合适的 key 取出来
    AVAudioSessionInterruptionType type = [info[AVAudioSessionInterruptionTypeKey] unsignedIntegerValue]; // 中断类型
    if (type == AVAudioSessionInterruptionTypeBegan) {
        // 实际上当接收到通知时,应用程序的音频会话已经被终止,player 实例处于暂停状态,调用 stop 方法只是做内部状态更新,并不能停止播放。
        [self stop];
        if (self.delegate) {
            [self.delegate playbackStopped];
        }
    } else {
        // 当中断结束后,字典会包含信息,表示音频会话是否已重新激活、是否可以再次播放
        AVAudioSessionInterruptionOptions options = [info[AVAudioSessionInterruptionOptionKey] unsignedIntegerValue];
        if (options == AVAudioSessionInterruptionOptionShouldResume) {
            [self play];
            if (self.delegate) {
                [self.delegate playbackBegan];
            }
        }
    }
}
在 iOS 设备上添加或移除音频输入、输出线路时,会发生线路改变事件。与中断事件一样,操作系统已经处理好了某些场景,但我们也需要确保对这些事件的处理是符合我们需要的。这里我们处理的是,当用户拔出耳机时,正在播放的内容希望保密或不打扰到周围,需要停止播放。
// 处理线路改变事件,首先需要注册通知
NSNotificationCenter *nsnc = [NSNotificationCenter defaultCenter];
[nsnc addObserver:self
         selector:@selector(handleRouteChange:)
             name:AVAudioSessionRouteChangeNotification
           object:[AVAudioSession sharedInstance]];

- (void)handleRouteChange:(NSNotification *)notification {
    NSDictionary *info = notification.userInfo;
    AVAudioSessionRouteChangeReason reason = [info[AVAudioSessionRouteChangeReasonKey] unsignedIntValue];
    if (reason == AVAudioSessionRouteChangeReasonOldDeviceUnavailable) {
        AVAudioSessionRouteDescription *previousRoute = info[AVAudioSessionRouteChangePreviousRouteKey];
        AVAudioSessionPortDescription *previousOutput = previousRoute.outputs[0]; // 找输出接口数组的第一个设备
        NSString *portType = previousOutput.portType;
        if ([portType isEqualToString:AVAudioSessionPortHeadphones]) {
            [self stop];
            [self.delegate playbackStopped];
        }
    }
}
音频录制
想要录制音频,需要在 Info.plist 里面增加配置,首次访问麦克风会询问用户同意。
<key>NSMicrophoneUsageDescription</key>
<string>To record memo.</string>
创建 AVAudioRecorder 实例:
AVFormatIDKey 是写入内容的音频格式。kAudioFormatLinearPCM 是未压缩格式、kAudioFormatMPEG4AAC 是最常用的 AAC 格式。注意,指定的音频格式一定要和文件类型相兼容!
AVSampleRateKey 是采样率。开发者应该尽量使用标准采样率,比如 8000、16000、22050、44100(CD 音质采样率)。
AVNumberOfChannelsKey 是通道数。默认值 1 代表单声道录制;设置为 2 代表立体声录制。除非使用外接设备,否则通常选择单声道录音。
NSString *tmpDir = NSTemporaryDirectory();
NSString *filePath = [tmpDir stringByAppendingPathComponent:@"memo.caf"];
NSURL *fileURL = [NSURL fileURLWithPath:filePath];
NSDictionary *settings = @{
    AVFormatIDKey : @(kAudioFormatAppleIMA4),
    AVSampleRateKey : @44100.0f,
    AVNumberOfChannelsKey : @1,
    AVEncoderBitDepthHintKey : @16,
    AVEncoderAudioQualityKey : @(AVAudioQualityMedium)
}
NSError *error;
self.recorder = [[AVAudioRecorder alloc] initWithURL:fileURL settings:settings error:&error];
if (self.recorder) {
    self.recorder.delegate = self;
    self.recorder.meteringEnabled = YES; // 允许对音量进行测量
    [self.recorder prepareToRecord];
} else {
    NSLog(@"Error: %@", [error localizedDescription]);
}
开始录制 -[AVAudioRecorder record],暂停录制 -[AVAudioRecorder pause],停止录制 -[AVAudioRecorder stop]。停止录制后,AVAudioRecorder 回调委托方法通知代理,我们在这个回调里处理录音文件的保存:
- (void)saveRecordingWithName:(NSString *)name completionHandler:(THRecordingSaveCompletionHandler)handler {
    NSTimeInterval timestamp = [NSDate timeIntervalSinceReferenceDate];
    NSString *filename = [NSString stringWithFormat:@"%@-%f.m4a", name, timestamp];
    NSString *docsDir = [self documentsDirectory];
    NSString *destPath = [docsDir stringByAppendingPathComponent:filename];
    NSURL *srcURL = self.recorder.url;
    NSURL *destURL = [NSURL fileURLWithPath:destPath];
    NSError *error;
    BOOL success = [[NSFileManager defaultManager] copyItemAtURL:srcURL toURL:destURL error:&error];
    if (success) {
        handler(YES, [THMemo memoWithTitle:name url:destURL]); // 回传数据模型
        [self.recorder prepareToRecord];
    } else {
        handler(NO, error);
    }
}

- (NSString *)documentsDirectory {
    NSArray *paths = NSSearchPathForDirectoriesInDomains(NSDocumentDirectory, NSUserDomainMask, YES);
    return [paths objectAtIndex:0];
}
我们希望展示给用户录制的时间。属性 currentTime 经过一定的格式化处理可以用于展示:
- (NSString *)formattedCurrentTime {
    NSUInteger time = (NSUInteger)self.recorder.currentTime;
    NSInteger hours = (time / 3600);
    NSInteger minutes = (time / 60) % 60;
    NSInteger seconds = time % 60;
    NSString *format = @"%02i:%02i:%02i";
    return [NSString stringWithFormat:format, hours, minutes, seconds];
}
如何实时更新显示时间,你可能想用 KVO,但是在这里并不可以,因 currentTime 属性是不可见的。这里需要用 NSTimer 按照一定时间间隔轮询值并更新界面。
- (void)startTimer { // 开始录制时调用
    [self.timer invalidate];
    self.timer = [NSTimer timerWithTimeInterval:0.5 // 这里我们 0.5 秒轮询一次
                                         target:self
                                       selector:@selector(updateTimeDisplay)
                                       userInfo:nil
                                        repeats:YES];
    [[NSRunLoop mainRunLoop] addTimer:self.timer forMode:NSRunLoopCommonModes];
}

- (void)stopTimer { // 暂停、停止录制时调用
    [self.timer invalidate];
    self.timer = nil;
}
接下来我们希望能将捕捉到的信号以可视化的形式表现出来。AVAudioRecorder 和 AVAudioPlayer 都可以对音量进行测量。
通过 averagePowerForChannel: 和 peakPowerForChannel: 方法获得的读数,是一个描述音量等级的对数单位,取值范围从最大分贝的 0 (full scale)到最小分贝或静音的 -160dB。我们想在用户界面上展示音量大小,需要把这个值转化为 0 - 1 之间的值。例子中的 THMeterTable 完成了这部分工作。
- (THLevelPair *)levels {
    [self.recorder updateMeters]; // 在读取当前等级值前调用此方法,以保证获取到的是最新的数据
    float avgPower = [self.recorder averagePowerForChannel:0]; // 单声道录制,获取通道 0 的音量
    float peakPower = [self.recorder peakPowerForChannel:0];
    float linearLevel = [self.meterTable valueForPower:avgPower]; // 将音量等级转换为 0 - 1 之间的值
    float linearPeak = [self.meterTable valueForPower:peakPower];
    return [THLevelPair levelsWithLevel:linearLevel peakLevel:linearPeak]; // 返回数据模型
}
同样用定时器轮询音量等级值,这里为了使音量值刷新的动画效果更加平滑,使用 CADisplayLink 以获得与屏幕刷新同步的回调:
- (void)startMeterTimer {
    [self.levelTimer invalidate];
    self.levelTimer = [CADisplayLink displayLinkWithTarget:self
                                                  selector:@selector(updateMeter)];
    self.levelTimer.frameInterval = 5;
    [self.levelTimer addToRunLoop:[NSRunLoop currentRunLoop]
                          forMode:NSRunLoopCommonModes];
}
资源和元数据
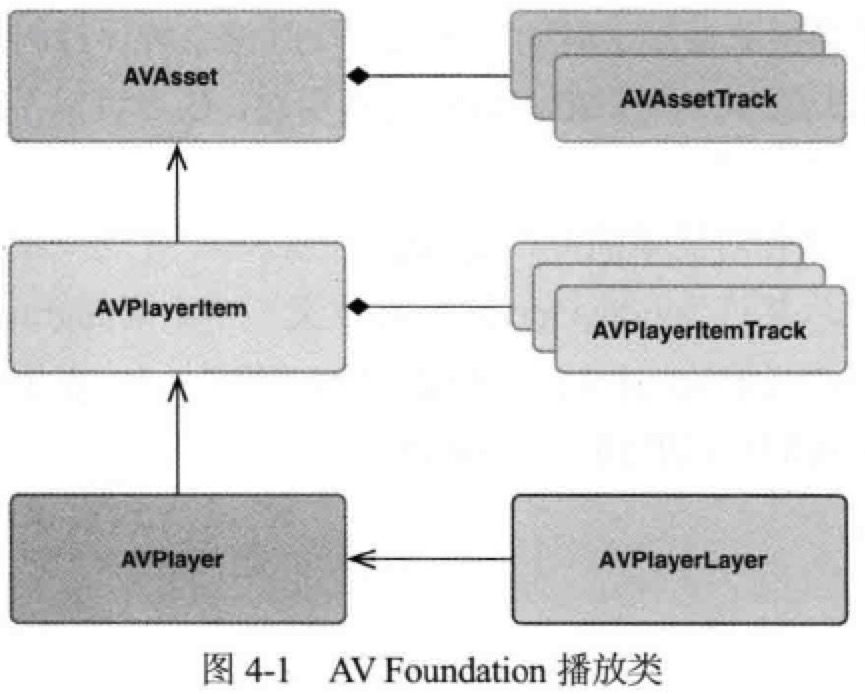
有别于传统面向文件的音频类,AVFoundation 把所有的代码设计围绕着“资源”进行,最核心的类就是 AVAsset!
AVAsset 是一个抽象类。第一,它提供了对基本媒体格式的抽象,开发者不需考虑不同的编码和容器格式细节,只需面对“资源”这一概念;第二,它屏蔽�了资源位置的细节,不管资源是在应用程序 bundle、沙盒文件夹、用户音乐库或远程音频流,开发者都可以合理地获取和载入媒体。
AVAsset 本身不是媒体资源,它是 timed media 的容器。它由一个或多个带有(描述自身的)元数据的媒体组成,即 AVAssetTrack,最常见的形态就是音频和视频流,还有文本、副标题、隐藏字幕等类型。资源的曲目可以通过 tracks 属性访问,返回的是一个 NSArray,数组的元素是专辑的所有曲目。
获取一个资源的方式很直接:AVAsset *asset = [AVAsset assetWithURL:url];。
如果创建一个用在音视频编辑场景中的资源,可以用更长的加载时间,来获取更精确的资源时长信息。
NSDictionary *options = @{AVURLAssetPreferPreciseDurationAndTimingKey: @YES};
AVURLAsset *asset = [[AVURLAsset alloc] initWithURL:url options:options];
媒体来源
UIImagePickerController
无需授权,无需权限描述。
class ViewController: UIViewController, UINavigationControllerDelegate, UIImagePickerControllerDelegate {
    override func touchesEnded(_ touches: Set<UITouch>, with event: UIEvent?) {
        let pickerController = UIImagePickerController()
        pickerController.sourceType = .photoLibrary
        pickerController.delegate = self
        pickerController.mediaTypes = ["public.movie"];
        pickerController.modalPresentationStyle = .fullScreen
        pickerController.videoExportPreset = AVAssetExportPresetPassthrough
        self.present(pickerController, animated: true, completion: nil)
    }

    func imagePickerController(_ picker: UIImagePickerController, didFinishPickingMediaWithInfo info: [UIImagePickerController.InfoKey : Any]) {
        if let url = info[.mediaURL] as? URL {
            let asset = AVURLAsset(url: url)
            print(asset.duration)
        }
        picker.dismiss(animated: true, completion: nil)
    }

    func imagePickerControllerDidCancel(_ picker: UIImagePickerController) {}
}
NSURL
来自 App Bundle 或网络。
NSURL *url = [[NSBundle mainBundle] URLForResource:@"v0300fd00000btm8f4819jm9302jl26g" withExtension:@"MP4"];
AVAsset *asset = [[AVURLAsset alloc] initWithURL:url options:nil];

NSURL *remoteUrl = [NSURL URLWithString:@"..."];
AVAsset *remoteAsset = [[AVURLAsset alloc] initWithURL:remoteUrl options:nil];
NSLog(@"%lld", remoteAsset.duration.value);
PhotoKit
需要在 Info.plist 中增加 NSPhotoLibraryUsageDescription,开发者自行获取并决定展示方式。
[PHPhotoLibrary requestAuthorizationForAccessLevel:PHAccessLevelReadWrite handler:^(PHAuthorizationStatus status) {
    switch (status) {
        case PHAuthorizationStatusAuthorized:
        case PHAuthorizationStatusLimited:
            [self fetchAllVideos];
            break;
        default:
            break;
    }
}];
Media Library
MPMediaPropertyPredicate *artistPredicate = [MPMediaPropertyPredicate predicateWithValue:@"Foo Fighters" forProperty:MPMediaItemPropertyArtist];
MPMediaPropertyPredicate *albumPredicate = [MPMediaPropertyPredicate predicateWithValue:@"In Your Honor" forProperty:MPMediaItemPropertyAlbumTitle];
MPMediaPropertyPredicate *songPredicate = [MPMediaPropertyPredicate predicateWithValue:@"Best of You" forProperty:MPMediaItemPropertyTitle];

MPMediaQuery *query = [[MPMediaQuery alloc]init];
[query addFilterPredicate:artistPredicate];
[query addFilterPredicate:albumPredicate];
[query addFilterPredicate:songPredicate];

NSArray *result = [query items];
if (result.count > 0) {
    MPMediaItem *item = result[0];
    NSURL *assetURL = [item valueForProperty:MPMediaItemPropertyAssetURL];
    AVAsset *asset = [AVAsset assetWithURL:assetURL];
    // do sth ...
}
异步载入资源属性
当创建 AVAsset 时,资源就是对媒体文件的处理。AVAsset 采用一种高效的设计,即延迟载入资源的属性,直到属性被请求时才载入,这样可以快速创建资源模型。但有一点,就是同步访问属性时,如果属性没有载入,程序就会阻塞。比如,请求资源的 duration 可能是一个昂贵的操作,例如 MP3 文件的头没有 TLEN 标签时,则需要解析整个音频来确定它的时长,假设这个请求发生在主线程,就会阻塞主线程直到操作完成。
正因为上述原因,AVAsset 和 AVAssetTrack 都遵循 AVAsynchronousKeyValueLoading 协议,可以异步查询资源的属性。
self.metadata = [[THMetadata alloc] init];
NSArray *keys = @[COMMON_META_KEY, AVAILABLE_META_KEY]; // key 的名称和 AVAsset 的属性名称一样
[self.asset loadValuesAsynchronouslyForKeys:keys completionHandler:^{
    // 即使请求了多个属性,这个 block 也只会被回调一次
    // 需要为每个请求的属性都调用 statusOfValueForKey:error: 方法,不能假设所有的属性都返回相同的状态值
    AVKeyValueStatus commonStatus = [self.asset statusOfValueForKey:COMMON_META_KEY error:nil];
    AVKeyValueStatus formatsStatus = [self.asset statusOfValueForKey:AVAILABLE_META_KEY error:nil];
    self.prepared = (commonStatus == AVKeyValueStatusLoaded) && (formatsStatus == AVKeyValueStatusLoaded);
    if (self.prepared) {
        for (AVMetadataItem *item in self.asset.commonMetadata) { // 访问已载入的属性不会耗时
            NSLog(@"%@: %@", item.keyString, item.value);
            [self.metadata addMetadataItem:item withKey:item.commonKey];
        }
        for (id format in self.asset.availableMetadataFormats) {
            if ([self.acceptedFormats containsObject:format]) {
                NSArray *items = [self.asset metadataForFormat:format];
                for (AVMetadataItem *item in items) {
                    NSLog(@"%@: %@", item.keyString, item.value);
                    [self.metadata addMetadataItem:item withKey:item.keyString];
                }
            }
        }
    }
    dispatch_async(dispatch_get_main_queue(), ^{
        completionHandler(self.prepared);
    });
}];
媒体元数据
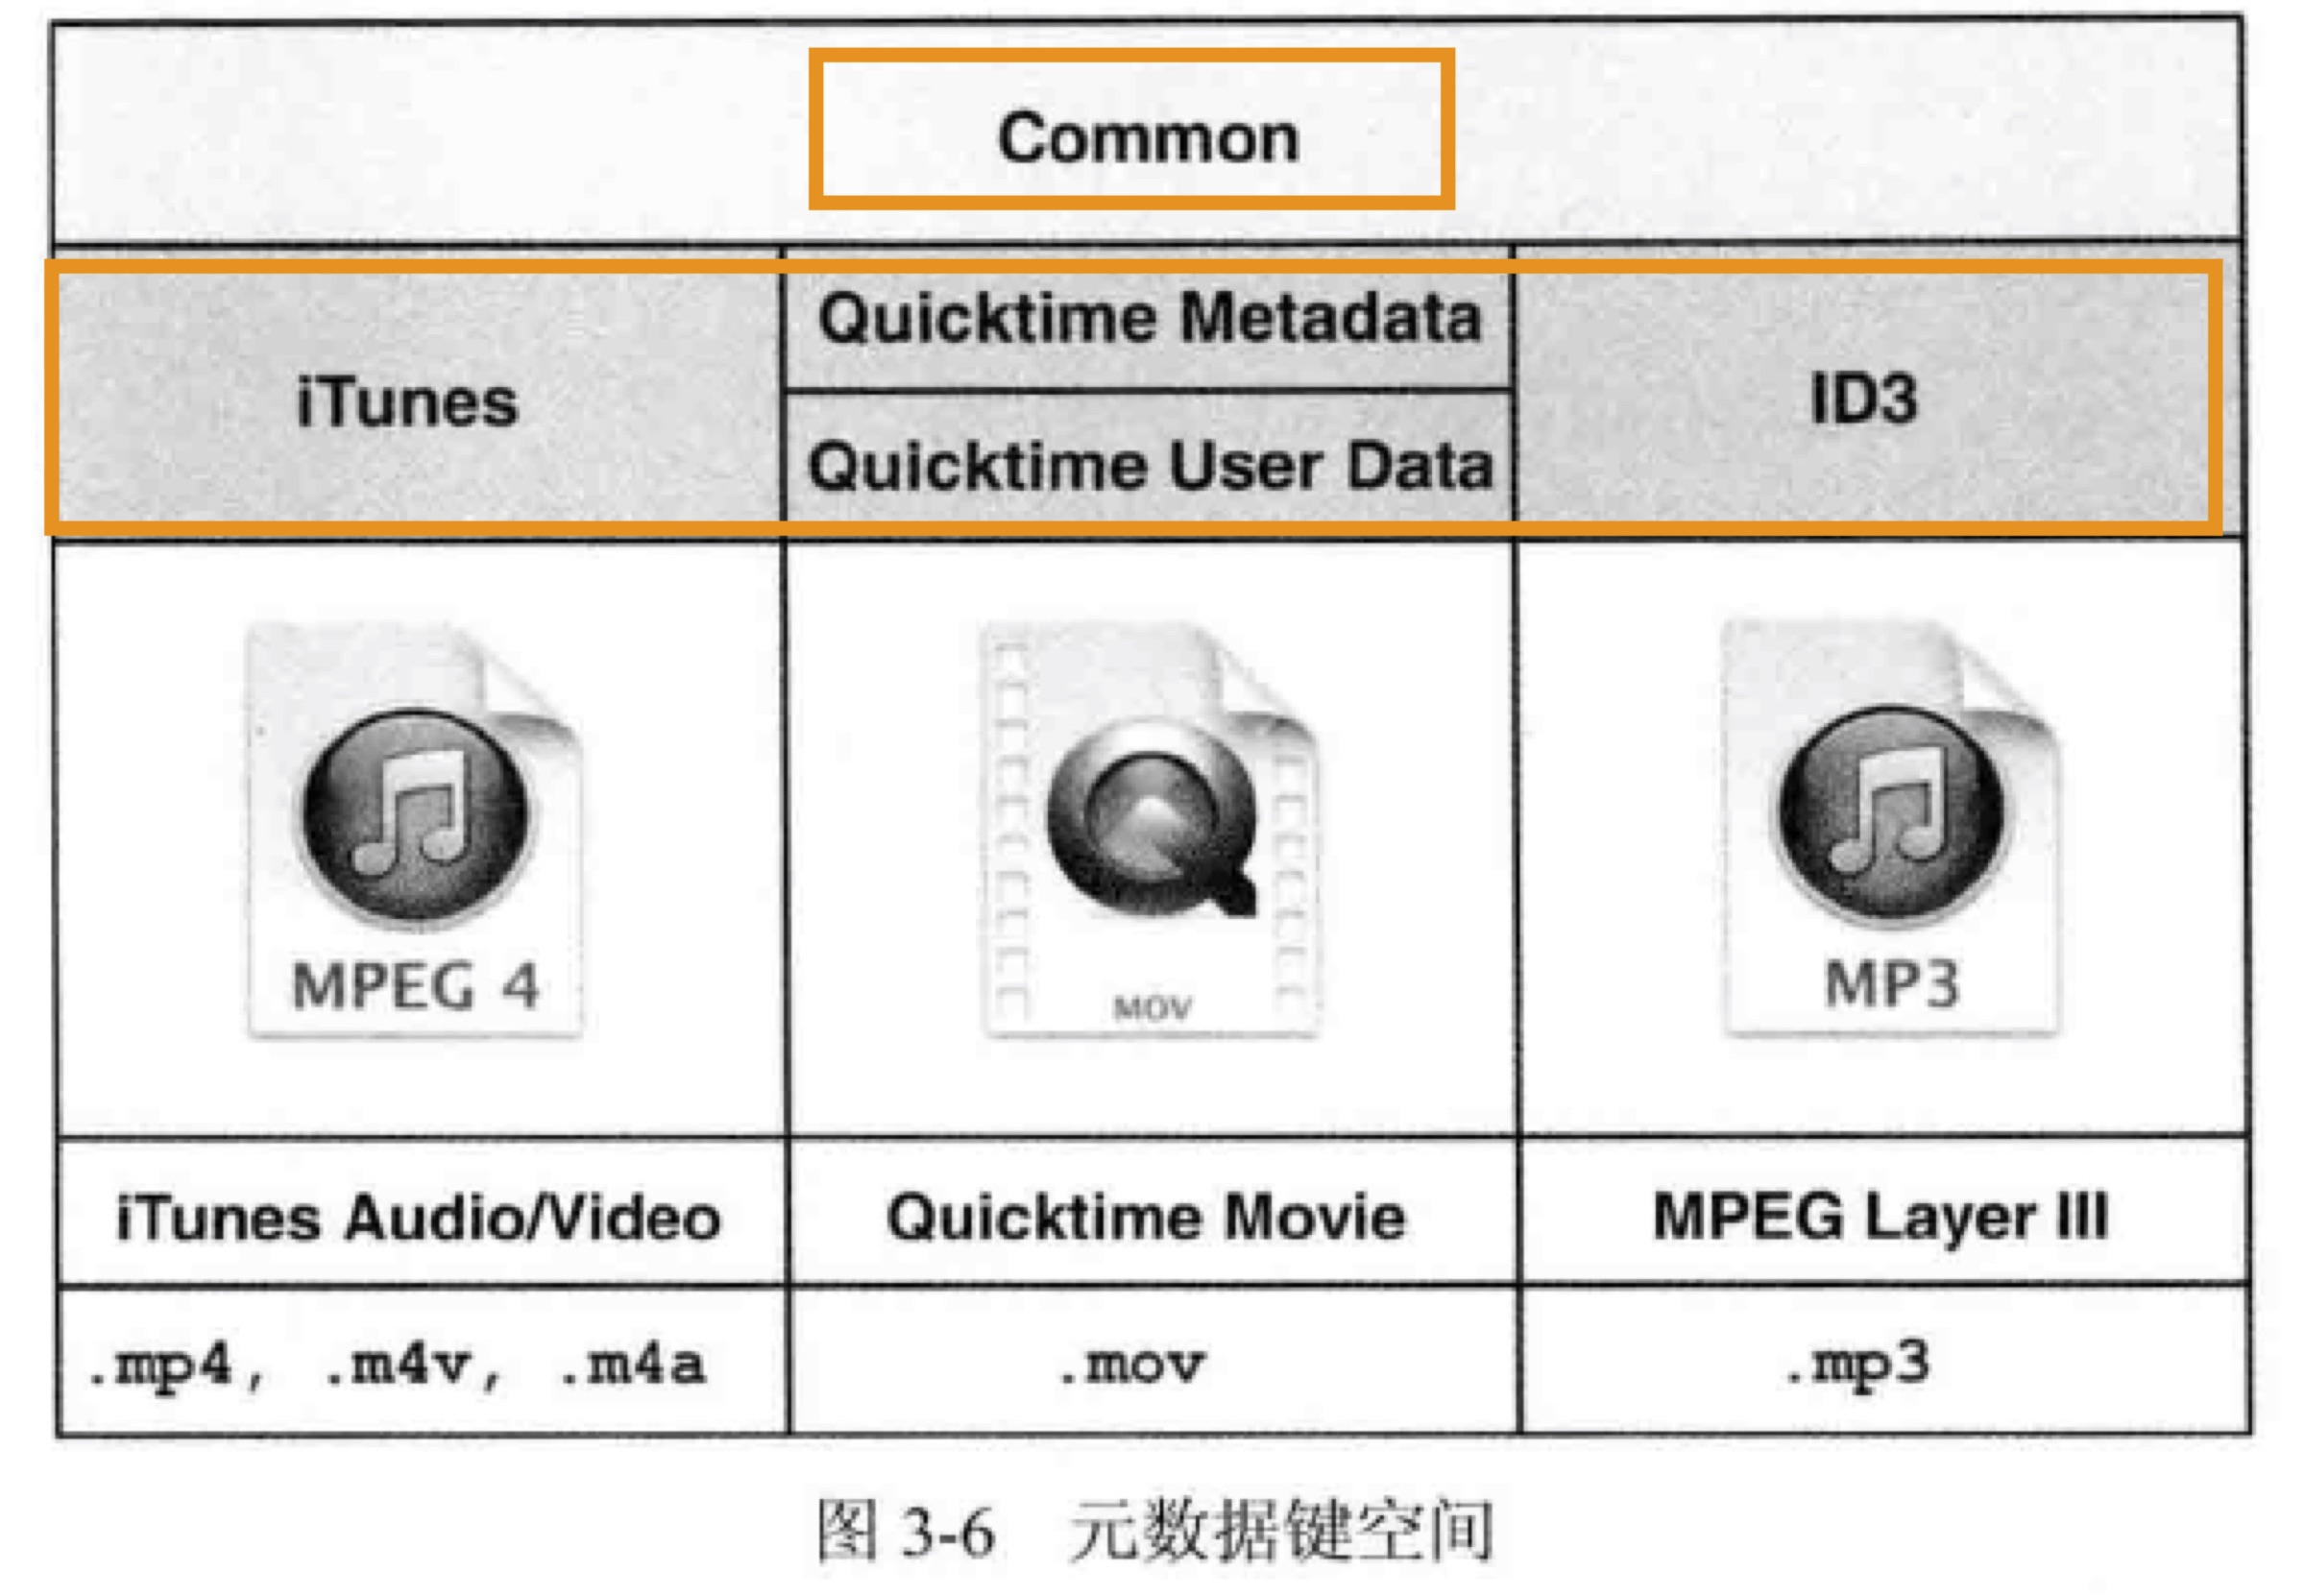
Apple 环境下的媒体类型主要有:QuickTime (mov), MPEG-4 video (mp4, m4v), MPEG-4 audio (m4a), MPEG-Layer III audio (mp3)。m4v 是带有苹果针对 FairPlay 加密及 AC3-audio 扩展的 mp4 格式;m4a 专门针对音频。
QuickTime 文件由一种称为 atom 的数据结构组成;MP4 直接派生自 QuickTime,数据结构相似。MP3 与前面两种格式则有显著区别,它不使用容器格式,使用编码音频数据,文件开头有可选元数据,使用一种称为 ID3v2 的格式来保存描述信息。AVFoundation 支持读取 ID3v2 标签�,但不支持写入,原因是 MP3 格式有专利限制。
对这些不同格式,AVFoundation 提供了统一的元数据接口 AVMetadataItem。大部分情况下我们使用 AVAsset 提供的元数据;涉及曲目一级元数据等情况也会用到 AVAssetTrack 提供的元数据。AVMetadataItem: A metadata item associated with an audiovisual asset or one of its tracks.
AVFoundation 使用键空间作为将一组相关的键组合在一起的方法,每个资源至少包含两个 AVMetadataKeySpace(键空间)。Common 键空间是所有资源格式都有的;其它键空间是特定的资源格式才有的。
Common 键空间通过 commonMetadata 查询:
let url = Bundle.main.url(forResource: "03 Demo ID3v2.3", withExtension: "mp3")!
let asset = AVURLAsset(url: url)
let commonMetadataKey = "commonMetadata"
asset.loadValuesAsynchronously(forKeys: [commonMetadataKey]) {
    let commonMetadata = asset.commonMetadata
    // 查找 Common 键空间的元数据
    let keySpace = AVMetadataKeySpace.common
    let artistKey = AVMetadataKey.commonKeyArtist
    let albumKey = AVMetadataKey.commonKeyAlbumName
    let artistMetadata = AVMetadataItem.metadataItems(from: commonMetadata, withKey: artistKey, keySpace: keySpace)
    let albumMetadata = AVMetadataItem.metadataItems(from: commonMetadata, withKey: albumKey, keySpace: keySpace)
    print(artistMetadata)
    print(albumMetadata)
}
其他特定类型键空间通过 metadataForFormat: 查询:
let url = Bundle.main.url(forResource: "01 Demo AAC", withExtension: "m4a")!
let asset = AVURLAsset(url: url)
let availableMetadataFormatsKey = "availableMetadataFormats"
asset.loadValuesAsynchronously(forKeys: [availableMetadataFormatsKey]) {
    let availableMetadataFormats = asset.availableMetadataFormats
    var metadata = [AVMetadataItem]()
    // 将所有元数据信息汇集到数组中
    for format in availableMetadataFormats {
        metadata.append(contentsOf: asset.metadata(forFormat: format))
    }
    print(metadata)
    // 查找 iTunes 键空间的元数据
    let keySpace = AVMetadataKeySpace.iTunes
    let artistKey = AVMetadataKey.iTunesMetadataKeyArtist
    let albumKey = AVMetadataKey.iTunesMetadataKeyAlbum
    let artistMetadata = AVMetadataItem.metadataItems(from: metadata, withKey: artistKey, keySpace: keySpace)
    let albumMetadata = AVMetadataItem.metadataItems(from: metadata, withKey: albumKey, keySpace: keySpace)
    print(artistMetadata)
    print(albumMetadata)
}
除了通过键和键空间来获取元数据外,iOS 8 之后新增了 keyForIdentifier: 方法,identifier 将键和键空间统一成单独的字符串,以更简单的方式获取元数据。
let url = Bundle.main.url(forResource: "03 Demo ID3v2.3", withExtension: "mp3")!
let asset = AVURLAsset(url: url)
let commonMetadataKey = "commonMetadata"
asset.loadValuesAsynchronously(forKeys: [commonMetadataKey]) {
    let commonMetadata = asset.commonMetadata
    // 查找 Common 键空间的元数据
    let artistMetadata = AVMetadataItem.metadataItems(from: commonMetadata, filteredByIdentifier: .commonIdentifierArtist)
    let albumMetadata = AVMetadataItem.metadataItems(from: commonMetadata, filteredByIdentifier: .commonIdentifierAlbumName)
    print(artistMetadata)
    print(albumMetadata)
}
例子:MetaManager
从上面的章节得知,一个元数据的键,在不同的容器格式下,存在不同的表示。例如 "artist" 有两种 key 分别是 AVMetadataCommonKeyArtist 和 AVMetadataQuickTimeMetadataKeyProducer。
示例程序的 THMetadata 负责读取元数据,并将这些不同格式下的元数据键,映射到一个标准化的、一致的键值集合中,这样一来,展现到用户界面的就是“艺术家”这个统一的选项。当用户修改元数据后,它还负责将用户输入的内容转换回 AVMetadataItem 并输出保存。
- (void)addMetadataItem:(AVMetadataItem *)item withKey:(id)key {
    NSString *normalizedKey = self.keyMapping[key]; // 首先将 AVMetadataItem 的键映射到标准化的键
    if (normalizedKey) {
        id <THMetadataConverter> converter = [self.converterFactory converterForKey:normalizedKey]; // 1
        id value = [converter displayValueFromMetadataItem:item];
        // Track and Disc numbers/counts are stored as NSDictionary
        if ([value isKindOfClass:[NSDictionary class]]) {
            NSDictionary *data = (NSDictionary *) value;
            for (NSString *currentKey in data) {
                if (![data[currentKey] isKindOfClass:[NSNull class]]) {
                    [self setValue:data[currentKey] forKey:currentKey];
                }
            }
        } else {
            [self setValue:value forKey:normalizedKey];
        }
        self.metadata[normalizedKey] = item;
    }
}
[1] 找到适合处理这个键的转换器。在处理 AVMetadataItem 时,最难的部分就是保存在 value 属性里的值。当 value 是简单字符串时,比如艺术家名字或唱片标题,很容易理解并且不需要转换。但如果 value 里是一些晦涩的内容,就需要一些额外工作来转换为可以展示的内容。我们当然可以在 THMetadata 类直接加入转换逻辑,但这样的话代码量会很大而且不易维护,更好的做法是将转换逻辑分离到几个独立的类中,使用工厂模式,这些类都遵循 THMetadataConverter 协议。
保存元数据
AVAsset 是一个不可变类,保存元数据的改变不会直接修改 AVAsset,而是通过 AVAssetExportSession 导出一个保存了元数据改动的资源副本。
AVAssetExportSession 用于将 AVAsset 根据预设条件进行转码、导出。
- (void)saveWithCompletionHandler:(THCompletionHandler)handler {
    NSString *presetName = AVAssetExportPresetPassthrough; // 1
    NSURL *outputURL = [self tempURL];
    AVAssetExportSession *session = [[AVAssetExportSession alloc] initWithAsset:self.asset presetName:presetName];
    session.outputURL = outputURL;
    session.outputFileType = self.filetype;
    session.metadata = [self.metadata metadataItems];
    [session exportAsynchronouslyWithCompletionHandler:^{
        AVAssetExportSessionStatus status = session.status;
        BOOL success = (status == AVAssetExportSessionStatusCompleted);
        if (success) {
            NSURL *sourceURL = self.url;
            NSFileManager *manager = [NSFileManager defaultManager];
            [manager removeItemAtURL:sourceURL error:nil];
            [manager moveItemAtURL:outputURL toURL:sourceURL error:nil];
            [self reset];
        }
        if (handler) {
            dispatch_async(dispatch_get_main_queue(), ^{
                handler(success);
            });
        }
    }];
}
[1] 预设 AVAssetExportPresetPassthrough 可以在不重新对视频进行编码的情况下修改元数据,导出时间很短。但要注意这个 preset 只适用于修改元数据,如果要新增元数据,则必须使用转码 preset。
播放视频
快速播放
- (void)viewDidLoad {
    [super viewDidLoad];

    NSURL *assetURL = [[NSBundle mainBundle] URLForResource:@"hubblecast" withExtension:@"m4v"];
    AVAsset *asset = [AVAsset assetWithURL:assetURL];
    AVPlayerItem *playerItem = [AVPlayerItem playerItemWithAsset:asset]; // 1
    [playerItem addObserver:self
                 forKeyPath:@"status"
                    options:0
                    context:&PlayerItemStatusContext];
    self.player = [AVPlayer playerWithPlayerItem:playerItem]; // 2
    AVPlayerLayer *playerLayer = [AVPlayerLayer playerLayerWithPlayer:self.player];
    playerLayer.frame = self.view.bounds;
    [self.view.layer addSublayer:playerLayer];
}

- (void)observeValueForKeyPath:(NSString *)keyPath ofObject:(id)object change:(NSDictionary<NSKeyValueChangeKey,id> *)change context:(void *)context {
    if (context == &PlayerItemStatusContext) {
        AVPlayerItem *playerItem = (AVPlayerItem *)object;
        [playerItem removeObserver:self forKeyPath:@"status"]; // 收到通知后,移除观察者!
        if (playerItem.status == AVPlayerStatusReadyToPlay) {
            [self.player play];
        }
    }
}
[1] AVAsset, AVAssetTrack 是媒体资源的静态信息,播放资源时,要通过 AVPlayerItem, AVPlayerItemTrack 构建相应的动态内容。
[2] 将 AVPlayerItem 与 AVPlayer 关联会将媒体放入队列,但在具体内容可以播放前,需要等待对象的状态改变为 AVPlayerStatusReadyToPlay,可以通过 KVO 来观察这一过程,以得知播放就绪的时机。
CMTime
A CMTime is represented as a rational number, with a numerator (an int64_t value), and a denominator (an int32_t timescale). Conceptually, the timescale specifies the fraction of a second each unit in the numerator occupies. Thus if the timescale is 4, each unit represents a quarter of a second.
在计算机程序中,用浮点型表示时长会存在丢失精度的问题,AVFoundation 使用 CMTime 这个数据结构来保存时长信息。CMTime 中的 value 和 timescale 分别作为分子和分母,表示一个时间间隔。
CMTime oneSample = CMTimeMake(1, 44100); // One sample from a 44.1 kHz audio file
获取以秒为单位的时长:CMTimeGetSeconds(duration);
处理视频内容时常见的 timescale 是 600,这是大部分常用视频帧率 24FPS、25FPS、30FPS 的公倍数。音频内容常见的 timescale 就是采样率,如 44,100 和 48,000。
例子:视频播放器
THPlayerView 是显示视频内容、为用户提供操作的 view。
@implementation THPlayerView
+ (Class)layerClass {
    return [AVPlayerLayer class]; // 1
}

- (id)initWithPlayer:(AVPlayer *)player {
    self = [super initWithFrame:CGRectZero];
    if (self) {
        self.backgroundColor = [UIColor blackColor];
        self.autoresizingMask = UIViewAutoresizingFlexibleHeight | UIViewAutoresizingFlexibleWidth;
        [(AVPlayerLayer *) [self layer] setPlayer:player];
        [[NSBundle mainBundle] loadNibNamed:@"THOverlayView" owner:self options:nil];
        [self addSubview:_overlayView];
    }
    return self;
}

- (void)layoutSubviews {
    [super layoutSubviews];
    self.overlayView.frame = self.bounds;
}

- (id <THTransport>)transport {
    return self.overlayView;
}
@end
[1] 指定以 AVPlayerLayer 作为 THPlayerView 的支持层。
THPlayerController 是这个例子核心的播放控制器。它为(类的)用户提供的接口相当简单:
@interface THPlayerController : NSObject
- (id)initWithURL:(NSURL *)assetURL; // 1
@property (strong, nonatomic, readonly) UIView *view; // 2
@end
[1] 用户可传入本地或远程 URL 初始化播放控制器。
[2] 为播放器视图提供了一个只读属性,用户可读取它、添加到业务视图中。这个视图是一个 THPlayerView,但这个细节并不需要对用户可见,所以只返回一个通用的 UIView 即可。
THPlayerController 与提供用户控制的视图 THOverlayView 之间会有很多交互,不过它们不需要直接了解彼此的细节,要断开这个关联,就会用到 THTransport 和 THTransportDelegate 协议(面向协议编程的思想)。
也就是说,THPlayerController 不直接与 THOverlayView 通信(操作它的属性或调用它的实例方法),而是通过 THTransport 协议里的接口!
通过资源 URL 初始化控制器后,为了播放资源,要做一些准备工作:
- (void)prepareToPlay {
    NSArray *keys = @[
        @"tracks",
        @"duration",
        @"commonMetadata",
        @"availableMediaCharacteristicsWithMediaSelectionOptions"
    ];
    self.playerItem = [AVPlayerItem playerItemWithAsset:self.asset automaticallyLoadedAssetKeys:keys]; // 2
    [self.playerItem addObserver:self
                      forKeyPath:@"status"
                         options:0
                         context:&PlayerItemStatusContext];
    self.player = [AVPlayer playerWithPlayerItem:self.playerItem]; // 3
    self.playerView = [[THPlayerView alloc] initWithPlayer:self.player];
    self.transport = self.playerView.transport;
    self.transport.delegate = self;
}
[2] 为了载入资源的属性,之前我们使用的是 loadValuesAsynchronously(forKeys:completionHandler:) 方法。但 iOS 7+ 提供了这个更简易的初始化方法,通过传入属性的数组,让框架自动载入。
[3] 同上,添加观察者,以得知播放就绪的时机。
- (void)observeValueForKeyPath:(NSString *)keyPath
                      ofObject:(id)object
                        change:(NSDictionary *)change
                       context:(void *)context {
    if (context == &PlayerItemStatusContext) {
        dispatch_async(dispatch_get_main_queue(), ^{
            [self.playerItem removeObserver:self forKeyPath:@"status"];
            if (self.playerItem.status == AVPlayerItemStatusReadyToPlay) {
                [self addPlayerItemTimeObserver]; // 更新播放时间
                [self addItemEndObserverForPlayerItem]; // 播放结束通知
                CMTime duration = self.playerItem.duration;
                [self.transport setCurrentTime:CMTimeGetSeconds(kCMTimeZero)
                                      duration:CMTimeGetSeconds(duration)];
                [self.transport setTitle:self.asset.title]; // (extension) 到 common keyspace 中获取 title
                [self.player play];
                [self loadMediaOptions]; // 获取字幕
                [self generateThumbnails]; // 创建缩略图
            } else {
                [UIAlertView showAlertWithTitle:@"Error" message:@"Failed to load video"];
            }
        });
    }
}
KVO 可以用来监听很多属性的变化,但也有不能胜任的场景,例如 AVPlayer 的时间变化——具有明显的动态特性、并且需要非常高的精确度。为了满足这一要求,AVPlayer 提供了两种基于时�间的监听方法,分别是:
addPeriodicTimeObserverForInterval:queue:usingBlock:,以一定时间间隔获得通知。addBoundaryTimeObserverForTimes:queue:usingBlock:,以数组形式传入一组时间戳,在每个时间戳到达时获得通知,
- (void)addPlayerItemTimeObserver {
    CMTime interval = CMTimeMakeWithSeconds(REFRESH_INTERVAL, NSEC_PER_SEC); // 0.5 秒
    dispatch_queue_t queue = dispatch_get_main_queue();
    __weak THPlayerController *weakSelf = self;
    void (^callback)(CMTime time) = ^(CMTime time) {
        NSTimeInterval currentTime = CMTimeGetSeconds(time);
        NSTimeInterval duration = CMTimeGetSeconds(weakSelf.playerItem.duration);
        [weakSelf.transport setCurrentTime:currentTime duration:duration];
    };
    self.timeObserver = [self.player addPeriodicTimeObserverForInterval:interval queue:queue usingBlock:callback];
}
当资源播放完毕时,AVPlayerItem 会发出通知,控制器应采取相应的动作。
- (void)addItemEndObserverForPlayerItem {
    NSString *name = AVPlayerItemDidPlayToEndTimeNotification;
    NSOperationQueue *queue = [NSOperationQueue mainQueue];
    __weak THPlayerController *weakSelf = self;
    void (^callback)(NSNotification *note) = ^(NSNotification *notification) {
        [weakSelf.player seekToTime:kCMTimeZero completionHandler:^(BOOL finished) {
            [weakSelf.transport playbackComplete];
        }];
    };
    self.itemEndObserver =
        [[NSNotificationCenter defaultCenter] addObserverForName:name
                                                          object:self.playerItem
                                                           queue:queue
                                                      usingBlock:callback];
}
与进度条拖拽有关的方法:
- (void)scrubbingDidStart {
    self.lastPlaybackRate = self.player.rate;
    [self.player pause];
    [self.player removeTimeObserver:self.timeObserver]; // 用户拖拽进度条时停用定时器
    self.timeObserver = nil;
}

- (void)scrubbedToTime:(NSTimeInterval)time {
    [self.playerItem cancelPendingSeeks]; // 取消之前的 seek 操作
    [self.player seekToTime:CMTimeMakeWithSeconds(time, NSEC_PER_SEC) toleranceBefore:kCMTimeZero toleranceAfter:kCMTimeZero];
}

- (void)scrubbingDidEnd {
    [self addPlayerItemTimeObserver];
    if (self.lastPlaybackRate > 0.0f) {
        [self.player play];
    }
}
创建视频缩略图
AVAssetImageGenerator 可从 AVAsset 中生成缩略图,可以从本地或是正在下载中的资源生成,但不能从 HTTP Live Stream 中生成。
- (void)generateThumbnails {
    self.imageGenerator = [AVAssetImageGenerator assetImageGeneratorWithAsset:self.asset]; // 1

    // 设置缩略图的像素宽为 200,高度自适应
    self.imageGenerator.maximumSize = CGSizeMake(200.0f, 0.0f);

    CMTime duration = self.asset.duration;
    NSMutableArray *times = [NSMutableArray array];
    CMTimeValue increment = duration.value / 20; // 将视频时长等分为 20 个间隔
    CMTimeValue currentValue = 2.0 * duration.timescale; // 2
    while (currentValue <= duration.value) {
        CMTime time = CMTimeMake(currentValue, duration.timescale);
        [times addObject:[NSValue valueWithCMTime:time]];
        currentValue += increment;
    }

    __block NSUInteger imageCount = times.count;
    NSMutableArray *images = [NSMutableArray array];

    AVAssetImageGeneratorCompletionHandler handler;
    handler = ^(CMTime requestedTime, // 我们要求的缩略图的时间
                CGImageRef imageRef,
                CMTime actualTime, // 实际生成的缩略图的时间
                AVAssetImageGeneratorResult result,
                NSError *error) {
        if (result == AVAssetImageGeneratorSucceeded) {
            UIImage *image = [UIImage imageWithCGImage:imageRef];
            id thumbnail = [THThumbnail thumbnailWithImage:image time:actualTime];
            [images addObject:thumbnail]; // 数据模型
        } else {
            NSLog(@"Error: %@", [error localizedDescription]);
        }

        if (--imageCount == 0) {
            dispatch_async(dispatch_get_main_queue(), ^{
                NSString *name = THThumbnailsGeneratedNotification;
                NSNotificationCenter *nc = [NSNotificationCenter defaultCenter];
                [nc postNotificationName:name object:images]; // 将装有数据模型的数组通过通知对象发送出去
            });
        }
    };

    [self.imageGenerator generateCGImagesAsynchronouslyForTimes:times
                                              completionHandler:handler];
}
[1] 这里有必要保持强引用,否则将无法回调。
[2] 这里为什么不用 0 呢?因为对于视频来说,时间戳 0 通常是一帧全黑的画面,因此这里取时间戳为第 2 秒的画面。
显示字幕
Apple Developer - Selecting Subtitles and Alternative Audio Tracks
AVMediaSelectionOption models an alternative audio, video, or text track contained within the source media. Media options are used to select alternative camera angles, present audio dubbed in a user’s native language, or display subtitles and closed captions.
You determine which alternative media presentations are available by asynchronously loading and calling the asset’s availableMediaCharacteristicsWithMediaSelectionOptions property, which returns an array of strings indicating the available media characteristics. The possible values returned are AVMediaCharacteristicAudible (alternative audio tracks), AVMediaCharacteristicVisual (alternative video tracks), and AVMediaCharacteristicLegible (subtitles and closed captions).
After you’ve retrieved the array of available options, you call the asset’s mediaSelectionGroupForMediaCharacteristic: method, passing it the desired characteristic. This method returns the associated AVMediaSelectionGroup object, or nil if no groups exist for the specified characteristic.
AVMediaSelectionGroup acts as a container for a collection of mutually exclusive AVMediaSelectionOption objects.
The output for an asset containing audio and subtitle media options looks similar to the following:
[AVMediaCharacteristicAudible] -> group
  Option: English
  Option: Spanish

[AVMediaCharacteristicLegible]
  Option: English
  Option: German
  Option: Spanish
  Option: French
在我们的例子中,前面我们载入资源的属性时,已经传入 key availableMediaCharacteristicsWithMediaSelectionOptions,因此当载入状态就绪时,我们可以尝试获取字幕:
- (void)loadMediaOptions {
    NSString *mc = AVMediaCharacteristicLegible;
    AVMediaSelectionGroup *group = [self.asset mediaSelectionGroupForMediaCharacteristic:mc];
    if (group) {
        // 获取媒体资源的所有字幕,添加到界面上,供用户选择
        NSMutableArray *subtitles = [NSMutableArray array];
        for (AVMediaSelectionOption *option in group.options) {
            [subtitles addObject:option.displayName];
        }
        [self.transport setSubtitles:subtitles];
    } else {
        [self.transport setSubtitles:nil];
    }
}
用户选择字幕时的调用:
- (void)subtitleSelected:(NSString *)subtitle {
    NSString *mc = AVMediaCharacteristicLegible;
    AVMediaSelectionGroup *group =
        [self.asset mediaSelectionGroupForMediaCharacteristic:mc];
    BOOL selected = NO;
    for (AVMediaSelectionOption *option in group.options) {
        if ([option.displayName isEqualToString:subtitle]) {
            [self.playerItem selectMediaOption:option inMediaSelectionGroup:group]; // 1
            selected = YES;
        }
    }
    if (!selected) {
        [self.playerItem selectMediaOption:nil // 2
                     inMediaSelectionGroup:group];
    }
}
[1] selectMediaOption:inMediaSelectionGroup: 这个调用会激活字幕并立即出现在 AVPlayerLayer 上。Selecting a media option makes it immediately available for presentation. Selecting a subtitle or closed-caption option displays the associated text within the video display provided by AVPlayerViewController, AVPlayerView, and AVPlayerLayer. Selecting an alternative audio or video option replaces the currently presented media with the new selection’s media.
[2] 选中 nil 会清空字幕。
章节
这里我们要介绍时间相关的元数据,它与第三章我们介绍的静态元数据同样重要。
时间相关的元数据只用于资源的时间轴内特定的一个范围。AVTimedMetadataGroup: A collection of metadata items that are valid for use during a specific time range. For example, are used to represent chapters, optionally containing metadata items for chapter titles and chapter images.
- (NSArray *)chaptersForAsset:(AVAsset *)asset {
    NSArray *languages = [NSLocale preferredLanguages];
    NSArray *metadataGroups = [asset chapterMetadataGroupsBestMatchingPreferredLanguages:languages]; // 1

    NSMutableArray *chapters = [NSMutableArray array];
    for (NSUInteger i = 0; i < metadataGroups.count; i++) {
        AVTimedMetadataGroup *group = metadataGroups[i];
        CMTime time = group.timeRange.start; // timeRange 属性记录了章节的开始时间和时长
        NSArray<AVMetadataItem *> *items = group.items;
        NSString *title = [self titleInMetadata:items];

        THChapter *chapter = [THChapter chapterWithTime:time number:i + 1 title:title];
        [chapters addObject:chapter];
    }
    return chapters;
}
[1] 获取章节信息有两个方法,都需要先载入资源的 availableChapterLocales 键。另一个方法是 chapterMetadataGroupsWithTitleLocale:containingItemsWithCommonKeys:。
了解了如何获取章节信息后,我们来实现“跳到上一章”和“跳到下一章”的方法。
- (THChapter *)findPreviousChapter {
    CMTime playerTime = self.playerItem.currentTime;
    CMTime currentTime = CMTimeSubtract(playerTime, CMTimeMake(3, 1));
    CMTime pastTime = kCMTimeNegativeInfinity;
    CMTimeRange timeRange = CMTimeRangeMake(pastTime, currentTime);
    return [self findChapterInTimeRange:timeRange reverse:YES]; // 1
}

- (THChapter *)findNextChapter {
    CMTime currentTime = self.playerItem.currentTime;
    CMTime futureTime = kCMTimePositiveInfinity;
    CMTimeRange timeRange = CMTimeRangeMake(currentTime, futureTime);
    return [self findChapterInTimeRange:timeRange reverse:NO];
}

- (THChapter *)findChapterInTimeRange:(CMTimeRange)timeRange
                              reverse:(BOOL)reverse {
    __block THChapter *matchingChapter = nil;
    NSEnumerationOptions options = reverse ? NSEnumerationReverse : 0;
    [self.chapters enumerateObjectsWithOptions:options
                                    usingBlock:^(id obj,
                                                 NSUInteger idx,
                                                 BOOL *stop) {
        if ([(THChapter *)obj isInTimeRange:timeRange]) {
            matchingChapter = obj;
            *stop = YES;
        }
    }];
    return matchingChapter;
}

- (BOOL)isInTimeRange:(CMTimeRange)timeRange {
    return CMTIME_COMPARE_INLINE(_time, >, timeRange.start) && CMTIME_COMPARE_INLINE(_time, <, timeRange.duration); // 2
}
[1] 创建一个时间范围,左边界是负无穷、右边界是当前播放时间减去 3 秒。拿着这个时间范围,从后往前遍历章节,直到找到第一个位于这个时间范围内的章节起始时间。为什么要减去 3 秒呢?这是一个经验值。当视频播放时,时间不断前进,应该给用户的操作留一点时间余地,否则用户就会陷入再次回到章起始时间的循环中。
[2] Core Media 定义了大量有用的函数和宏。
捕捉媒体
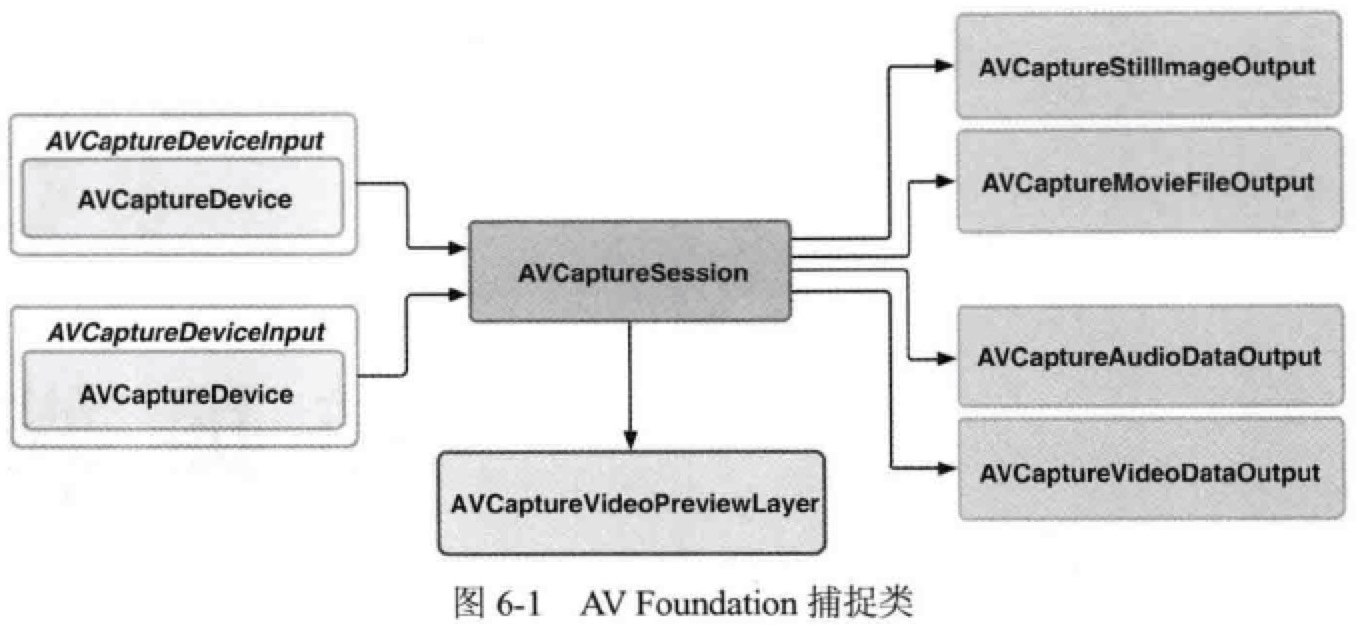
AVCaptureSession
捕捉的核心类是 AVCaptureSession,它就像一个“插线板”,用于连接输入和输出的资源。捕捉会话还可以配置一个预设值,默认是 AVCaptureSessionPresetHigh。
AVCaptureDevice 定义了大量类方法用于访问系统的捕捉设备。在使用捕捉设备前,要将它添加为捕捉会话的输入,不过设备不能直接添加到会话中,需要封装成 AVCaptureDeviceInput。
捕捉的输出类是一个抽象基类 AVCaptureOutput,它被扩展为 AVCaptureStillImageOutput 和 AVCaptureMovieFileOutput,分别实现捕捉静态图片和视频的功能。还有更底层的扩展 AVCaptureAudioDataOutput 和 AVCaptureVideoDataOutput,使用它们可以直接访问捕捉到的数字样本,对音频和视频流进行实时处理。
我们来看看如何设置一个会话:
- (BOOL)setupSession:(NSError **)error {
    self.captureSession = [[AVCaptureSession alloc] init];
    self.captureSession.sessionPreset = AVCaptureSessionPresetHigh;

    // Set up default camera device
    AVCaptureDevice *videoDevice = [AVCaptureDevice defaultDeviceWithMediaType:AVMediaTypeVideo];
    AVCaptureDeviceInput *videoInput = [AVCaptureDeviceInput deviceInputWithDevice:videoDevice error:error];
    if (videoInput) {
        if ([self.captureSession canAddInput:videoInput]) {
            [self.captureSession addInput:videoInput];
            self.activeVideoInput = videoInput;
        }
    } else {
        return NO;
    }

    // Setup default microphone
    AVCaptureDevice *audioDevice = [AVCaptureDevice defaultDeviceWithMediaType:AVMediaTypeAudio];
    AVCaptureDeviceInput *audioInput = [AVCaptureDeviceInput deviceInputWithDevice:audioDevice error:error];
    if (audioInput) {
        if ([self.captureSession canAddInput:audioInput]) {
            [self.captureSession addInput:audioInput];
        }
    } else {
        return NO;
    }

    // Setup the still image output
    self.imageOutput = [[AVCaptureStillImageOutput alloc] init];
    self.imageOutput.outputSettings = @{AVVideoCodecKey : AVVideoCodecJPEG};

    if ([self.captureSession canAddOutput:self.imageOutput]) {
        [self.captureSession addOutput:self.imageOutput];
    }

    // Setup movie file output
    self.movieOutput = [[AVCaptureMovieFileOutput alloc] init];
    if ([self.captureSession canAddOutput:self.movieOutput]) {
        [self.captureSession addOutput:self.movieOutput];
    }

    return YES;
}
预览视图
捕捉会话的预览是通过 AVCaptureVideoPreviewLayer,像 AVPlayer 一样,也支持视频重力的概念。
对于 iPhone 5 竖屏状态下,屏幕坐标系左上角为 (0, 0),右下角为 (320, 568)。而捕捉设备的坐标系则定义不同,左上角为 (0, 0),右下角为 (1, 1)。AVCaptureVideoPreviewLayer 定义了两个方法完成这两种坐标系之间的转换。
captureDevicePointOfInterestForPoint传入屏幕坐标系的点,返回设备坐标系的点;pointForCaptureDevicePointOfInterest传入设备坐标系的点,返回屏幕坐标系的点。
THPreviewView 使用了第一个方法,用于实现点击对焦功能。
- (void)setupView {
    [(AVCaptureVideoPreviewLayer *)self.layer setVideoGravity:AVLayerVideoGravityResizeAspectFill];

    _singleTapRecognizer =
    [[UITapGestureRecognizer alloc] initWithTarget:self action:@selector(handleSingleTap:)];

    _doubleTapRecognizer =
    [[UITapGestureRecognizer alloc] initWithTarget:self action:@selector(handleDoubleTap:)];
    _doubleTapRecognizer.numberOfTapsRequired = 2;

    _doubleDoubleTapRecognizer =
    [[UITapGestureRecognizer alloc] initWithTarget:self action:@selector(handleDoubleDoubleTap:)];
    _doubleDoubleTapRecognizer.numberOfTapsRequired = 2;
    _doubleDoubleTapRecognizer.numberOfTouchesRequired = 2;

    [self addGestureRecognizer:_singleTapRecognizer];
    [self addGestureRecognizer:_doubleTapRecognizer];
    [self addGestureRecognizer:_doubleDoubleTapRecognizer];
    [_singleTapRecognizer requireGestureRecognizerToFail:_doubleTapRecognizer];

    _focusBox = [self viewWithColor:[UIColor colorWithRed:0.102 green:0.636 blue:1.000 alpha:1.000]];
    _exposureBox = [self viewWithColor:[UIColor colorWithRed:1.000 green:0.421 blue:0.054 alpha:1.000]];
    [self addSubview:_focusBox];
    [self addSubview:_exposureBox];
}

- (void)handleSingleTap:(UIGestureRecognizer *)recognizer {
    CGPoint point = [recognizer locationInView:self];
    [self runBoxAnimationOnView:self.focusBox point:point];
    if (self.delegate) {
        [self.delegate tappedToFocusAtPoint:[self captureDevicePointForPoint:point]];
    }
}

- (CGPoint)captureDevicePointForPoint:(CGPoint)point {
    AVCaptureVideoPreviewLayer *layer = (AVCaptureVideoPreviewLayer *)self.layer;
    return [layer captureDevicePointOfInterestForPoint:point];
}
启动和停止会话
启动和停止会话是一个同步调用并会消耗一定的时间,为了不要阻塞主线程,一个好的做法是把对会话的操作都异步派发到全局队列里。
- (void)startSession {
    if (![self.captureSession isRunning]) {
        dispatch_async([self globalQueue], ^{
            [self.captureSession startRunning];
        });
    }
}

- (void)stopSession {
    if ([self.captureSession isRunning]) {
        dispatch_async([self globalQueue], ^{
            [self.captureSession stopRunning];
        });
    }
}

- (dispatch_queue_t)globalQueue {
    return dispatch_get_global_queue(DISPATCH_QUEUE_PRIORITY_DEFAULT, 0);
}
切换摄像头
获取不同摄像头可以通过下面的方法:
- (AVCaptureDevice *)cameraWithPosition:(AVCaptureDevicePosition)position {
    NSArray *devices = [AVCaptureDevice devicesWithMediaType:AVMediaTypeVideo];
    for (AVCaptureDevice *device in devices) {
        if (device.position == position) {
            return device;
        }
    }
    return nil;
}
切换摄像头需要重新配置 AVCaptureSession,在会话初始化以后,对会话的任何改变,都要通过 beginConfiguration 和 commitConfiguration 进行原子性的改变。
- (BOOL)switchCameras {
    if (![self canSwitchCameras]) {
        return NO;
    }
    NSError *error;
    AVCaptureDevice *videoDevice = [self inactiveCamera];
    AVCaptureDeviceInput *videoInput = [AVCaptureDeviceInput deviceInputWithDevice:videoDevice error:&error];
    if (videoInput) {
        [self.captureSession beginConfiguration];
        [self.captureSession removeInput:self.activeVideoInput];
        if ([self.captureSession canAddInput:videoInput]) {
            [self.captureSession addInput:videoInput];
            self.activeVideoInput = videoInput;
        } else {
            [self.captureSession addInput:self.activeVideoInput];
        }
        [self.captureSession commitConfiguration];
    } else {
        [self.delegate deviceConfigurationFailedWithError:error];
        return NO;
    }
    return YES;
}
配置捕捉设备
应用任何配置项之前,都需要检查它是否可用。修改的过程是先获取锁、修改配置、解锁:
- (void)resetFocusAndExposureModes {
    AVCaptureDevice *device = [self activeCamera];
    AVCaptureExposureMode exposureMode = AVCaptureExposureModeContinuousAutoExposure;
    AVCaptureFocusMode focusMode = AVCaptureFocusModeContinuousAutoFocus;
    BOOL canResetFocus = [device isFocusPointOfInterestSupported] && [device isFocusModeSupported:focusMode];
    BOOL canResetExposure = [device isExposurePointOfInterestSupported] && [device isExposureModeSupported:exposureMode];

    CGPoint centerPoint = CGPointMake(0.5f, 0.5f);
    NSError *error;
    if ([device lockForConfiguration:&error]) {
        if (canResetFocus) {
            device.focusMode = focusMode;
            device.focusPointOfInterest = centerPoint;
        }
        if (canResetExposure) {
            device.exposureMode = exposureMode;
            device.exposurePointOfInterest = centerPoint;
        }
        [device unlockForConfiguration];
    } else {
        [self.delegate deviceConfigurationFailedWithError:error];
    }
}
拍摄静态图片
当创建一个会话并添加设备后,会话自动建立输入与输出的连接,按需选择信号流线路。访问这些连接可以让开发者对发送到输出端的数据进行精确的控制。
- (void)captureStillImage {
    AVCaptureConnection *connection = [self.imageOutput connectionWithMediaType:AVMediaTypeVideo]; // 获取一个输出的连接
    if (connection.isVideoOrientationSupported) {
        connection.videoOrientation = [self currentVideoOrientation];
    }
    id handler = ^(CMSampleBufferRef sampleBuffer, NSError *error) {
        if (sampleBuffer != NULL) {
            NSData *imageData = [AVCaptureStillImageOutput jpegStillImageNSDataRepresentation:sampleBuffer];
            UIImage *image = [[UIImage alloc] initWithData:imageData];
            [self writeImageToAssetsLibrary:image];
        } else {
            NSLog(@"NULL sampleBuffer: %@", [error localizedDescription]);
        }
    };
    // Capture still image
    [self.imageOutput captureStillImageAsynchronouslyFromConnection:connection completionHandler:handler];
}
视频捕捉
AVCaptureMovieFileOutput 继承于 AVCaptureFileOutput,这个抽象超类定义了许多功能,例如录制到最长时限、录制到最大文件大小为止等。
QuickTime 影片文件的开始位置有影片头元数据,以便让播放器快速读取头的信息。我们录制影片时,直到所有的样本捕捉完成后才能创建信息头,这样做有一个问题,如果应用程序遇到崩溃或者电话拨入等中断,影片头就不会正确写入,会在磁盘生成一个不可读的影片文件。
AVCaptureMovieFileOutput 提供了分段捕捉的功能,可以通过 movieFragmentInterval 来修改输出的间隔。默认每 10 秒写入一个片段,并更新头信息。
- (void)startRecording {
    if (![self isRecording]) {
        AVCaptureConnection *videoConnection = [self.movieOutput connectionWithMediaType:AVMediaTypeVideo];
        if ([videoConnection isVideoOrientationSupported]) {
            // 设置视频方向后,输出文件会应用相应的矩阵变化
            videoConnection.videoOrientation = self.currentVideoOrientation;
        }
        if ([videoConnection isVideoStabilizationSupported]) {
            // 稳定效果不会在预览层看到,只会体现在输出文件里
            videoConnection.preferredVideoStabilizationMode = AVCaptureVideoStabilizationModeAuto;
        }
        AVCaptureDevice *device = [self activeCamera];
        if (device.isSmoothAutoFocusSupported) {
            NSError *error;
            if ([device lockForConfiguration:&error]) {
                // 平滑对焦,避免切换焦点时的脉冲式对焦
                device.smoothAutoFocusEnabled = YES;
                [device unlockForConfiguration];
            } else {
                [self.delegate deviceConfigurationFailedWithError:error];
            }
        }
        self.outputURL = [self uniqueURL];
        [self.movieOutput startRecordingToOutputFileURL:self.outputURL recordingDelegate:self];
    }
}

- (void)captureOutput:(AVCaptureFileOutput *)captureOutput
didFinishRecordingToOutputFileAtURL:(NSURL *)outputFileURL
      fromConnections:(NSArray *)connections
                error:(NSError *)error {
    if (error) {
        [self.delegate mediaCaptureFailedWithError:error];
    } else {
        [self writeVideoToAssetsLibrary:[self.outputURL copy]];
    }
    self.outputURL = nil;
}
高级捕捉功能
视频缩放
AVCaptureDevice 支持缩放参数,所有会话的输出,包括预览层,都会自动应用这一状态。设置 videoZoomFactor 属性会立即调整缩放,调用 rampToVideoZoomFactor:withRate: 会在一段时间内逐渐调整缩放。
- (void)setZoomValue:(CGFloat)zoomValue {
    if (!self.activeCamera.isRampingVideoZoom) {
        NSError *error;
        if ([self.activeCamera lockForConfiguration:&error]) {
            // Provide linear feel to zoom slider
            CGFloat zoomFactor = pow([self maxZoomFactor], zoomValue);
            self.activeCamera.videoZoomFactor = zoomFactor;
            [self.activeCamera unlockForConfiguration];
        } else {
            [self.delegate deviceConfigurationFailedWithError:error];
        }
    }
}
监听缩放属性的变化以更新界面:
[self.activeCamera addObserver:self
                forKeyPath:@"videoZoomFactor"
                    options:0
                    context:&THRampingVideoZoomFactorContext];
[self.activeCamera addObserver:self
                forKeyPath:@"rampingVideoZoom"
                    options:0
                    context:&THRampingVideoZoomContext];
人脸检测
为会话添加一个输出AVCaptureOutput 的子类 AVCaptureMetadataOutput ,代表元数据类型的输出,并设置为我们感兴趣的类型(即人脸)。
- (BOOL)setupSessionOutputs:(NSError **)error {
    self.metadataOutput = [[AVCaptureMetadataOutput alloc] init];
    if ([self.captureSession canAddOutput:self.metadataOutput]) {
        [self.captureSession addOutput:self.metadataOutput];
        NSArray *metadataObjectTypes = @[AVMetadataObjectTypeFace];
        self.metadataOutput.metadataObjectTypes = metadataObjectTypes;
        dispatch_queue_t mainQueue = dispatch_get_main_queue();
        [self.metadataOutput setMetadataObjectsDelegate:self queue:mainQueue];
        return YES;
    } else {
        if (error) {
            NSDictionary *userInfo = @{NSLocalizedDescriptionKey: @"Failed to still image output."};
            *error = [NSError errorWithDomain:THCameraErrorDomain
                                         code:THCameraErrorFailedToAddOutput
                                     userInfo:userInfo];
        }
        return NO;
    }
}

- (void)captureOutput:(AVCaptureOutput *)captureOutput
didOutputMetadataObjects:(NSArray *)metadataObjects
       fromConnection:(AVCaptureConnection *)connection {
    for (AVMetadataFaceObject *face in metadataObjects) {
        NSLog(@"Face detected with ID: %li", (long)face.faceID);
        NSLog(@"Face bounds: %@", NSStringFromCGRect(face.bounds));
    }
    [self.faceDetectionDelegate didDetectFaces:metadataObjects];
}
为捕捉到的人脸添加图层,并应用 transform:
- (void)didDetectFaces:(NSArray *)faces {
    // 获取到的人脸数据先做一次坐标系的转换,从捕捉设备坐标系转换成屏幕视图坐标系
    NSArray *transformedFaces = [self transformedFacesFromFaces:faces];
    // 已经不在画面中的人脸,需要移除对应的图层
    NSMutableArray *lostFaces = [self.faceLayers.allKeys mutableCopy];
    for (AVMetadataFaceObject *face in transformedFaces) {
        NSNumber *faceID = @(face.faceID);
        [lostFaces removeObject:faceID];
        CALayer *layer = [self.faceLayers objectForKey:faceID];
        if (!layer) {
            // no layer for faceID, create new face layer
            layer = [self makeFaceLayer];
            [self.overlayLayer addSublayer:layer];
            self.faceLayers[faceID] = layer;
        }
        layer.transform = CATransform3DIdentity;
        layer.frame = face.bounds;

        // 应用人脸的角度变换
        if (face.hasRollAngle) {
            CATransform3D t = [self transformForRollAngle:face.rollAngle];
            layer.transform = CATransform3DConcat(layer.transform, t);
        }
        if (face.hasYawAngle) {
            CATransform3D t = [self transformForYawAngle:face.yawAngle];
            layer.transform = CATransform3DConcat(layer.transform, t);
        }
    }

    for (NSNumber *faceID in lostFaces) {
        CALayer *layer = [self.faceLayers objectForKey:faceID];
        [layer removeFromSuperlayer];
        [self.faceLayers removeObjectForKey:faceID];
    }
}
机器可读代码识别
设置会话输入有一个值得注意的地方,就是可以把自动对焦功能限制在近距离内,可以提高识别成功率:
- (BOOL)setupSessionInputs:(NSError *__autoreleasing *)error {
    BOOL success = [super setupSessionInputs:error];
    if (success) {
        if (self.activeCamera.autoFocusRangeRestrictionSupported) {
            if ([self.activeCamera lockForConfiguration:error]) {
                self.activeCamera.autoFocusRangeRestriction = AVCaptureAutoFocusRangeRestrictionNear;
                [self.activeCamera unlockForConfiguration];
            }
        }
    }
    return success;
}
会话的输出设置为 AVCaptureMetadataOutput,并设置接受的元数据类型:
- (BOOL)setupSessionOutputs:(NSError **)error {
    self.metadataOutput = [[AVCaptureMetadataOutput alloc] init];

    if ([self.captureSession canAddOutput:self.metadataOutput]) {
        [self.captureSession addOutput:self.metadataOutput];

        dispatch_queue_t mainQueue = dispatch_get_main_queue();
        [self.metadataOutput setMetadataObjectsDelegate:self queue:mainQueue];

        NSArray *types = @[AVMetadataObjectTypeQRCode,
                           AVMetadataObjectTypeAztecCode,
                           AVMetadataObjectTypeUPCECode];
        self.metadataOutput.metadataObjectTypes = types;
    } else {
        NSDictionary *userInfo = @{NSLocalizedDescriptionKey: @"Failed to still image output."};
        *error = [NSError errorWithDomain:THCameraErrorDomain
                                     code:THCameraErrorFailedToAddOutput
                                 userInfo:userInfo];
        return NO;
    }
    return YES;
}
检测到条形码:
- (void)didDetectCodes:(NSArray *)codes {
    // 坐标系转换
    NSArray *transformedCodes = [self transformedCodesFromCodes:codes];
    // 移除已经不在画面内的条形码
    NSMutableArray *lostCodes = [self.codeLayers.allKeys mutableCopy];
    for (AVMetadataMachineReadableCodeObject *code in transformedCodes) {
        NSString *stringValue = code.stringValue;
        if (stringValue) {
            [lostCodes removeObject:stringValue];
        } else {
            continue;
        }
        NSArray *layers = self.codeLayers[stringValue];
        if (!layers) {
            // no layers for stringValue, create new code layers
            layers = @[[self makeBoundsLayer], [self makeCornersLayer]];
            self.codeLayers[stringValue] = layers;
            [self.previewLayer addSublayer:layers[0]];
            [self.previewLayer addSublayer:layers[1]];
        }

        CAShapeLayer *boundsLayer  = layers[0]; // 矩形边框
        boundsLayer.path  = [self bezierPathForBounds:code.bounds].CGPath;
        boundsLayer.hidden = NO;

        CAShapeLayer *cornersLayer = layers[1]; // 与条形码的四个角的点对齐的边框
        cornersLayer.path = [self bezierPathForCorners:code.corners].CGPath;
        cornersLayer.hidden = NO;

        NSLog(@"String: %@", stringValue); // 条形码内容
    }

    for (NSString *stringValue in lostCodes) {
        for (CALayer *layer in self.codeLayers[stringValue]) {
            [layer removeFromSuperlayer];
        }
        [self.codeLayers removeObjectForKey:stringValue];
    }
}
高帧率捕捉
实时捕捉与渲染
让捕捉会话直接输出视频原始帧数据:
- (BOOL)setupSessionOutputs:(NSError **)error {
    self.videoDataOutput = [[AVCaptureVideoDataOutput alloc] init];
    self.videoDataOutput.alwaysDiscardsLateVideoFrames = YES; // 丢掉来不及处理的帧
    self.videoDataOutput.videoSettings = @{
        (id)kCVPixelBufferPixelFormatTypeKey : @(kCVPixelFormatType_32BGRA)
    }; // 摄像头色彩二次抽样的格式

    [self.videoDataOutput setSampleBufferDelegate:self
                                            queue:dispatch_get_main_queue()]; // 按照实际情况选择队列,本例中样本直接送到 OpenGL 渲染管线,因此选择主队列
    if ([self.captureSession canAddOutput:self.videoDataOutput]) {
        [self.captureSession addOutput:self.videoDataOutput];
        return YES;
    }
    return NO;
}
CMSampleBuffer is a Core Foundation object containing zero or more compressed (or uncompressed) samples of a particular media type (audio, video, muxed, etc), that are used to move media sample data through the media pipeline.
下面的代码直接操作了 CMSampleBuffer 样本的数据并应用一个灰度效果。
- (void)captureOutput:(AVCaptureOutput *)captureOutput
didOutputSampleBuffer:(CMSampleBufferRef)sampleBuffer
       fromConnection:(AVCaptureConnection *)connection {
    const int BYTES_PER_PIXEL = 4;

    // CVPixelBufferRef 在主存中保存像素数据,提供了操作内容的机会。
    CVPixelBufferRef pixelBuffer = CMSampleBufferGetImageBuffer(sampleBuffer);

    // 在与 CVPixelBuffer 数据交互前,必须获取相应内存块的锁
    CVPixelBufferLockBaseAddress(pixelBuffer, 0);

    // 确定像素 buffer 的宽和高,这样就可以迭代它的行和列
    size_t bufferWidth = CVPixelBufferGetWidth(pixelBuffer);
    size_t bufferHeight = CVPixelBufferGetHeight(pixelBuffer);

    // 获取像素 buffer 的基址指针,以迭代其数据
    unsigned char *pixel = (unsigned char *)CVPixelBufferGetBaseAddress(pixelBuffer);
    unsigned char grayPixel;
    // 这个例子中我们简单地进行像素灰度平均
    for (int row = 0; row < bufferHeight; ++row) {
        for (int column = 0; column < bufferWidth; ++column) {
            grayPixel = (pixel[0] + pixel[1] + pixel[2]) / 3;
            pixel[0] = pixel[1] = pixel[2] = grayPixel;
            pixel += BYTES_PER_PIXEL;
        }
    }

    CVPixelBufferUnlockBaseAddress(pixelBuffer, 0);

    // 接下来把处理好的 pixelBuffer 数据转换成图片……
}
除了原始媒体样本之外,CMSampleBuffer 还通过 CMFormatDescription 提供了样本的格式信息。
- (void)captureOutput:(AVCaptureOutput *)captureOutput
didOutputSampleBuffer:(CMSampleBufferRef)sampleBuffer
       fromConnection:(AVCaptureConnection *)connection {
    CMFormatDescriptionRef formatDesc = CMSampleBufferGetFormatDescription(sampleBuffer);
    CMMediaType mediaType = CMFormatDescriptionGetMediaType(formatDesc);
    if (mediaType == kCMMediaType_Video) {
        // 获取视频帧的宽高
        CMVideoDimensions dimensions = CMVideoFormatDescriptionGetDimensions(formatDesc);
        // ...
    } else if (mediaType == kCMMediaType_Audio) {
        CMBlockBufferRef blockBuffer = CMSampleBufferGetDataBuffer(sampleBuffer); // 1
        // ...
    }
}
[1] blockBuffer 用于在 Core Media 通道中传输任意字节的数据。
读取和写入媒体
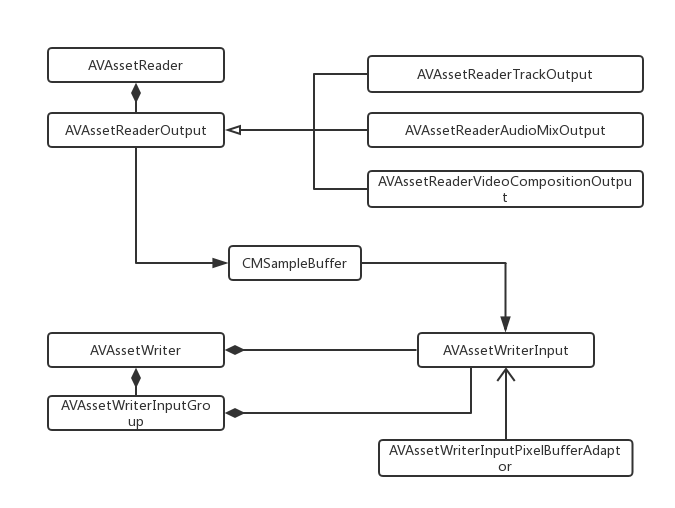
AVAssetReader 用于从 AVAsset 中读取媒体样本,以访问音频样本和视频帧。它是以多线程的方式不断提供下一个可用样本的,尽管提供了低时延的检索操作,但是不倾向于实时操作例如播放。
AVAssetWriter 则用于对媒体资源进行编码并写入容器文件中。它可以支持自动交叉媒体样本。

下面通过一段简单的示例代码,对这两个类进行一个直观的了解:
- (void)viewDidLoad {
    [super viewDidLoad];

    NSURL *url = [[NSBundle mainBundle] URLForResource:@"v03" withExtension:@"mp4"];
    AVAsset *asset = [AVURLAsset assetWithURL:url];
    AVAssetTrack *track = [[asset tracksWithMediaType:AVMediaTypeVideo] firstObject];

    self.assetReader = [[AVAssetReader alloc]initWithAsset:asset error:nil];
    // 将视频帧解压缩为 BGRA 格式
    NSDictionary *readerOutputSettings = @{
        (id)kCVPixelBufferPixelFormatTypeKey: @(kCVPixelFormatType_32BGRA)
    };
    AVAssetReaderTrackOutput *trackOutput = [[AVAssetReaderTrackOutput alloc] initWithTrack:track outputSettings:readerOutputSettings];
    [self.assetReader addOutput:trackOutput];
    [self.assetReader startReading]; // validates, initiates

    NSURL *outputURL = [self outputURL];
    NSLog(@"%@", outputURL);
    self.assetWriter = [[AVAssetWriter alloc] initWithURL:outputURL fileType:AVFileTypeQuickTimeMovie error:nil];
    NSDictionary *writerInputSettings = @{
        AVVideoCodecKey: AVVideoCodecTypeH264,
        AVVideoWidthKey: @720,
        AVVideoHeightKey: @1280,
        AVVideoCompressionPropertiesKey: @{
                AVVideoMaxKeyFrameIntervalKey: @1,
                AVVideoAverageBitRateKey: @10500000,
                AVVideoProfileLevelKey: AVVideoProfileLevelH264Main31,
        }
    }; // 1
    AVAssetWriterInput *writerInput = [[AVAssetWriterInput alloc] initWithMediaType:AVMediaTypeVideo outputSettings:writerInputSettings];
    [self.assetWriter addInput:writerInput];
    [self.assetWriter startWriting]; // validates, initiates

    dispatch_queue_t queue = dispatch_queue_create("com.demo.writer", nil);
    [self.assetWriter startSessionAtSourceTime:kCMTimeZero];
    [writerInput requestMediaDataWhenReadyOnQueue:queue usingBlock:^{ // 2
        BOOL complete = NO;
        while ([writerInput isReadyForMoreMediaData] && !complete) {
            CMSampleBufferRef sampleBuffer = [trackOutput copyNextSampleBuffer];
            if (sampleBuffer) {
                BOOL result = [writerInput appendSampleBuffer:sampleBuffer];
                CFRelease(sampleBuffer);
                complete = !result;
            } else {
                [writerInput markAsFinished];
                complete = YES;
            }
        }
        if (complete) {
            [self.assetWriter finishWritingWithCompletionHandler:^{
                AVAssetWriterStatus status = self.assetWriter.status;
                if (status == AVAssetWriterStatusCompleted) {
                    NSLog(@"completed");
                } else {
                    NSLog(@"error");
                }
            }];
        }
    }];
}

- (NSURL *)outputURL {
    NSString *filePath =
        [NSTemporaryDirectory() stringByAppendingPathComponent:THVideoFilename];
    NSURL *url = [NSURL fileURLWithPath:filePath];
    if ([[NSFileManager defaultManager] fileExistsAtPath:url.path]) {
        [[NSFileManager defaultManager] removeItemAtURL:url error:nil];
    }
    return url;
}
[1] AVAssetWriter 能够对输出编码时进行细致的压缩设置,例如关键帧间隔、比特率、H.264 配置文件、像素宽高比、纯净光圈等。
[2] 本例中的写入会话,使用的是拉模式 (pull mode),即当 writer 准备附加更多的样本时,从资源中拉取样本。这是我们从一个非实时资源中写入样本时所用的模式。这个 block 会在 writer 准备好添加更多样本时被不断调用。
实时捕捉写入
- (void)startWriting {
    dispatch_async(self.dispatchQueue, ^{
        NSError *error = nil;
        NSString *fileType = AVFileTypeQuickTimeMovie;
        self.assetWriter = [AVAssetWriter assetWriterWithURL:[self outputURL] fileType:fileType error:&error];
        if (!self.assetWriter || error) {
            NSString *formatString = @"Could not create AVAssetWriter: %@";
            NSLog(@"%@", [NSString stringWithFormat:formatString, error]);
            return;
        }
        self.assetWriterVideoInput =
            [[AVAssetWriterInput alloc] initWithMediaType:AVMediaTypeVideo
                                            outputSettings:self.videoSettings];
        self.assetWriterVideoInput.expectsMediaDataInRealTime = YES; // 指明这个输入应该针对实时性进行优化

        UIDeviceOrientation orientation = [UIDevice currentDevice].orientation;
        self.assetWriterVideoInput.transform = THTransformForDeviceOrientation(orientation);

        NSDictionary *attributes = @{
            (id)kCVPixelBufferPixelFormatTypeKey : @(kCVPixelFormatType_32BGRA),
            (id)kCVPixelBufferWidthKey : self.videoSettings[AVVideoWidthKey],
            (id)kCVPixelBufferHeightKey : self.videoSettings[AVVideoHeightKey],
            (id)kCVPixelFormatOpenGLESCompatibility : (id)kCFBooleanTrue
        };

        // 这个 adaptor 提供了一个优化的 CVPixelBufferPool,使用它可以创建 CVPixelBuffer 对象来渲染经过滤镜处理的视频帧,在附加视频样本时提供最优性能。
        self.assetWriterInputPixelBufferAdaptor =
            [[AVAssetWriterInputPixelBufferAdaptor alloc]
                initWithAssetWriterInput:self.assetWriterVideoInput
                sourcePixelBufferAttributes:attributes];

        if ([self.assetWriter canAddInput:self.assetWriterVideoInput]) {
            [self.assetWriter addInput:self.assetWriterVideoInput];
        } else {
            NSLog(@"Unable to add video input.");
            return;
        }

        self.assetWriterAudioInput =
            [[AVAssetWriterInput alloc] initWithMediaType:AVMediaTypeAudio
                                            outputSettings:self.audioSettings];
        self.assetWriterAudioInput.expectsMediaDataInRealTime = YES;

        if ([self.assetWriter canAddInput:self.assetWriterAudioInput]) {
            [self.assetWriter addInput:self.assetWriterAudioInput];
        } else {
            NSLog(@"Unable to add audio input.");
        }

        self.isWriting = YES;
        self.firstSample = YES;
    });
}

- (void)processSampleBuffer:(CMSampleBufferRef)sampleBuffer {
    if (!self.isWriting) {
        return;
    }
    // 判断媒体的样本类型,以传递给正确的 writer
    CMFormatDescriptionRef formatDesc = CMSampleBufferGetFormatDescription(sampleBuffer);
    CMMediaType mediaType = CMFormatDescriptionGetMediaType(formatDesc);
    if (mediaType == kCMMediaType_Video) {
        CMTime timestamp = CMSampleBufferGetPresentationTimeStamp(sampleBuffer);
        if (self.firstSample) {
            if ([self.assetWriter startWriting]) {
                [self.assetWriter startSessionAtSourceTime:timestamp];
            } else {
                NSLog(@"Failed to start writing.");
            }
            self.firstSample = NO;
        }
        // 从 pixelBufferPool 中创建一个空的 CVPixelBufferRef,使用该像素 buffer 来渲染经过滤镜处理的视频帧
        CVPixelBufferRef outputRenderBuffer = NULL;
        CVPixelBufferPoolRef pixelBufferPool = self.assetWriterInputPixelBufferAdaptor.pixelBufferPool;
        OSStatus err = CVPixelBufferPoolCreatePixelBuffer(NULL, pixelBufferPool, &outputRenderBuffer);
        if (err) {
            NSLog(@"Unable to obtain a pixel buffer from the pool.");
            return;
        }
        CVPixelBufferRef imageBuffer = CMSampleBufferGetImageBuffer(sampleBuffer);
        CIImage *sourceImage = [CIImage imageWithCVPixelBuffer:imageBuffer options:nil];
        [self.activeFilter setValue:sourceImage forKey:kCIInputImageKey];
        CIImage *filteredImage = self.activeFilter.outputImage;
        if (!filteredImage) {
            filteredImage = sourceImage;
        }
        [self.ciContext render:filteredImage
               toCVPixelBuffer:outputRenderBuffer
                        bounds:filteredImage.extent
                    colorSpace:self.colorSpace];
        if (self.assetWriterVideoInput.readyForMoreMediaData) {
            if (![self.assetWriterInputPixelBufferAdaptor
                            appendPixelBuffer:outputRenderBuffer
                         withPresentationTime:timestamp]) {
                NSLog(@"Error appending pixel buffer.");
            }
        }
        CVPixelBufferRelease(outputRenderBuffer);
    } else if (!self.firstSample && mediaType == kCMMediaType_Audio) {
        if (self.assetWriterAudioInput.isReadyForMoreMediaData) {
            if (![self.assetWriterAudioInput appendSampleBuffer:sampleBuffer]) {
                NSLog(@"Error appending audio sample buffer.");
            }
        }
    }
}

- (void)stopWriting {
    self.isWriting = NO;
    dispatch_async(self.dispatchQueue, ^{
        [self.assetWriter finishWritingWithCompletionHandler:^{
            if (self.assetWriter.status == AVAssetWriterStatusCompleted) {
                dispatch_async(dispatch_get_main_queue(), ^{
                    NSURL *fileURL = [self.assetWriter outputURL];
                    [self.delegate didWriteMovieAtURL:fileURL];
                });
            } else {
                NSLog(@"Failed to write movie: %@", self.assetWriter.error);
            }
        }];
    });
}
媒体组合与编辑
AVFoundation 提供了一些 API 来创建非线性、无损的编辑工具。“非线性”指的是可以自由组合、分开、修建、覆盖和以任何顺序重排媒体片段。
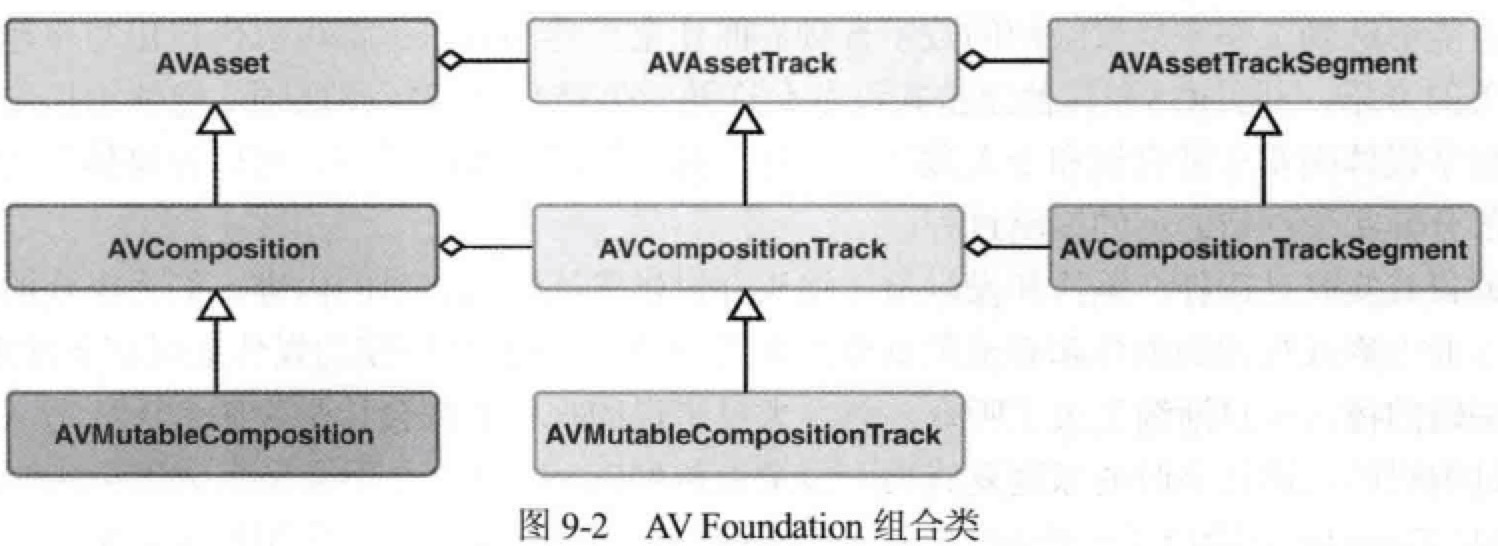
AVComposition 是 AVAsset 的子类,是包含了一个或多个媒体轨道的容器。
AVComposition: An object that combines media data from multiple file-based sources to present or process media data from multiple sources.
AVComposition 中的轨道是 AVAssetTrack 的子类 AVCompositionTrack,轨道又由多个片段 AVCompositionTrackSegment 组成。如下图所示:
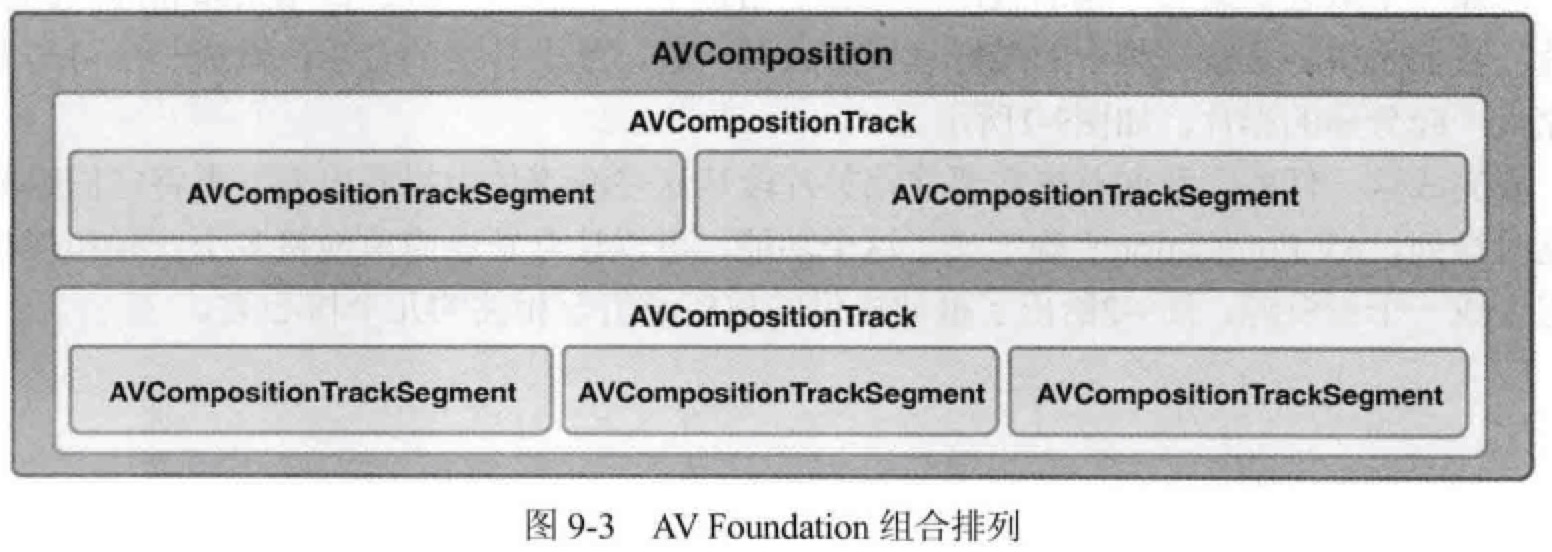
AVComposition 和 AVCompositionTrack 都是不可变对象,提供对资源的只读操作。创建自己的组合时,需使用可变子类。
下面我们介绍一个例子,将两个视频的前五秒拿出来、再从另外一个视频中提取音频,将它们组合到一起。
NSURL *url1 = [[NSBundle mainBundle] URLForResource:@"v03" withExtension:@"mp4"];
NSURL *url2 = [[NSBundle mainBundle] URLForResource:@"v04" withExtension:@"mp4"];
NSURL *url3 = [[NSBundle mainBundle] URLForResource:@"v05" withExtension:@"mp4"];
AVAsset *asset1 = [AVURLAsset assetWithURL:url1];
AVAsset *asset2 = [AVURLAsset assetWithURL:url2];
AVAsset *asset3 = [AVURLAsset assetWithURL:url3];

AVMutableComposition *composition = [AVMutableComposition composition];
AVMutableCompositionTrack *videoTrack = [composition addMutableTrackWithMediaType:AVMediaTypeVideo preferredTrackID:kCMPersistentTrackID_Invalid];
AVMutableCompositionTrack *audioTrack = [composition addMutableTrackWithMediaType:AVMediaTypeAudio preferredTrackID:kCMPersistentTrackID_Invalid]; // [1]

CMTime cursorTime = kCMTimeZero;
CMTime videoDuration = CMTimeMake(5, 1);
CMTimeRange videoTimeRange = CMTimeRangeMake(kCMTimeZero, videoDuration);

// 往视频轨道插入第一段视频
AVAssetTrack *assetTrack = [[asset1 tracksWithMediaType:AVMediaTypeVideo] firstObject];
[videoTrack insertTimeRange:videoTimeRange ofTrack:assetTrack atTime:cursorTime error:nil];
// 移动光标
cursorTime = CMTimeAdd(cursorTime, videoDuration);
// 往视频轨道插入第二段视频
assetTrack = [[asset2 tracksWithMediaType:AVMediaTypeVideo] firstObject];
[videoTrack insertTimeRange:videoTimeRange ofTrack:assetTrack atTime:cursorTime error:nil];
// 重置光标
cursorTime = kCMTimeZero;

CMTime audioDuration = composition.duration; // 目前已经插入的长度
CMTimeRange audioTimeRange = CMTimeRangeMake(kCMTimeZero, audioDuration);

// 往音频轨道插入音频
assetTrack = [[asset3 tracksWithMediaType:AVMediaTypeAudio] firstObject];
[audioTrack insertTimeRange:audioTimeRange ofTrack:assetTrack atTime:cursorTime error:nil];

// 现在这个 AVComposition 与其它任何 AVAsset 一样,可以播放、导出或处理了
[1] kCMPersistentTrackID_Invalid 这个奇怪的名字的意思是我们将创建合适的轨道 ID 的任务委托给框架。
混合音频
上一章的例子中,我们编辑和组合了三个视频。但还有两个优化点,一是视频声音的淡入淡出效果;二是当视频画外音持续期间,背景音乐声音调低。
AVAudioMix 用于在组合的音频轨道中自定义音频的处理,它是 NSObject 的子类。
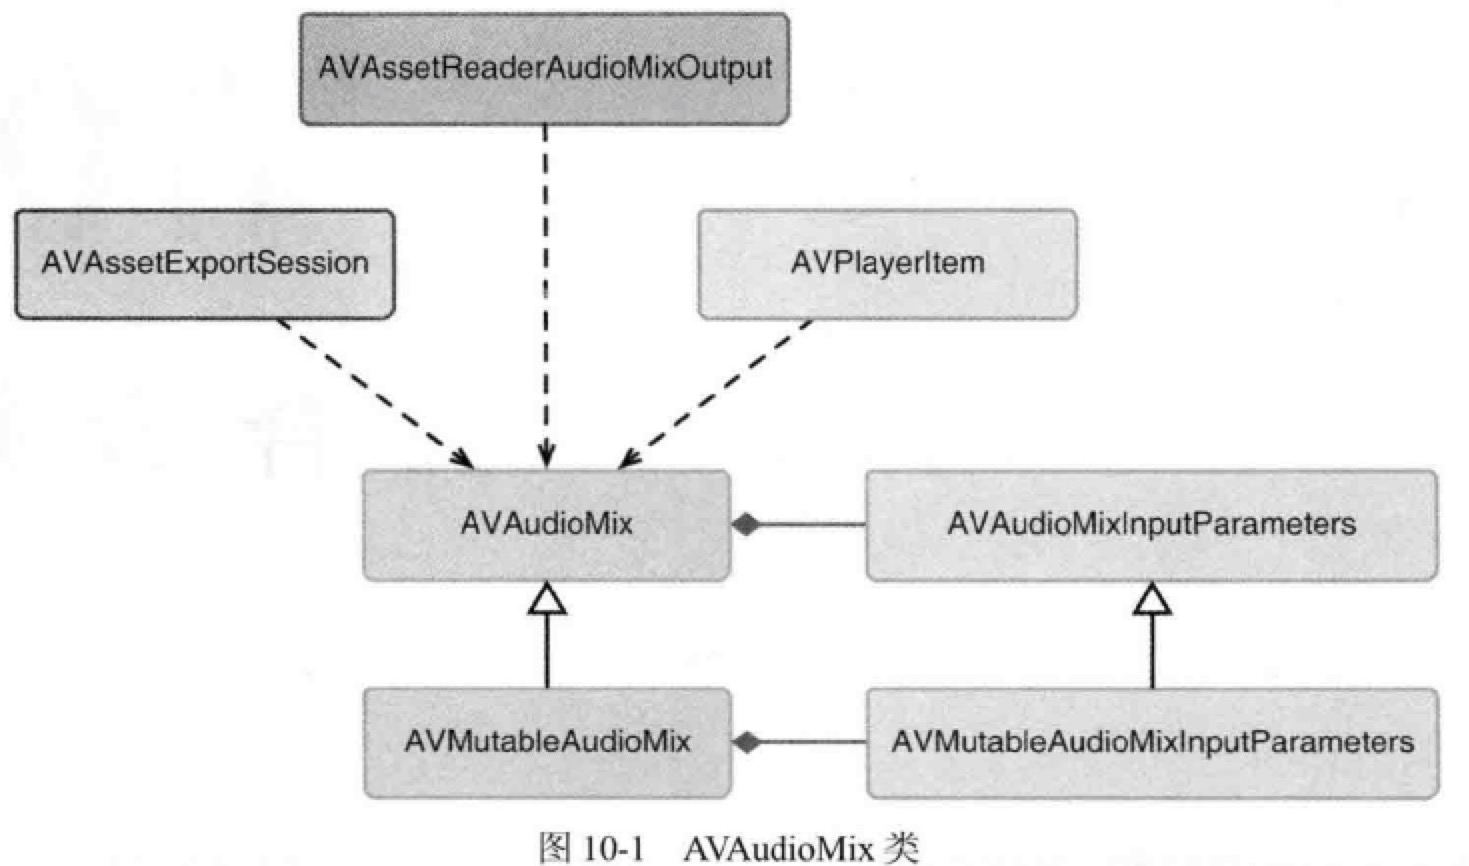
AVAudioMix: An object that manages the input parameters for mixing audio tracks.
AVAudioMixInputParameters: An object that represents the parameters that you apply when adding an audio track to a mix.
An instance of AVAudioMixInputParameters isn't required for each audio track that contributes to the mix. Audio for those without associated AVAudioMixInputParameters objects are included in the mix and processed according to the default behavior.
AVMutableAudioMixInputParameters 提供了两个方法来实现音量调节:
setVolume:atTime:在指定时间点立即调整音量setVolumeRampFromStartVolumn:toEndVolume:timeRange:在给定时间��范围内平滑过渡
// 混合音频
CMTime twoSeconds = CMTimeMake(2, 1);
CMTime fourSeconds = CMTimeMake(4, 1);
CMTime sevenSeconds = CMTimeMake(7, 1);

AVMutableAudioMixInputParameters *parameters = [AVMutableAudioMixInputParameters audioMixInputParametersWithTrack:audioTrack];
[parameters setVolume:0.5f atTime:kCMTimeZero];

CMTimeRange range = CMTimeRangeFromTimeToTime(twoSeconds, fourSeconds);
[parameters setVolumeRampFromStartVolume:0.5f toEndVolume:0.8f timeRange:range];

[parameters setVolume:0.3f atTime:sevenSeconds];

AVMutableAudioMix *audioMix = [AVMutableAudioMix audioMix];
audioMix.inputParameters = @[parameters];
// 现在这个 audioMix 可以被设置为 AVPlayerItem 的 audioMix 属性来进行播放;
// 或者被设置为 AVAssetExportSession 的 audioMix 属性来进行导出。
AVAudioMix 在常规的 AVAsset 上也可以定义音量调整,用于特定的播放和导出场景,例如增加淡入淡出效果。
视频过渡效果
视频过渡的核心类是 AVVideoComposition,它是 NSObject 的子类,和 AVComposition 没有关联。但它像 AVAudioMix一样,可以被 AVPlayerItem 播放、被 AVAssetExportSession 导出等。
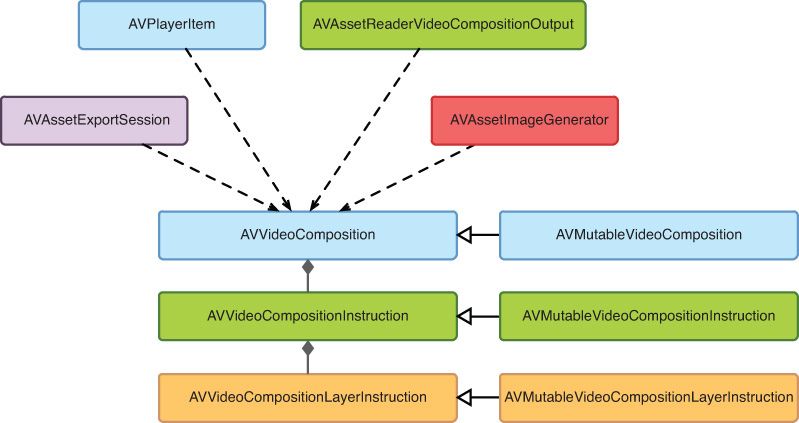
AVVideoComposition 由一组 AVVideoCompositionInstruction 定义的指令组成,AVVideoCompositionInstruction 最主要是提供时间轴上的信息;AVVideoCompositionLayerInstruction 则定义对给定视频轨道应用的模糊、变形、裁剪、溶解、淡出等效果。